This post has affiliate links to products that I use and always recommend. You can buy them from anywhere but if you buy through the link (and Amazon) I receive a tiny percent back from that mega-retailer to help support this blog. Just letting you know 😉
When I was a kid, I loved thinking up costumes for Halloween. I remember being a witch, a mouse, a pirate, a pumpkin, and a cat. We always made our costumes from things and clothing around the house and that was half the fun. (But I also remember getting pretty teary when I didn’t win the costume contest because, believe me, I was the best witch there)
When I had kids the fun began again only this time with a lot more knowledge of how to create costumes that would last through a Trick-or-Treat session. I sewed those costumes like they were couture. (Apparently, I needed a creative outlet)
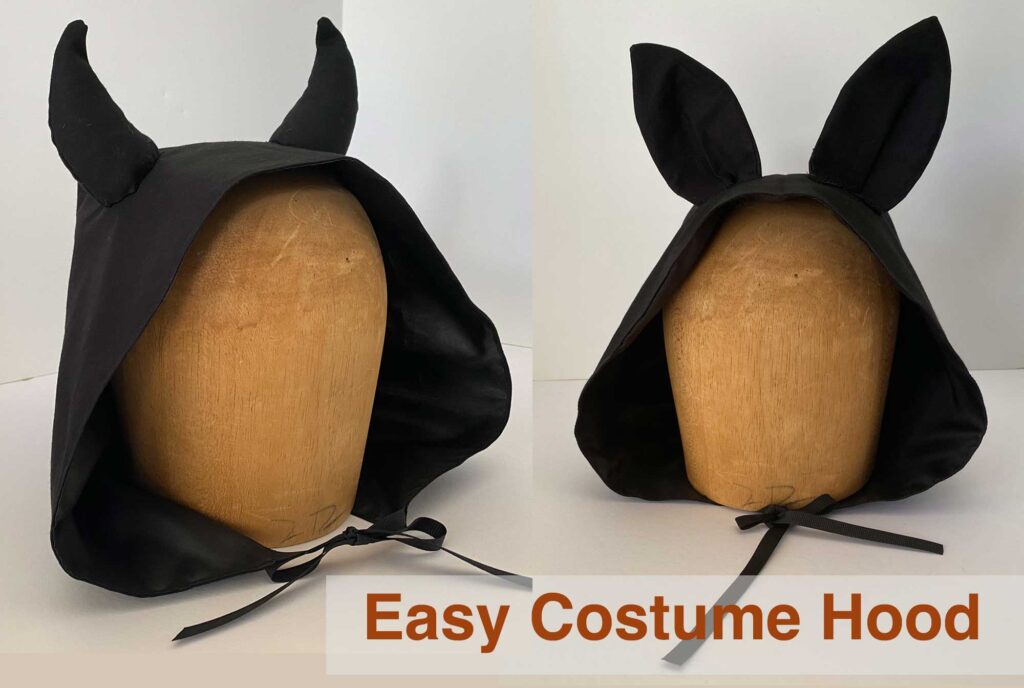
Well, this hood is a nice in-between. It’s better than a paper plate mask with stapled-on ribbon for ties and it’s also very easy to make.
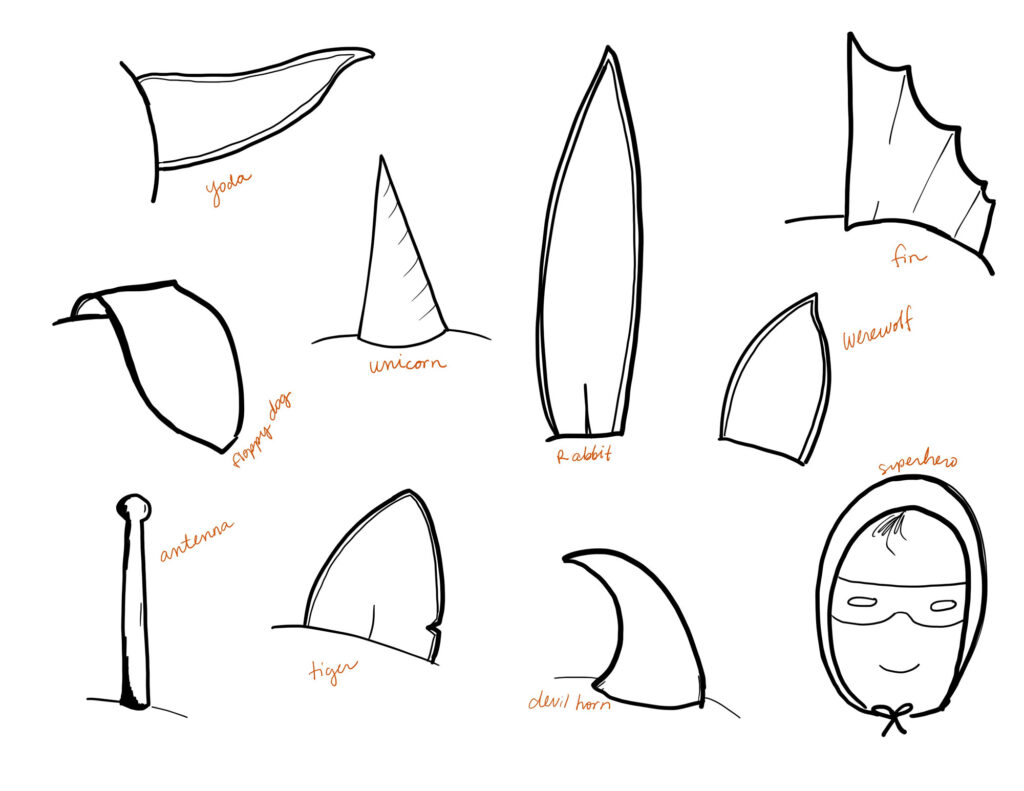
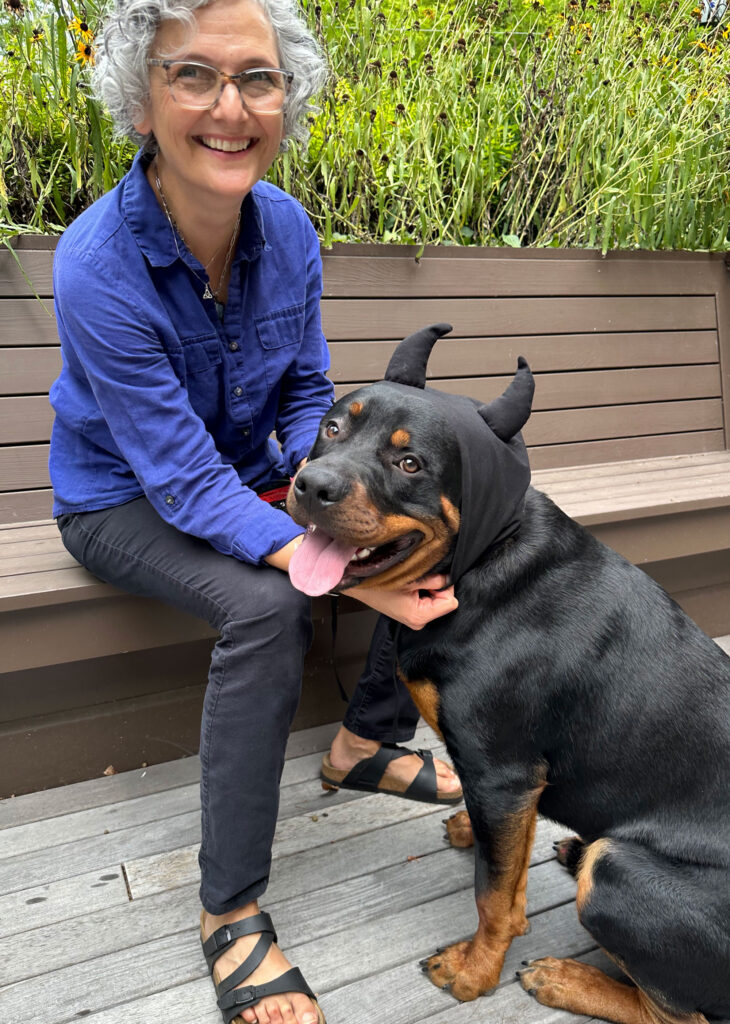
The best part is all the ways you could adapt this hood for different costumes. You can make animal ears like bears, bats, and cats or creature ears like a werewolf or Yoda. You can make horns or antennae or even a fin. You can also leave the hood plain for a sleek superhero look.
This video will walk you through the steps or you can read along.
Supplies Needed
For drafting the pattern:
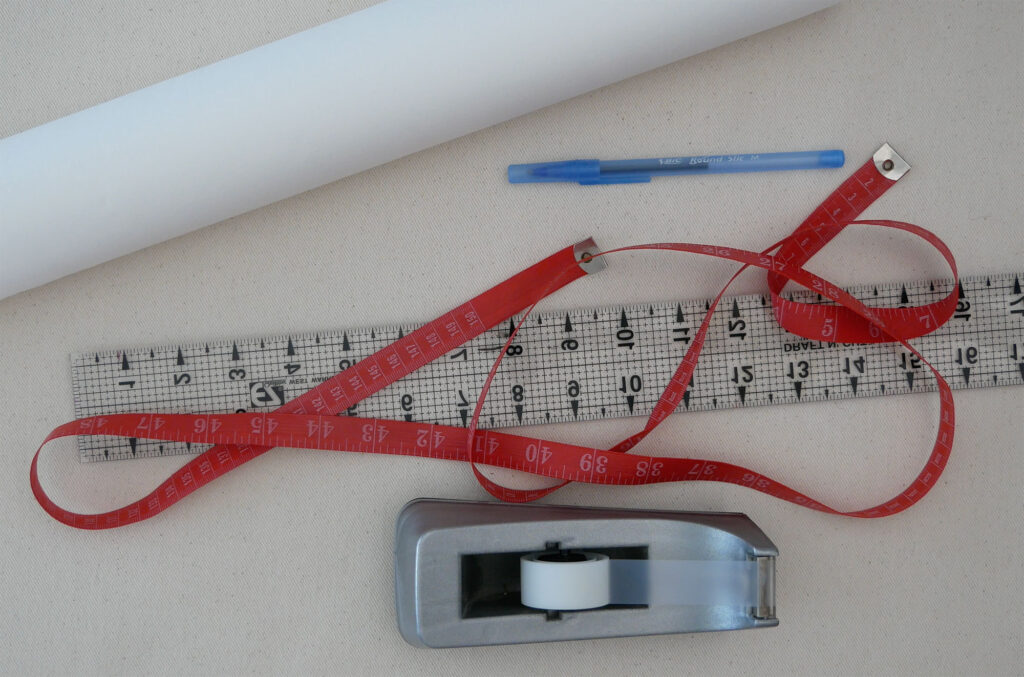
- Large piece of paper. On a roll or a paper grocery bag opened up flat.
- A sheet of tracing paper
- Ruler
- Tape measurer
- Pen
- Tape
For making the hood:
- Fabric for the hood about ½ a yard. I used plain cotton of a medium weight, You could use fake fur (harder to sew with), fake suede or velveteen.
- Optional: Lining fabric to line the hood
- Ribbon 20” or longer. It can be wide or narrow in width
- Sewing supplies; scissors, pins, thread, machine (opt), hand needle
For the Ears, Horns, or antennae:
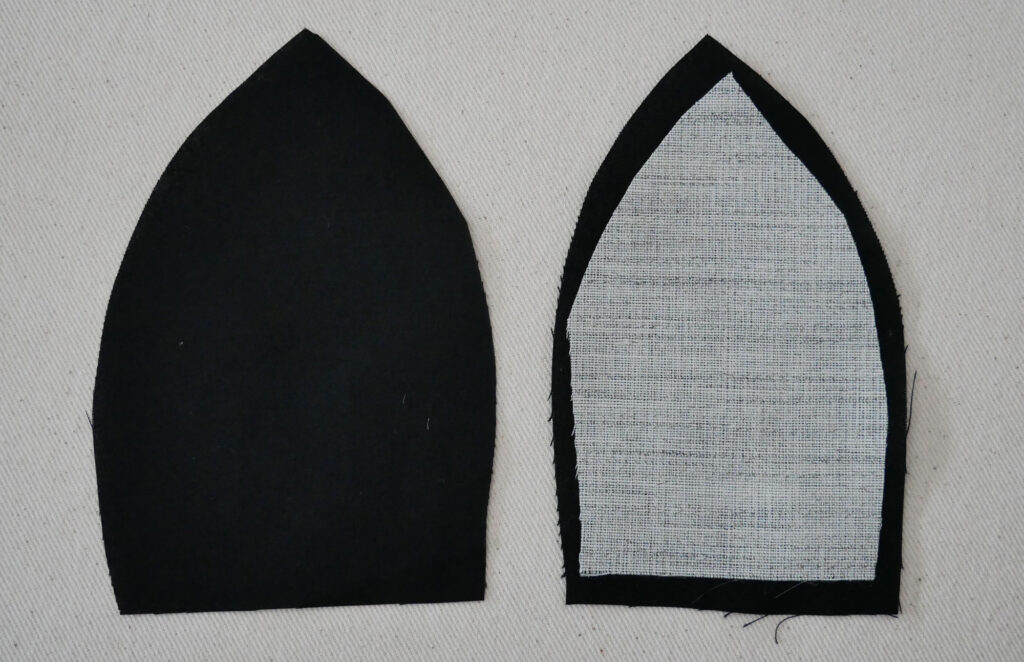
- Fabric: You can use the same fabric as the hood, or use the hood fabric for the back of the ear and a different fabric for the front of the ear like your lining fabric (shiny) or a different color.
- Stiff Fusible Interfacing (Heat-n-Bond Craft Extra Firm or Pellon 808 Craft-Fuse) or Fusible Horse Hair Canvas for long ears (over 3” tall)
- Wire or a pipe cleaner (optional) to make the ear bendable.
- Polyester or cotton stuffing (Poly-fil is what I use) to give horns fullness.
To Draft the Hood Pattern
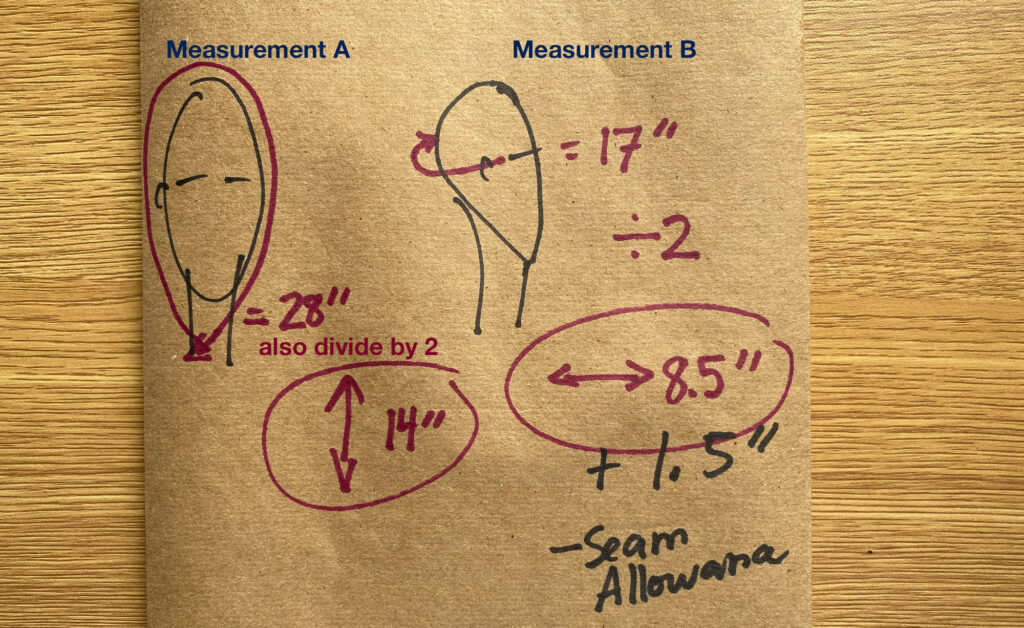
You’ll need 2 measurements.
- Start at the front base of the neck and go up and over the head ending where you started. This is measurement A
- At the eye and eye level measure from the side of your head, around the back, and to the opposite side of the head. This is measurement B
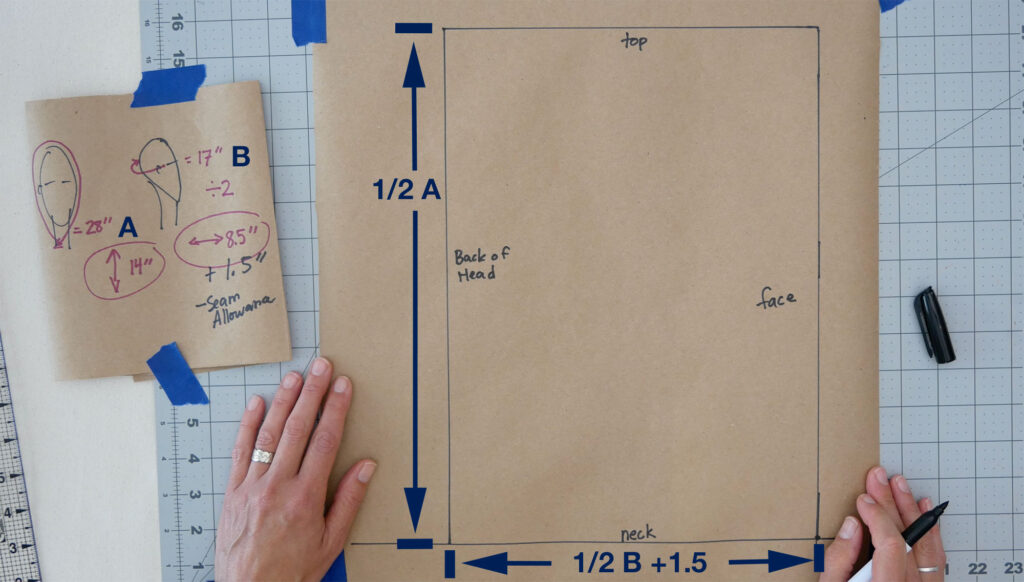
On a large sheet of paper draft a box as tall as ½ measurement A (Example Measurement A = 28” my box is 14” tall) and as wide as ½ Measurement B plus 1.5” seam allowance (Example Measurement B = 17”, ½ of 17 = 8.5”, add 1.5 “ = 10” My box is 10” wide)
Label the box so the left side is the back, and the right side is the front. The top is the top and the bottom is the neck. Put the pattern aside and draw your ears or horns or antenna.
Drafting the Ears or Horns
Take some time and sketch out your ears or horns. You probably need to draw them bigger than you think.
All of the objects you’ll add to the hood will need a front and a back piece.
For horns and antennae and fins, the front and back are the same so you draw your object just once. Even if your horns curl or direction you only need to draw it one time. You will simply flip the pattern upside down to cut out a mirrored horn for the other side of the head.
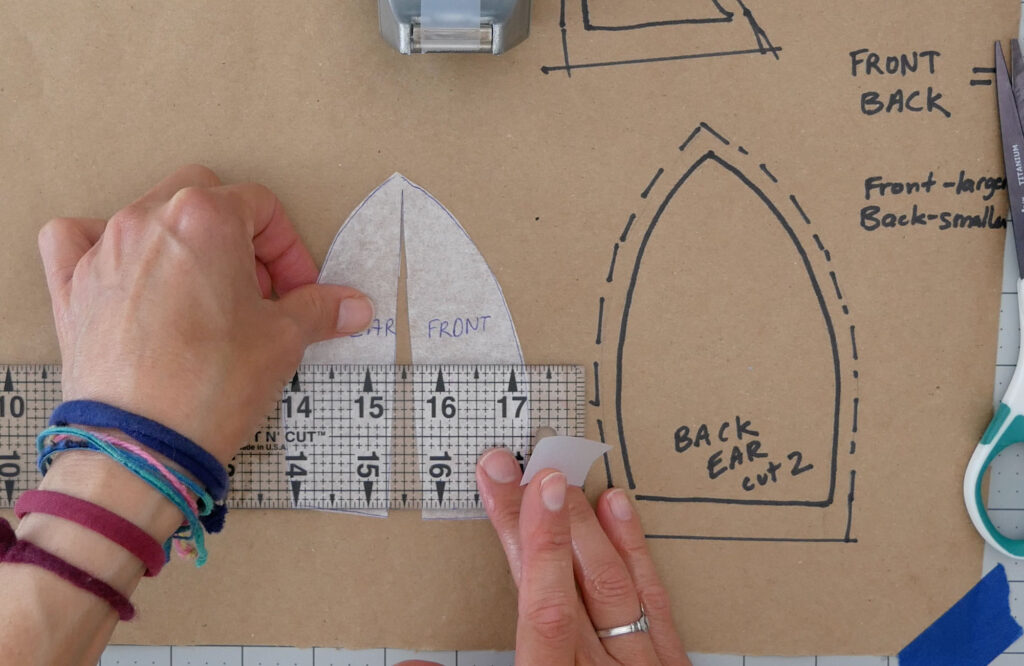
However, to give the ears a curl the front ear piece pattern needs to be larger than the back piece.
After drafting an ear shape you like make a tracing of it. The original drawing is now the back ear. The tracing will become the front/inside ear.
Draw a line straight on the traced ear, up the middle from the bottom to the tip of the ear. Cut on that line from the bottom to the top but do not cut the ear in two. Stop a little way before the top of the ear. The 2 parts are hinged together at the top.
Tape the pattern down to another piece of paper spreading the pattern apart at the bottom so there is about ½” in between the left and right side of the ear. The ear is now ½ bigger at the bottom
After drawing your chosen shape add ¼” seam allowance around the sides. Add ½” seam allowance to the bottom (where it attaches to the hood). For front ear pieces that “grew” you may have to draw a straight line across the bottom before adding the ½” seam allowance.
You may want to sew up a test ear before cutting out your good fabric to check the shape, size, etc.
Cutting the Hood
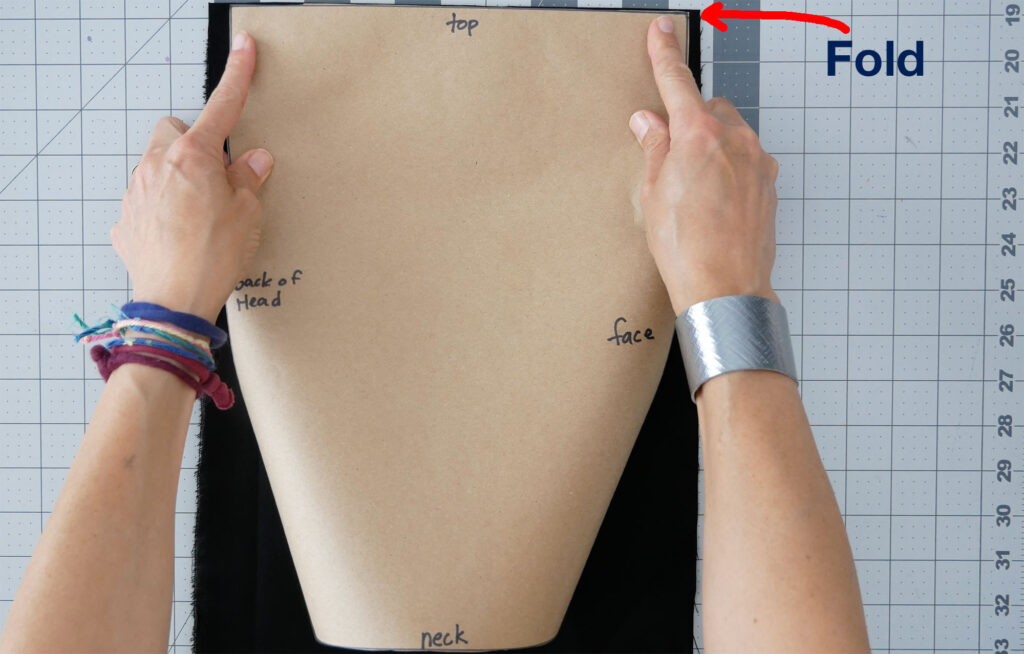
Fold the hood fabric so the top of the hood pattern can be placed on the fold. You’re not going to cut across the top just the other 3 sides.
Cut out the ears, horns, etc. from the rest of the fabric. Because the fabric is folded you are cutting two ears, horns, etc, at the same time. If your object has a curve to it, cut out the fabric once with the pattern right side up and once with the pattern upside down.
Cut the ribbon so you have two pieces about 10 to 11” long. You can always trim later. I like to put Fray Check on the ends to keep it from unraveling because I have it but any glue that dries clear will work here. Just dab a little on the ends and using your thumb and finger press/rub it into the end of the ribbon.
Let’s Make the Ears, Horns, Etc.
If you are using a fusible interfacing it should be applied to the wrong side of the back ear piece first
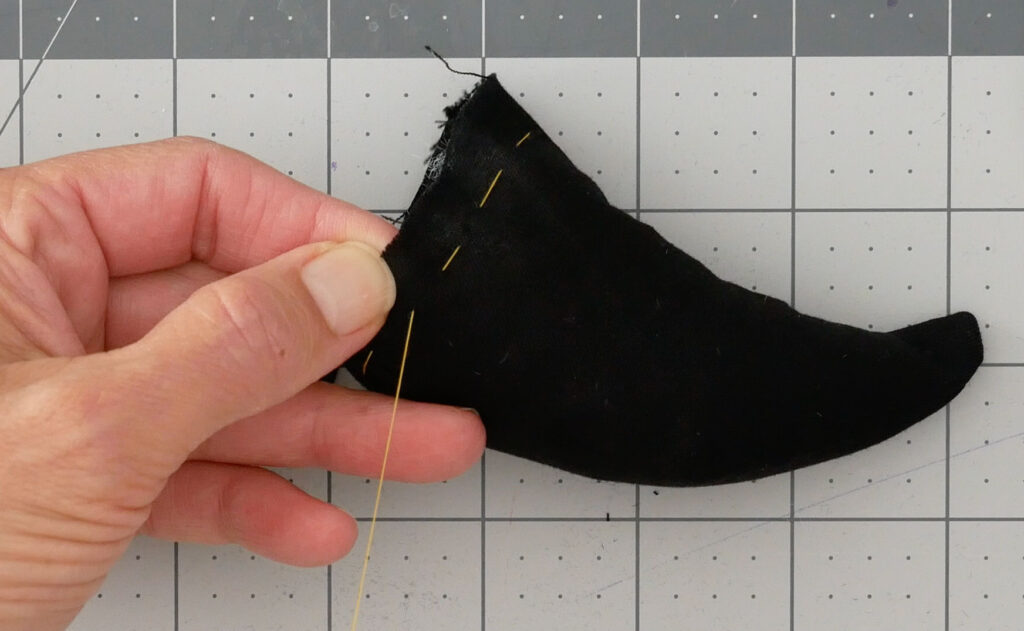
Line up one back piece of your object to one front piece, right sides of the fabric touching. And pin around the sides, but not the bottom (where it attaches to the hood). Do the same for the other ear, horn, or whatever object.
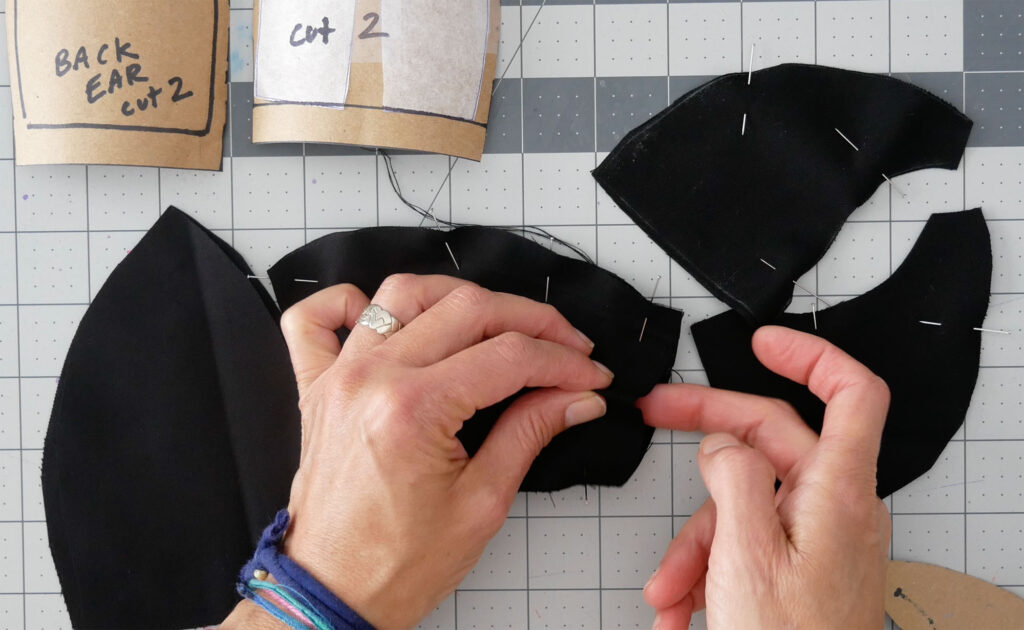
Remember the front ear is larger than the back ear so it doesn’t line up neatly. Still, just line up the outer edges to each other. When the edges are lined up you’ll have a little fabric bump on the front ear. (This is because it’s larger).
Sew around the sides with ¼” seam allowance and leave the bottom open
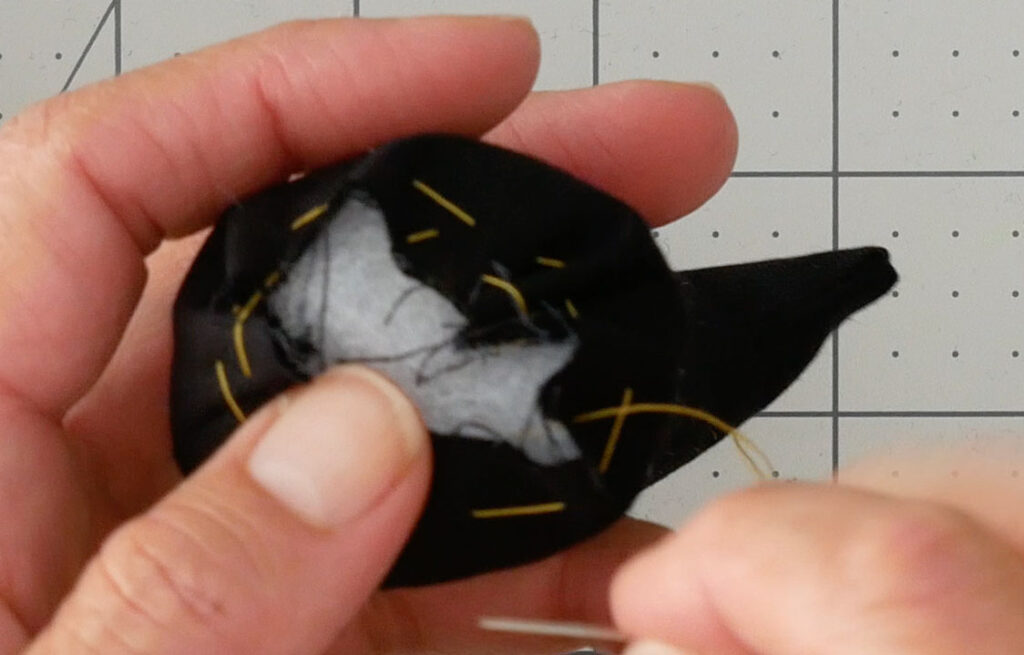
After sewing you may want to clip the seam allowance across any points. This takes away the extra bulk of the seam allowance and will give you a crisper point. But be careful not to clip your stitches
Turn your objects right side out and gently poke any tips using a chopstick, pencil, or something not sharp. If you poke through the fabric just resew over the new hole.
Add Some Shape
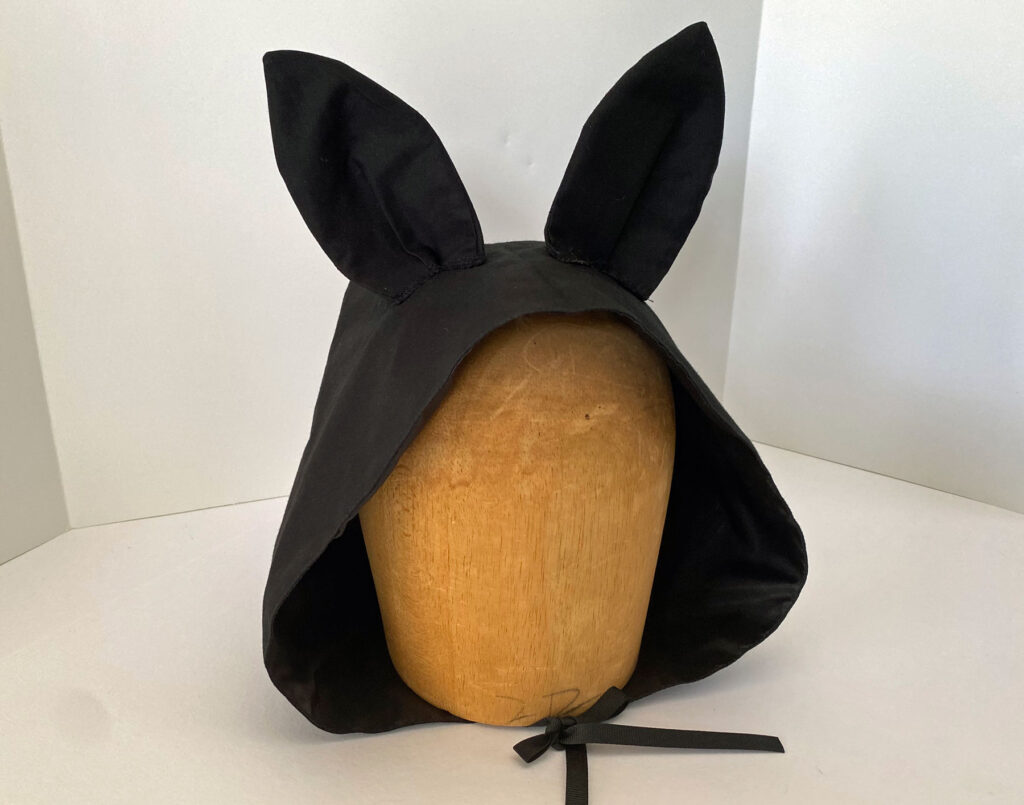
Ears
The seams on the ears are, at this point, turning toward the backside. Pinch out the center on the front ear, about ½” to make the ears flat, or pinch a little more to add a little forward curve to the ear. This is good for bear, rabbit, bat, and other ears that stand up. Pin the pleat (what you pinched) down. I have my pleat fold toward the side of the ear that will be closer to the center of the head.
If you want to add any wire apertures place them in the ear now.
Then sew the ear shut across the bottom. Add a zigzag stitch across the bottom edge to keep the ear fabric from unraveling.
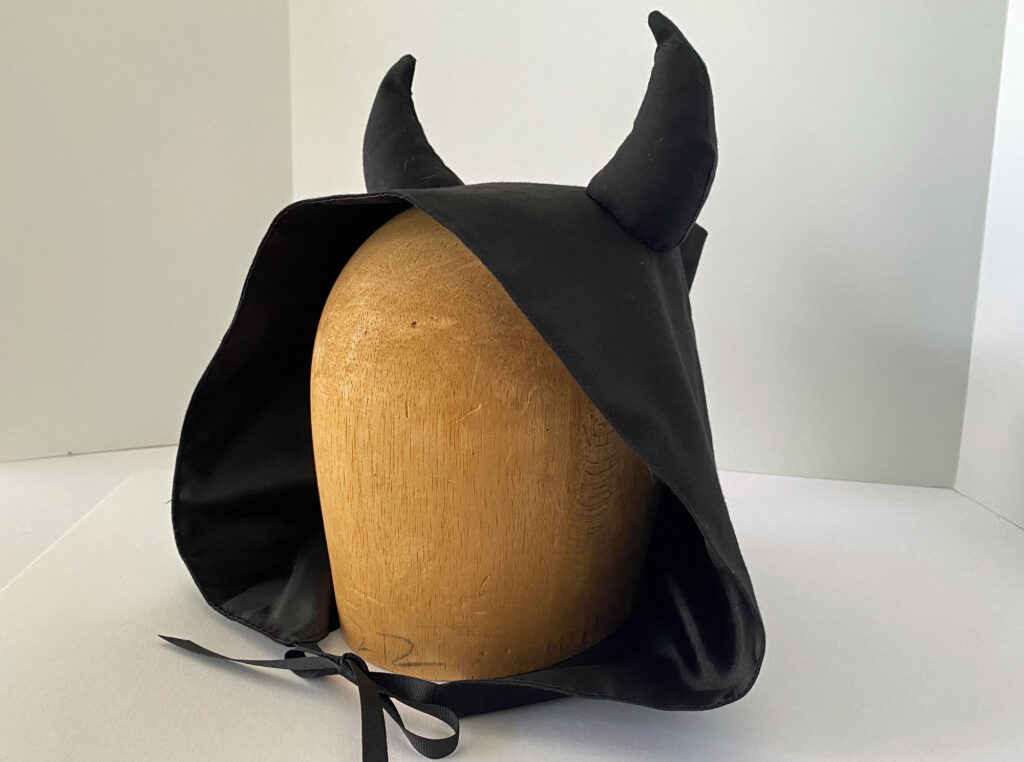
Horns and Antenneae
Add stuffing using a chopstick or pencil to get it into the point. Leave the bottom ½” unstuffed.
If using wire place it in now, through the stuffing. The wire needs to be a little shorter than the object so you can close up the bottom of it.
To close up any circular shape, sew a long running stitch around the bottom edge, about a centimeter from the edge.
When you reach where you started, don’t knot the thread, instead, leave the needle threaded and gently pull so the stitches to bring the bottom edge of the fabric in toward the center. With that same needle and thread begin stitching down the fabric. It’s a little awkward and not pretty but it doesn’t have to be pretty so no worries.
Let’s Make the Hood
Fold the hood piece, right sides together so the fold is across the top. It’s oriented the same way as when you cut it out, but this time be sure the wrong side of the fabric is facing you.
Sew down the back edge using a ¼” seam allowance. (One side. I stuck with the left like my pattern was labeled but it doesn’t matter)
Now that it’s sewn, and still inside out, open it up and put it on your head. The seam you just sewed should be going down the back of the head.
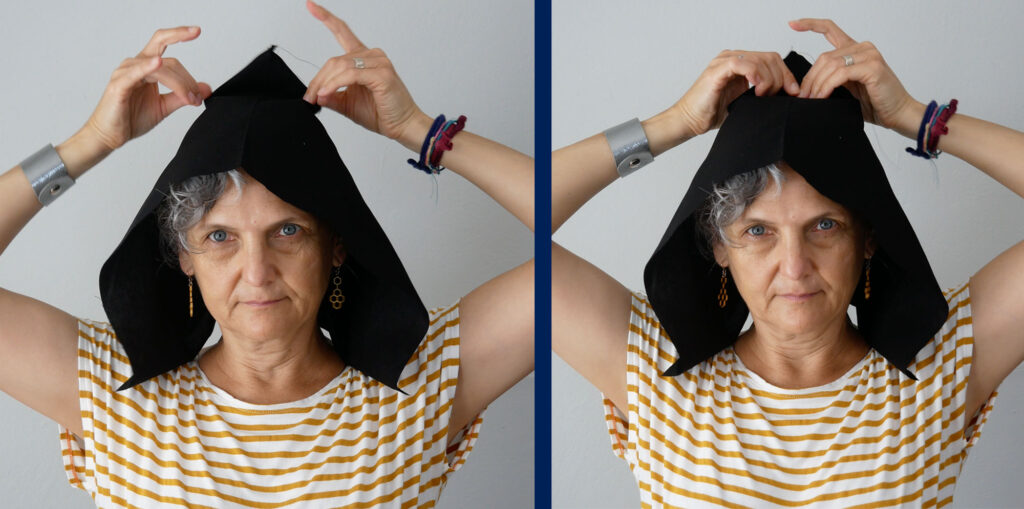
Currently, you have a very pointy hood but we’re going to get rid of it.
Pinch the peak/point of the hood close to your head. Place a pin to hold where you pinched. Slip the hood off your head.
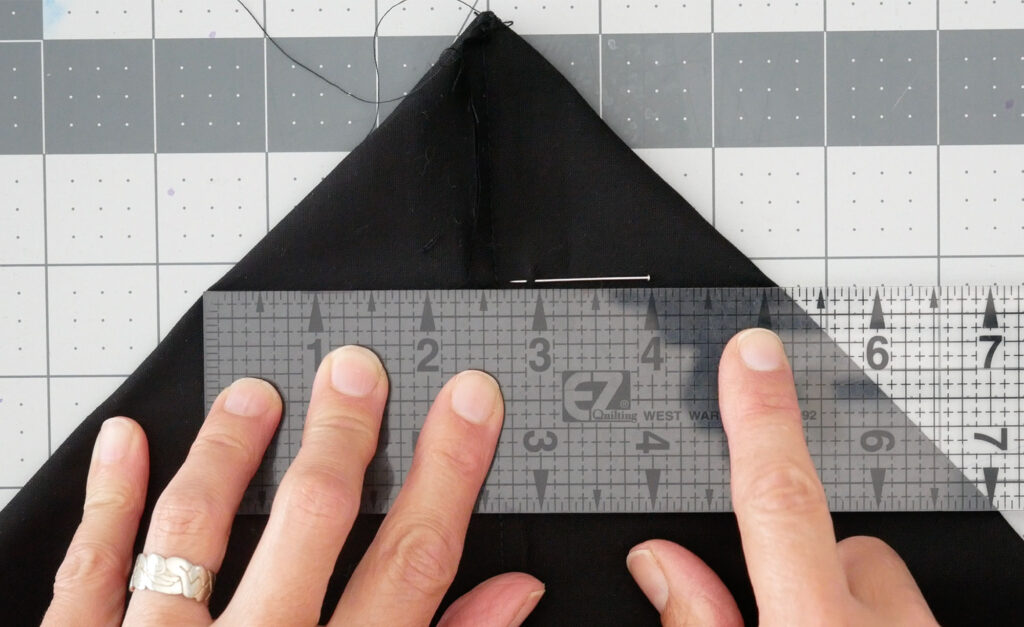
Where you pinched the hood is where you will sew across the peak. Place the hood on a flat surface it so you can see the seam and the point is facing up. Measure from the seam over to each side. Adjust the hood to get the seam evenly in the middle. Mark a line across the peak as far down as you pinched it. Pin in place. Sew across the peak on your line.
If your fabric is thick, cut off the peak after you’ve sewn across it.
If you are lining your hood, repeat this process to make a hood with your lining fabric.
Attaching the Ears, Horns, Etc
I attached my ears first, before lining, because if you are not lining your hood, you would, and you would also be hiding your stitches from attaching the ears, under the lining. However, You can attach them, or reattach them, as I did after making adjustments, after the lining is sewn in.
I recommend if you have very large horns going on your hood to attach them after you line the hood (if you are lining it). It will be easier.
With the hood on your head and standing in front of a mirror, decide where the ears will go. You can just pinch and hold the hood where you want it to go or place a pin in the hood to mark the place.
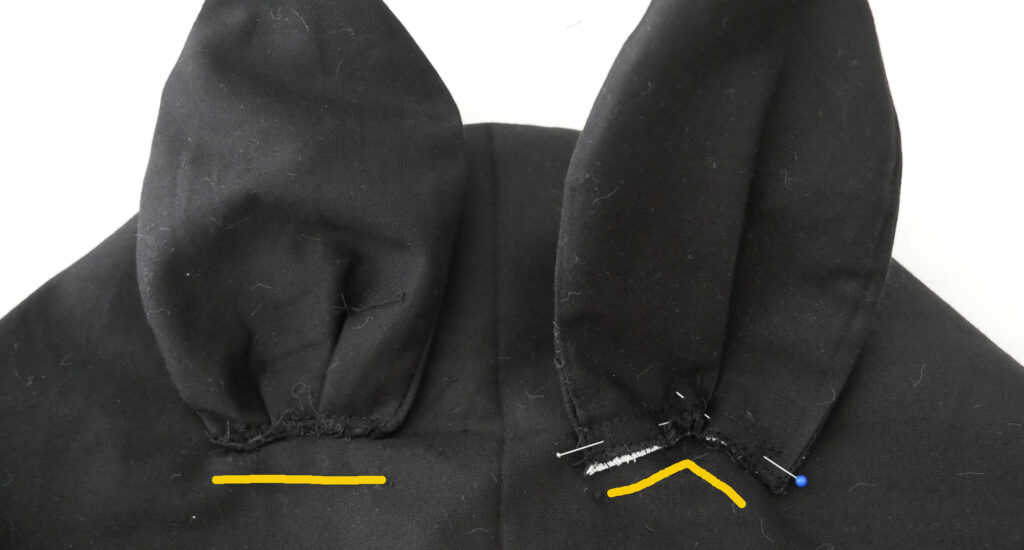
Let’s talk about ear placement
I tested sewing the ears in the same seam that took the peak away but it is too far back on the head and my ears just flopped down backward.
I also tested cutting a slit in the hood, I cut a slit where I wanted the base of the ear to go, stuck the ear in and sewed across the bottom of the ear and the edges of the slit. This worked, but warning, you could easily cut the slit too long or, not catch the edges of the slit when you sew the ear in.
I decided that hand-sewing the ears to the hood worked best. Of course, it’s the only option for something with a wide base like a horn.
To get the ears or horns evenly positioned on the hood, measure over from the crease (top of the hood) to the pin marking where the ear will go. Mine is 1 ½”. Then measure how far back from the front edge you placed the pin. Mine was 2 ½”. Place the center of the ear however many inches from the center hood crease and back from the front edge. (The center of my ear was pinned down, 1 ½” from the center and 2 ½” back from the front edge)
Pin the ears or horns down. Styling them as you wish, scrunched more, at an angle, etc.
Floppy ears will be sewn straight across. The best position for attaching stand-up type ears is folding the ears slightly in the middle.
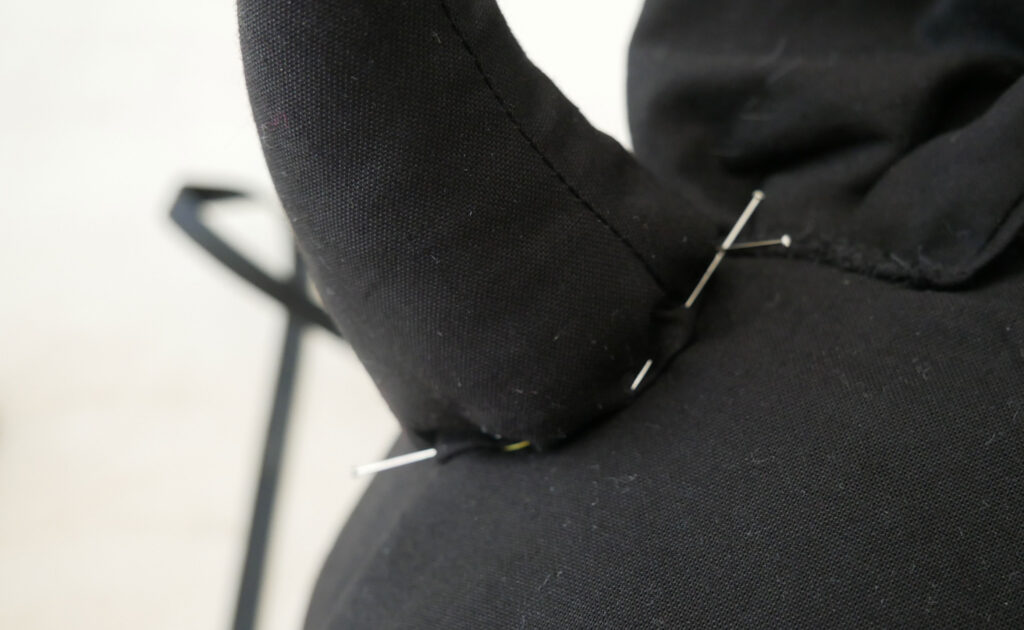
Horns are pinned down all the way around as best you can – winky smiley
Sew ears and horns onto the hood with small stitches
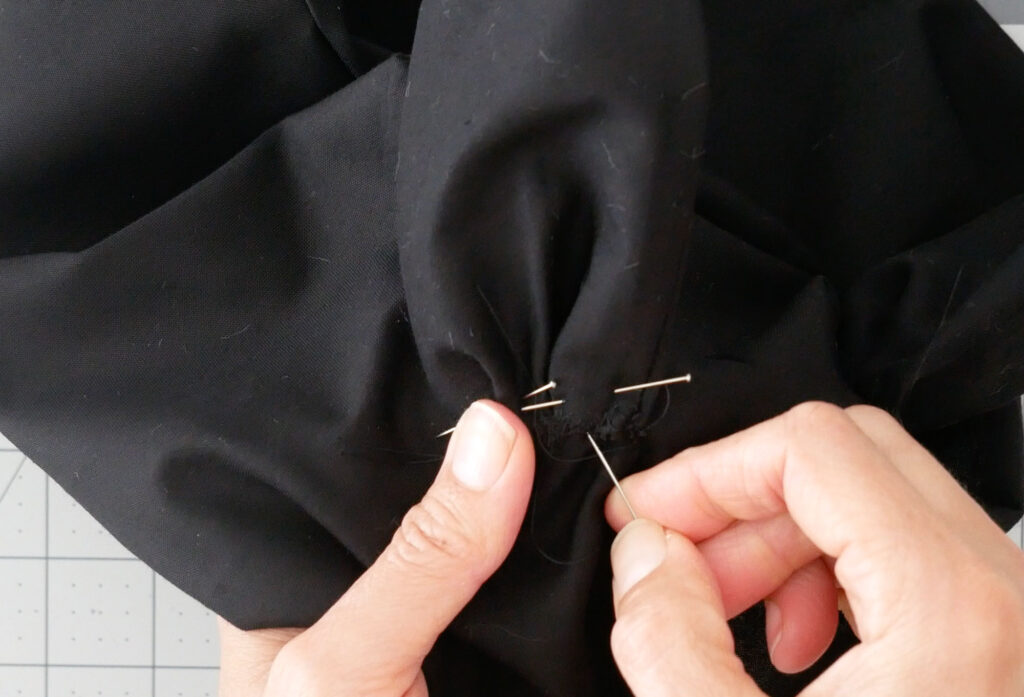
After the ears are attached across the base, you can play with the shape more by tacking down a little in the back or pinching a little from the side and sewing that to give the ears direction. The video shows this best
There really are all sorts of possibilities to play with
Let’s Finish This
Ears are on, and now you have to line the hood or finish the raw fabric edge to prevent fraying.
To finish the raw edges without lining, fold the raw edge onto itself two times. First, fold over ¼” to ½” then the same amount again. Pin and press flat. Sew this fold down, all the way around.
Attach the ribbon to the bottom neck corners. Then you’re done.
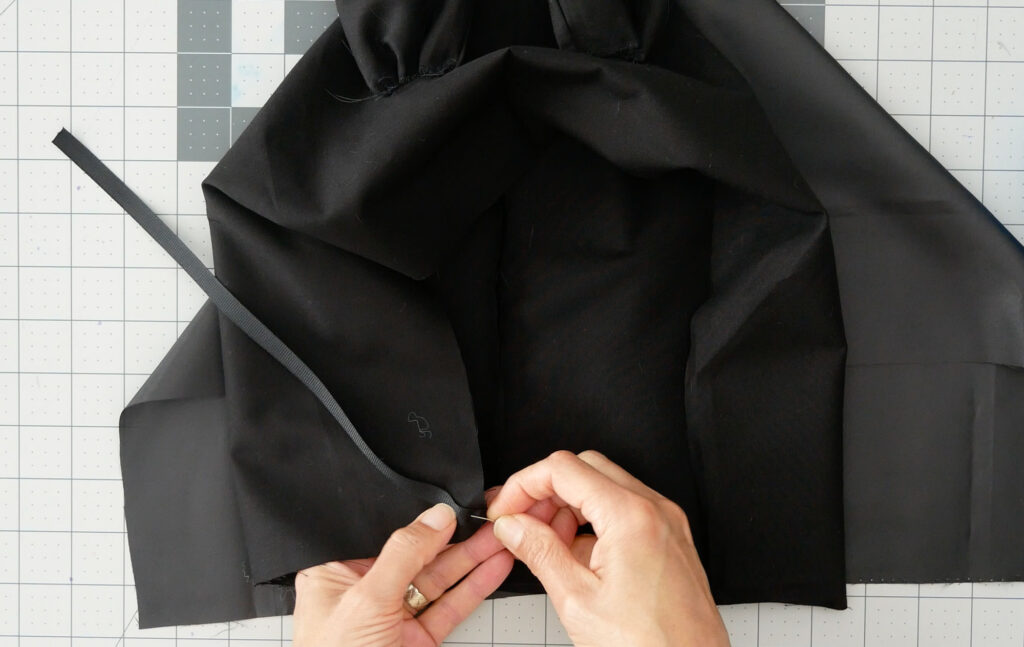
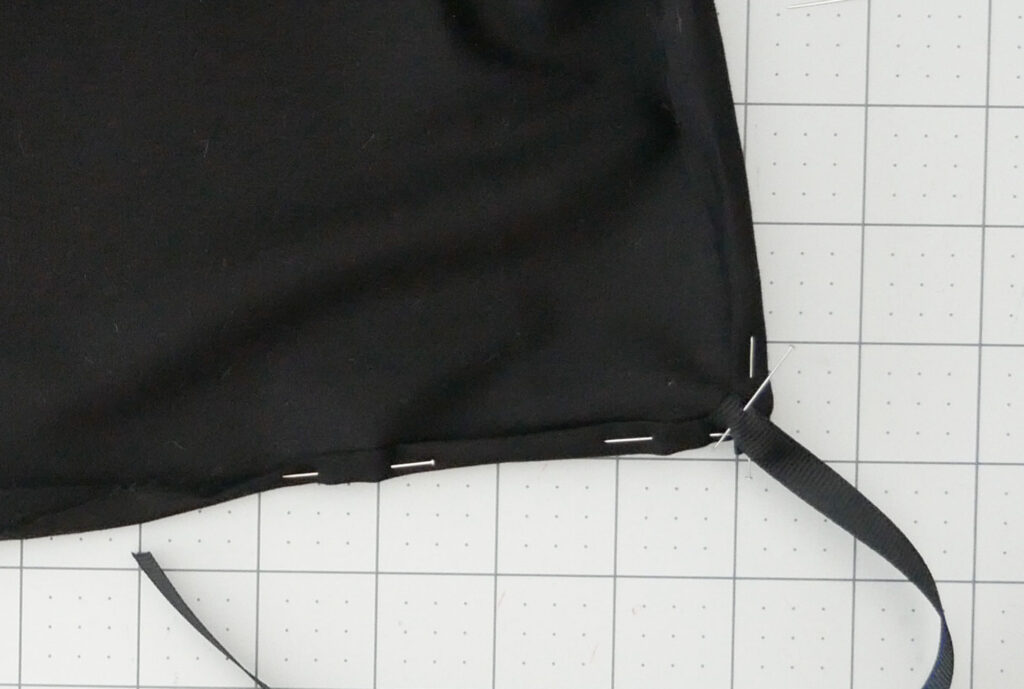
If you are lining the hood, pin the ribbons to the hood at the corners so they turn back, toward the hood, not forward as they will be when the hood is done. It’s also a good idea to pin them down back on the hood away from the edges so they stay out of the way when sewing the lining and hood together.
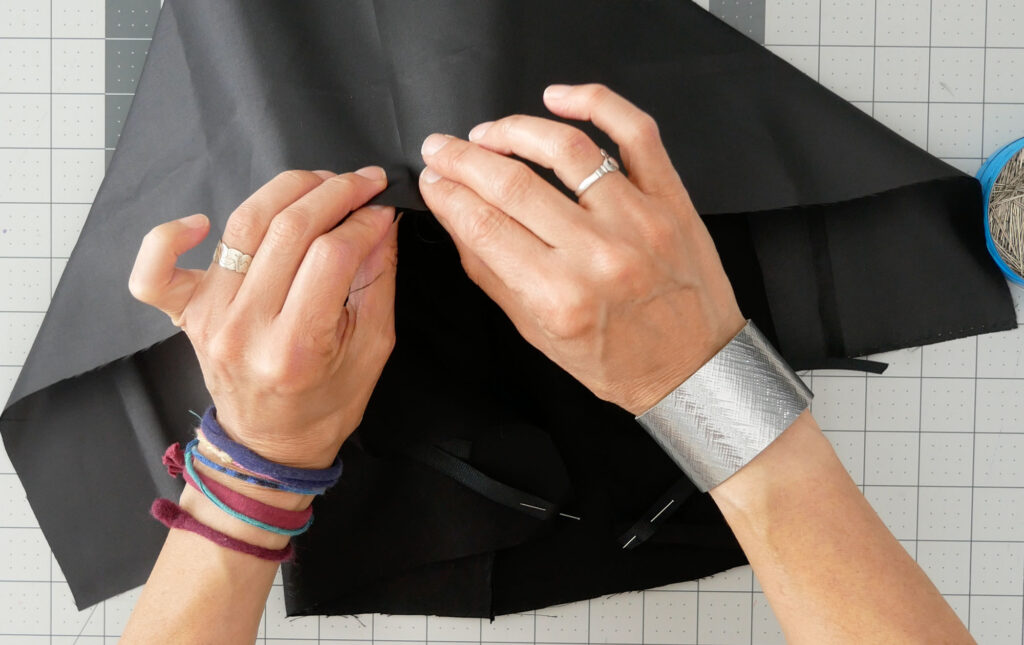
Place the hood inside the lining so the right sides of the fabrics are touching. Line up the front top creases, then one corner. Take the pin holding the ribbon out at the corner and replace it to catch all three layers together (the hood, the ribbon, and the lining).
Line up the seams at the back neck, but place the pin a couple of inches away from the seam. I use 2 pins here, close together, as a visual reminder when sewing, to start and stop at the double pins. You want to leave that 4”-5” space between the double pins open. Don’t sew between the double pins. But do sew all the way around the rest of the hood.
After sewing, reach your hand in the hood and pull it right side out. Unpin the end of the ribbons from the hood.
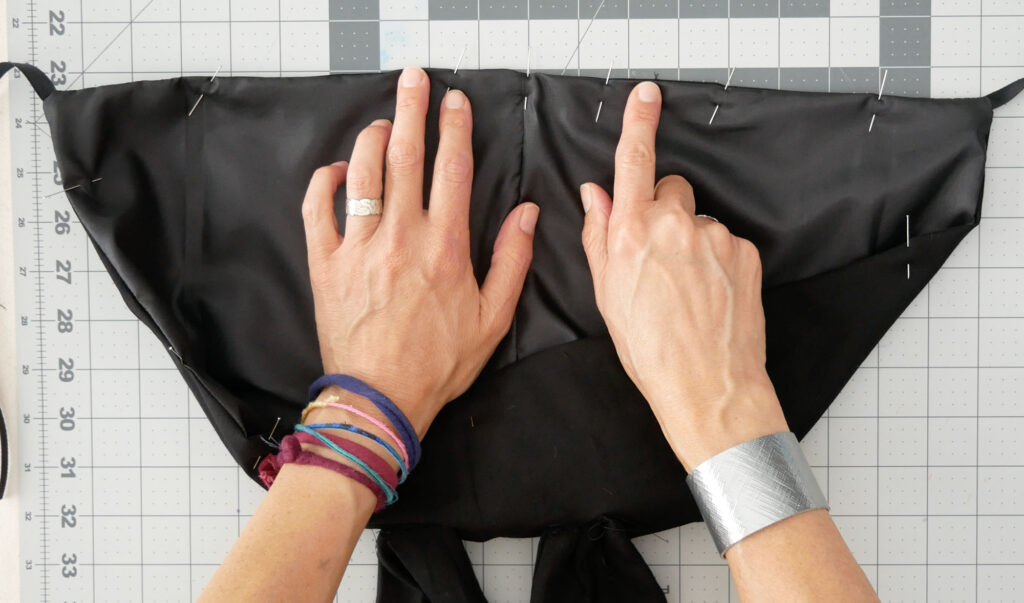
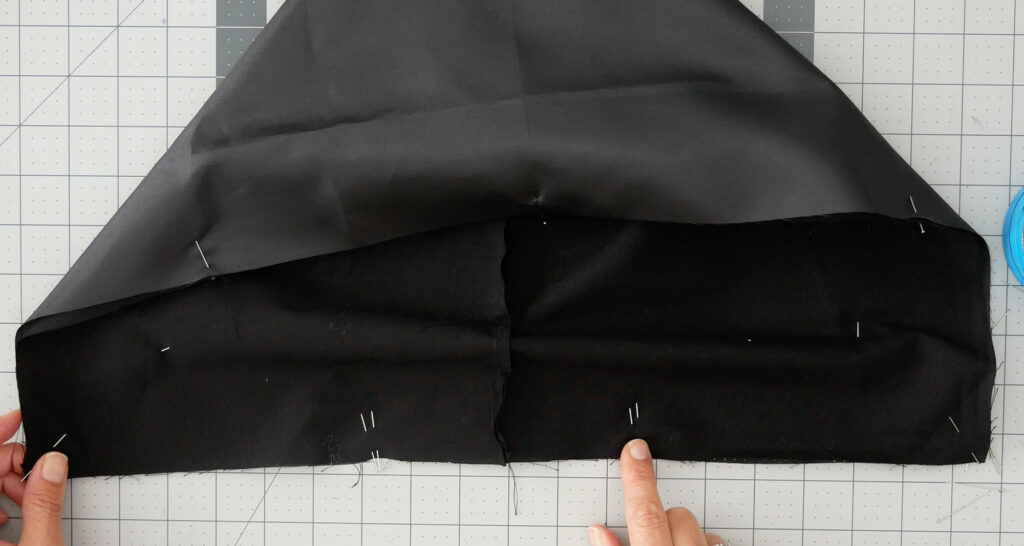
Line up the hood and lining seam so it’s on the edge (the lining is fully inside the hood and the hood is fully outside the hood) and pin it in place. Fold in the seam allowance of the opening inward and pin down. Sew all the way around the hood to keep everything nice and tidy and close the opening.
Now you are finished. Well done.