
Finding a hole in your sweater doesn’t mean the end of your sweater. Taking just a few minutes to mend that hole will let you continue to wear your sweater for years to come. Those few minutes will save you the money and time it takes to replace the sweater and the more years you wear continue wearing it the more value you get from that mending. And that, you can take to the bank.
There are many different ways you can go about fixing holes in a sweater but you want to decide two important things upfront:
Do you want this mend to be invisible/blend-in or visible/add a little flair
What are your skills and what materials do you have to work with?
This video and post will talk about different ways to mend a sweater.
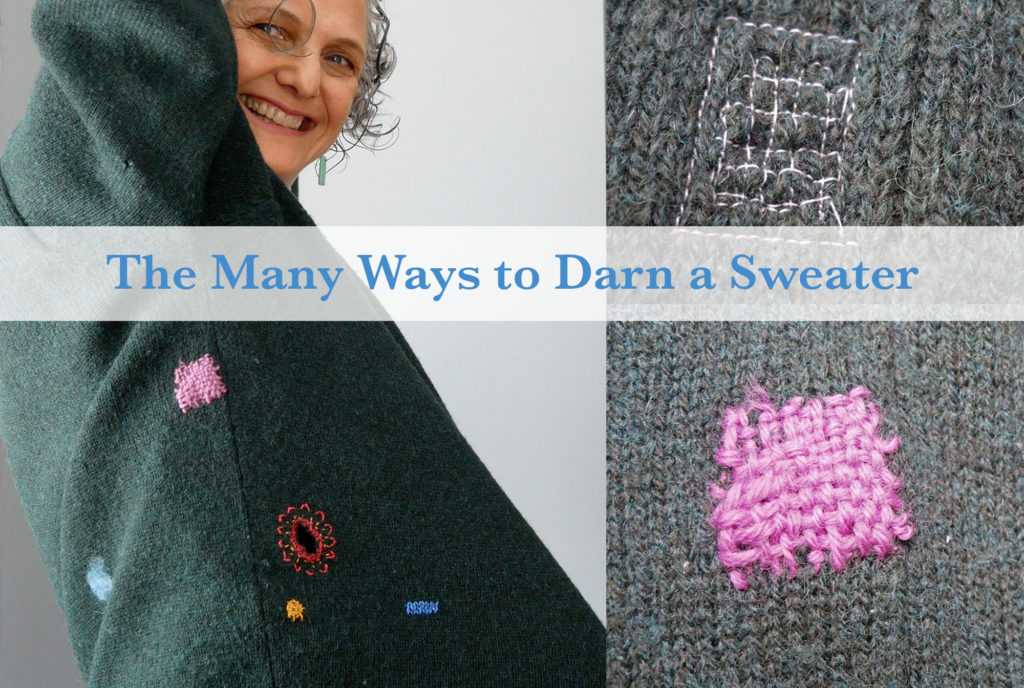
I tried seven ways to mend a hole (an eighth was such a fail I don’t even bother suggesting it) and I explain how to do another that is beyond my skillset (Crochet – if you know how to crochet then you have yet another option)
Different Ways For Mending a Hole in a Sweater
First, let’s just jump the mending queue – let’s just hide that darn hole
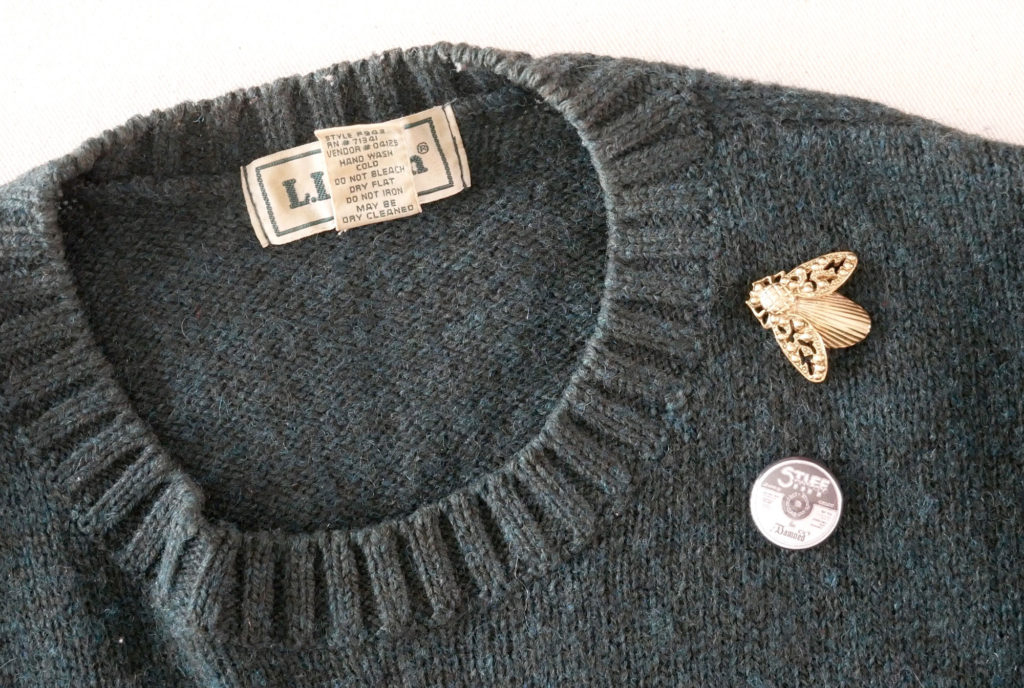
If the hole is located in a spot where you can simply hide the hole with a badge or brooch. You could add more brooches just to play up the idea and make a statement – like Orsola de Castro who is well known for her blazer with the cluster of brooches that started with covering up a hole.

And that’s a “repair” you can do in under a minute.
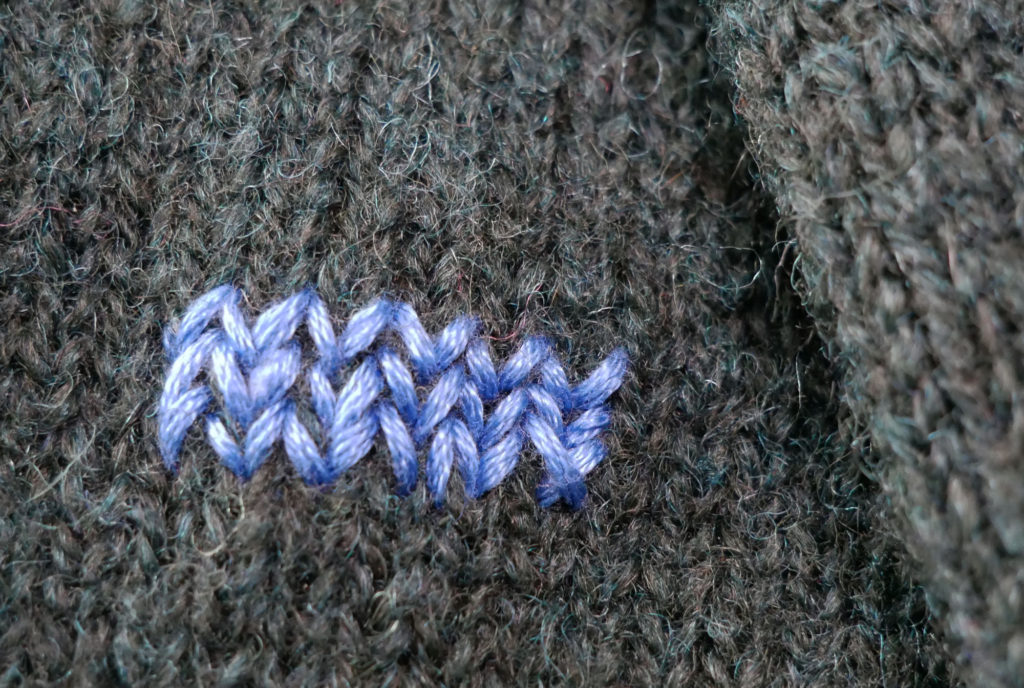
Replicate Stitch – aka Swiss Darning
For worn-down areas in a sweater (like the elbows), you can strengthen the area with replicate stitches using lightweight yarn or pearl cotton – something thicker than sewing thread.
When knitting, little loops are formed. They can appear as little “V’s” on plain knitted sweaters, or loops, or other more complicated loops. The idea of the replicate stitch is to do just that, Replicate the knitted stitch with a darning needle and yarn/thread and hand stitches.
Simply follow and sew over the sweater’s stitches. Look for the rows of Vs going up and across the worn area. Start replicating the stitches of the worn area one or two rows beyond on all sides so you can anchor your yarn into the sweater where it is not worn down. Weave the tails of the yarn through the sweater and to the inside.
This is best for a thicker sweater so you can see the stitches and possibly match the yarn weight of the sweater.
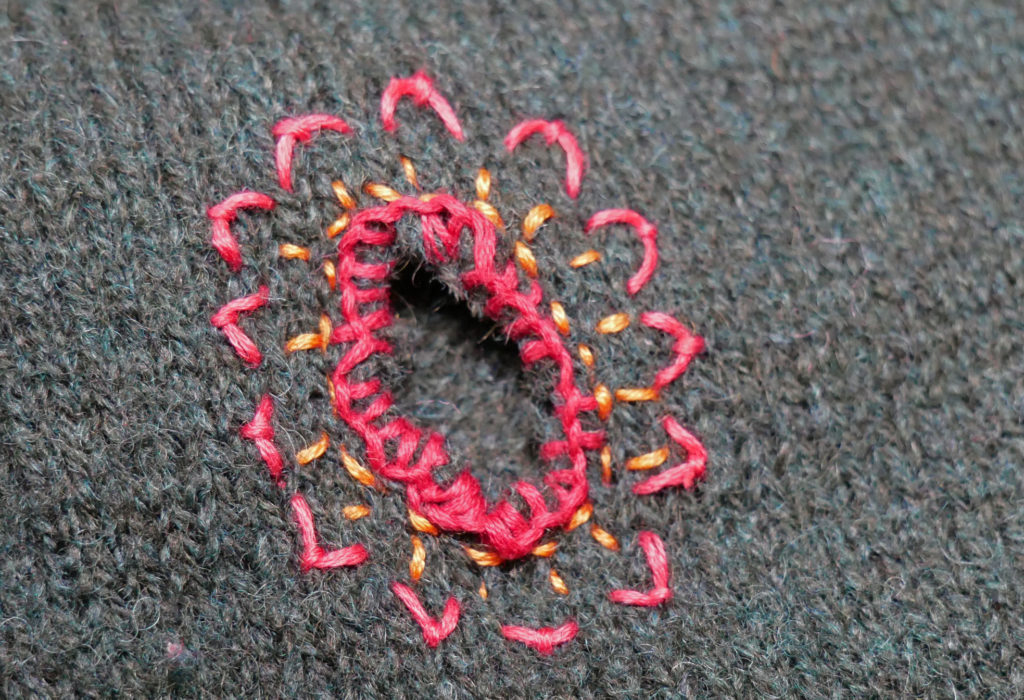
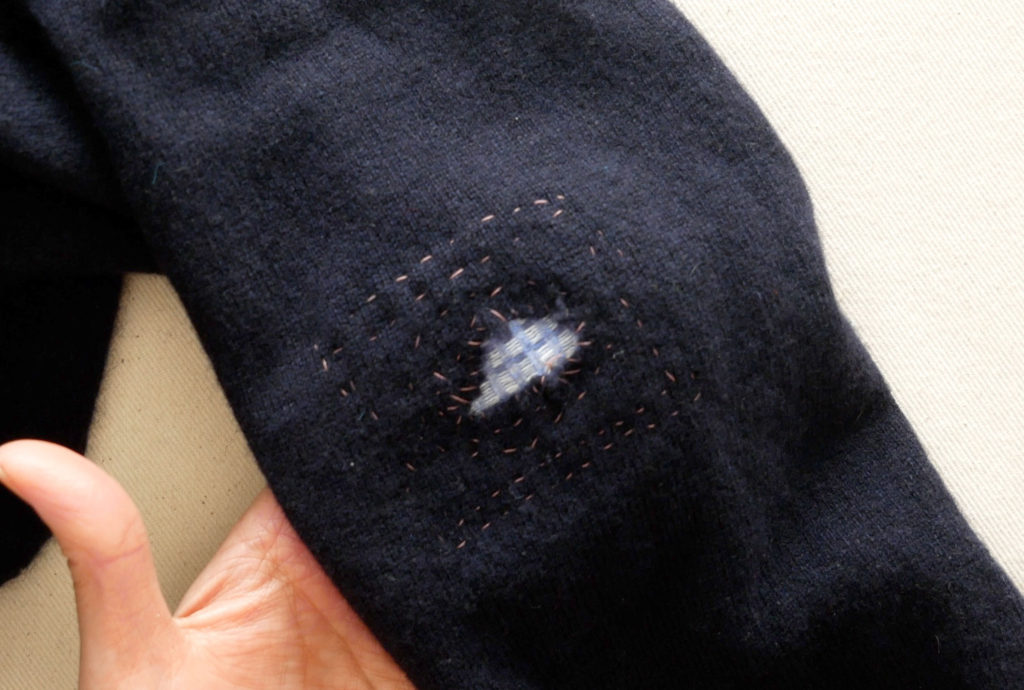
Embroidery
This method is not repairing the hole so much as it is preventing it from growing. It’s more of a Visible Mending approach. An opportunity to add a decorative element or some color to the sweater but you will still have a hole in your sweater when you’re done.
Trim the hole if there are any fuzzy ends in it. Look for runs coming from the hole. You want to stitch those up as part of this mend (bring the two sides together).
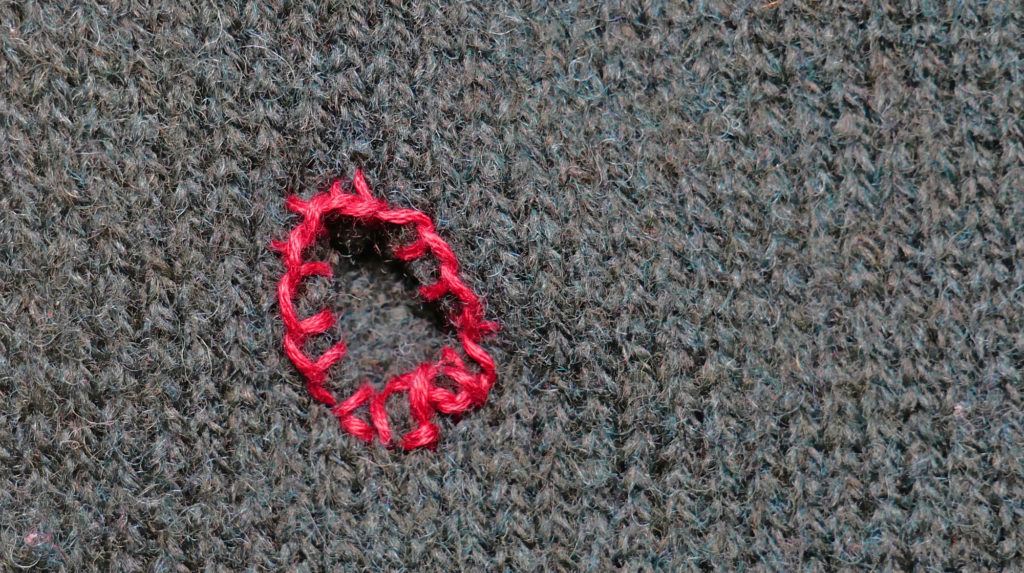
Stitch around the hole using a blanket stitch. These stitches can be close together, or widely spaced.
You could add more stitches and turn the hole into an object; a flower, a mandala, a donut, etc.
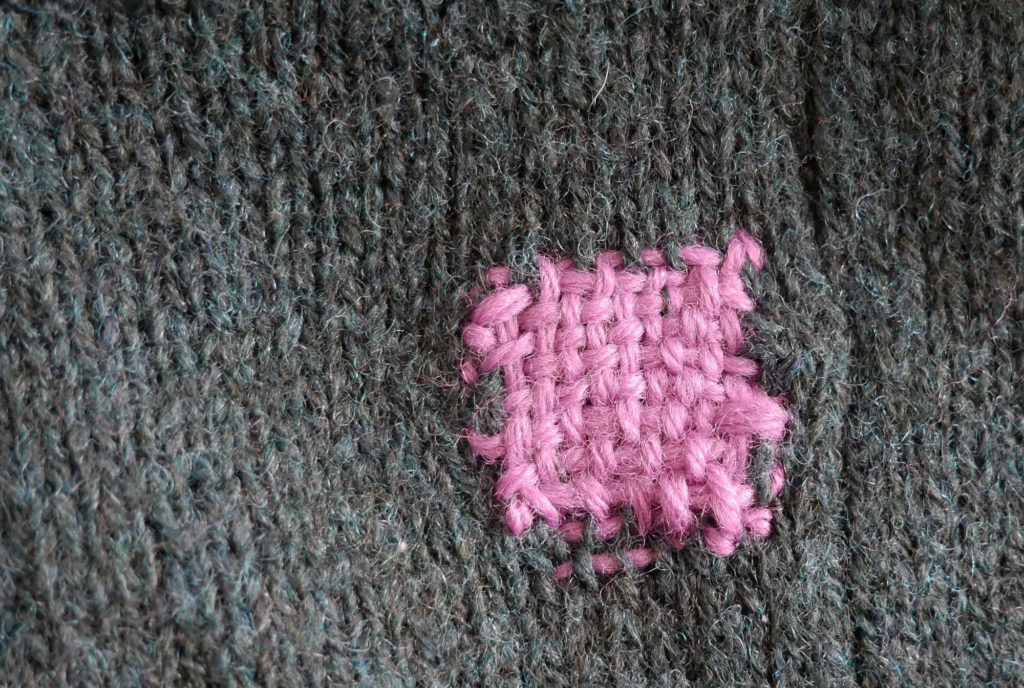
Basket Darning
This is the traditional way to darn. It is a weaving technique and quite fun. My example just covers the hole but the darning could be extended beyond the hole to make a particular shape, say a heart.
Trim the hole if there are any fuzzy ends in it. Look for runs coming from the hole. You want to stitch those up as part of this mend (bring the two sides together).

Use yarn, embroidery floss (for small holes), or pearl cotton. Because you work on the outside of the sweater you need to keep the two layers of the sweater separate. If you have a darning mushroom use it. (place it under the hole and tie the sweater around the stem with a yarn scrap or rubber band, so that the hole is laying over the cap of the wooden mushroom. Not stretched but not loose.
Most of us don’t have a darning mushroom so we can use an embroidery hoop to hold the repair area firmly and isolated from the rest of the sweater
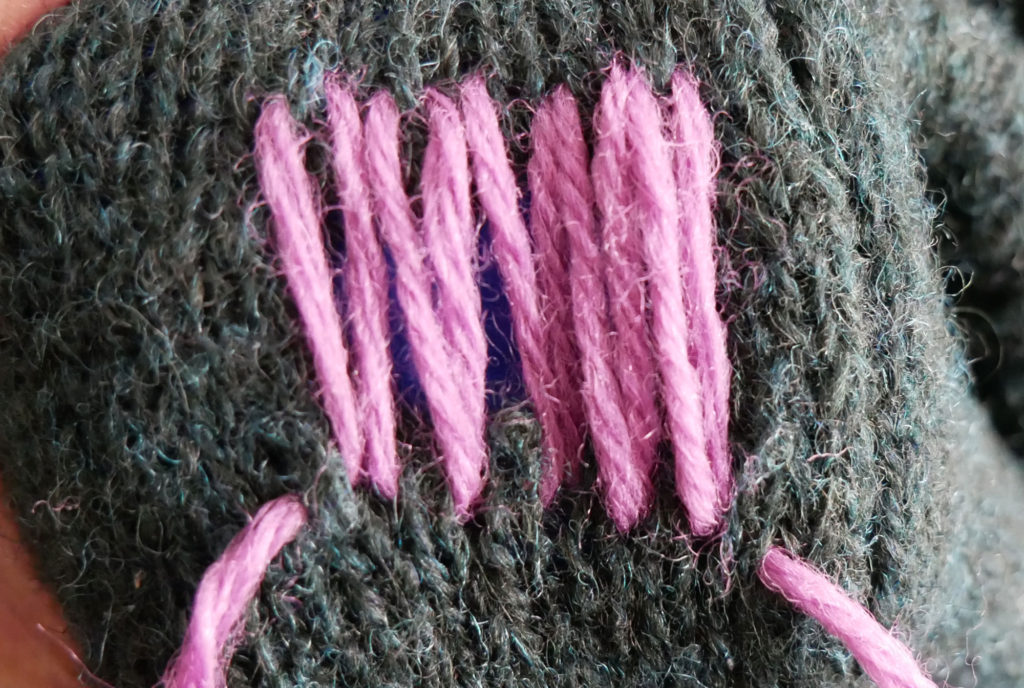
You are going to stitch vertical rows of yarn over the hole first. Anchor the rows of repair yarn into the surrounding stitches on the sweater. Cover the entire hole. Leave a long tail whenever you start or end a piece of repair yarn.
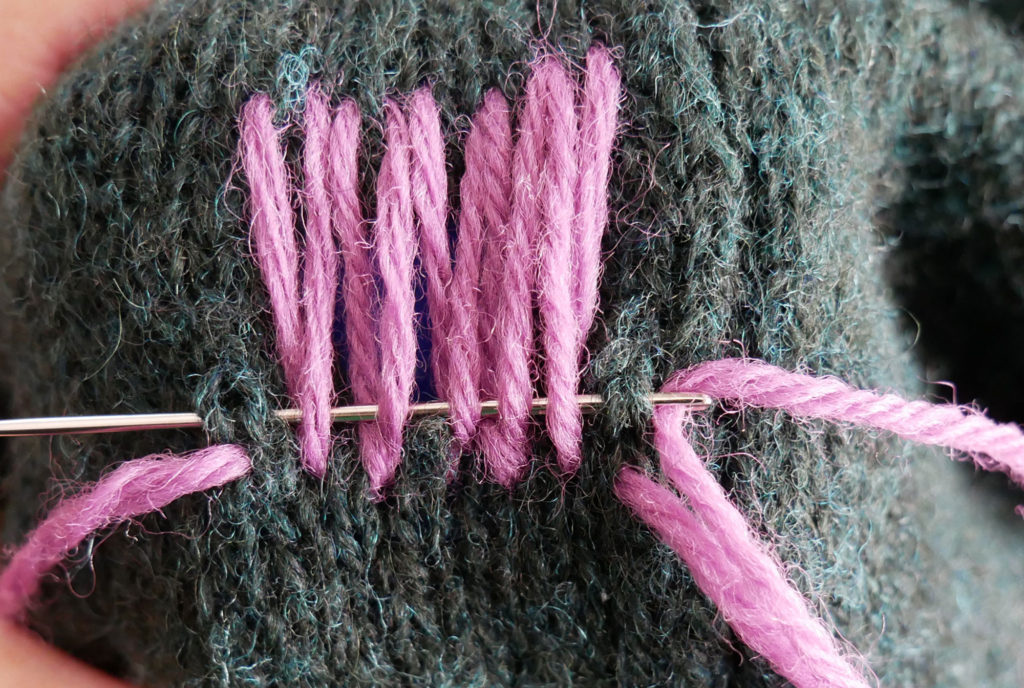
Then you will create rows horizontally, anchoring them into the sweater by catching a stitch. However this time you weave the stitches through the vertical rows of repair yarn. Scooch the woven rows down as you weave.
Weave the tails of the yarn through some sweater stitches and bring them to the underside. Clip the tails.
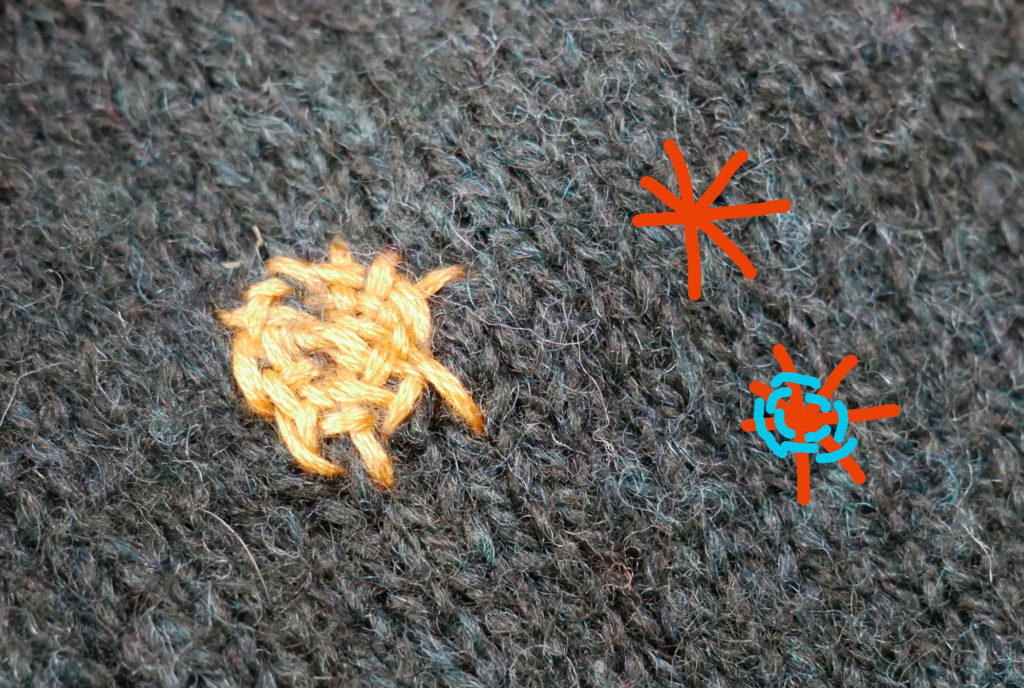
Darning small holes
Small holes can be darned making rows of repair yarn or thread going across the hole like spokes of a wheel (red lines above) and then weaving in and out of the spokes (blue line above). You need to have an odd number of spokes for this to work.
Again trim the hole if there are any fuzzy ends in it. Look for runs coming from the hole. You want to stitch those up as part of this mend (bring the two sides together).
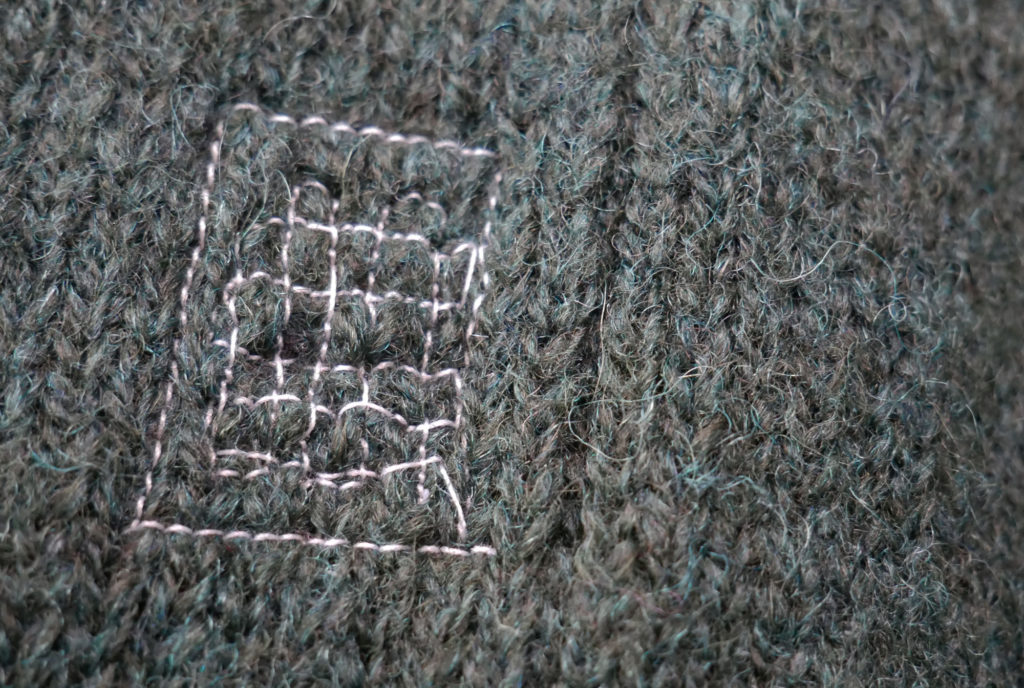
Machine Darning
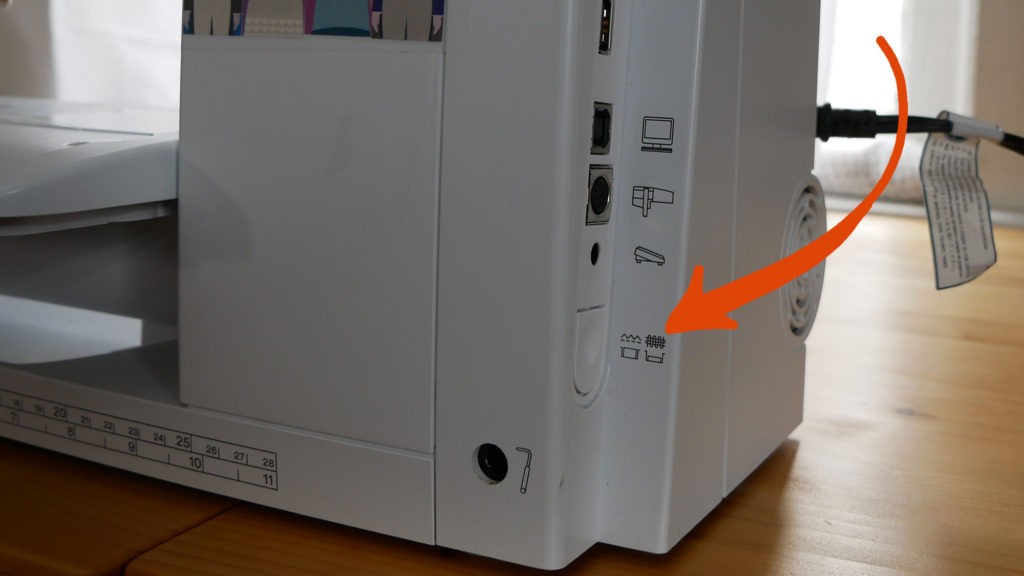
This is great for worn areas that are not yet a hole and for small holes. Many sewing machines come with a darning option. It lowers the feed dogs on your machine. But you can still machine darn without this option.
The darning option icon looks like a grid (like the traditional basket darning stitched mentioned above). But you could darn in any direction you want – circles, diagonal lines, spirals, etc.
If you don’t have a darning option on your machine you just have to use a presser foot (normal stuff) and raise it to pivot the fabric to change direction.
Before using the darning option, place a piece of fabric under the area you are darning. Pin it in place. Stitch the fabric to the sweater around the edge. Use a piece of knit fabric (an old T-shirt or even a sock) because it will stretch with your sweater and it won’t unravel so you don’t have to do anything to the raw edges.
If you have the darning option, lower the feed dogs and take off the presser foot. If not keep the presser foot on.
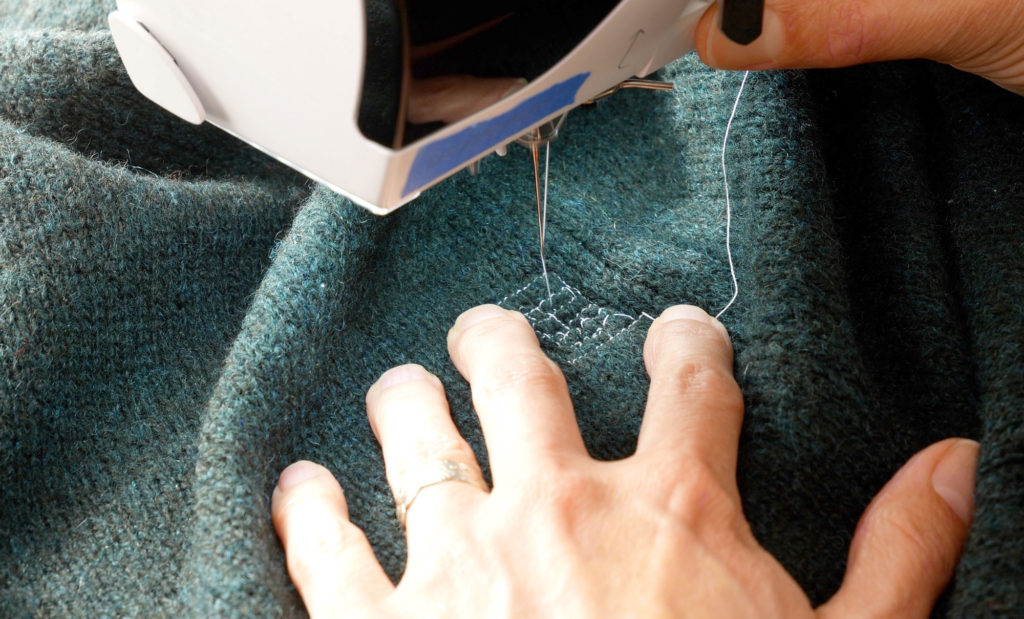
Sew rows of straight stitches in one direction, then across those rows in the other direction. That’s it. Really.
There are two things you need to remember: Move the fabric yourself if using the darning option because there are no feed dogs or presser foot to move the fabric.
Remember your presser foot has to be “ down” for your stitches to form properly but there is no foot there to remind you, so just check that the lever is flipped so the foot would be down if it was on your machine.
The only problem with this method is getting up in the sleeve to repair worn elbows. It’s too narrow. You could open up the sleeve seam if there is one to lay the area flat for darning. Then restitch the sleeve seam closed. Or you could darn by hand as in this post all about repairing the elbows
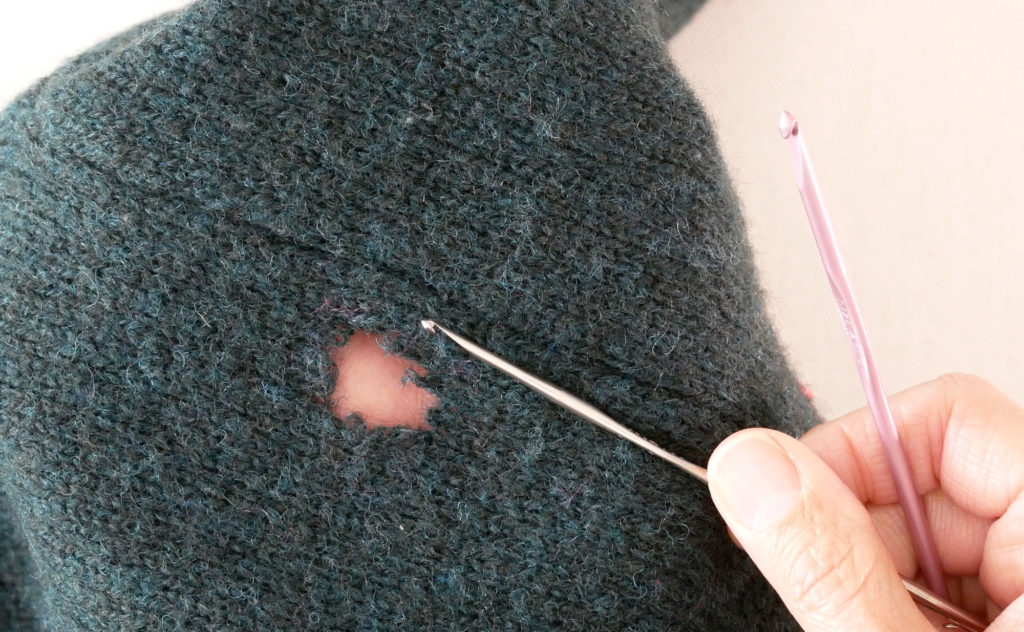
Crochet
Crochet is very stretchy, unlike basket darning and it can be shaped to fit any hole (perfect for heels of socks). If I knew how to crochet I could explain this better. But the main steps are as follows:
- Trim the edges of the hole and any runs. You want to crochet into strong fibers.
- Using a very tiny crochet hook join your yarn to the hole with a slip stitch
- Work single crochet stitch around the circumference of the hole. After the first row, you can switch to a bigger hook.
- Continue filling in the hole.
(I saw this idea in my book “Mend It Better” by Kristen M. Roach. Please check that out for detailed instructions)
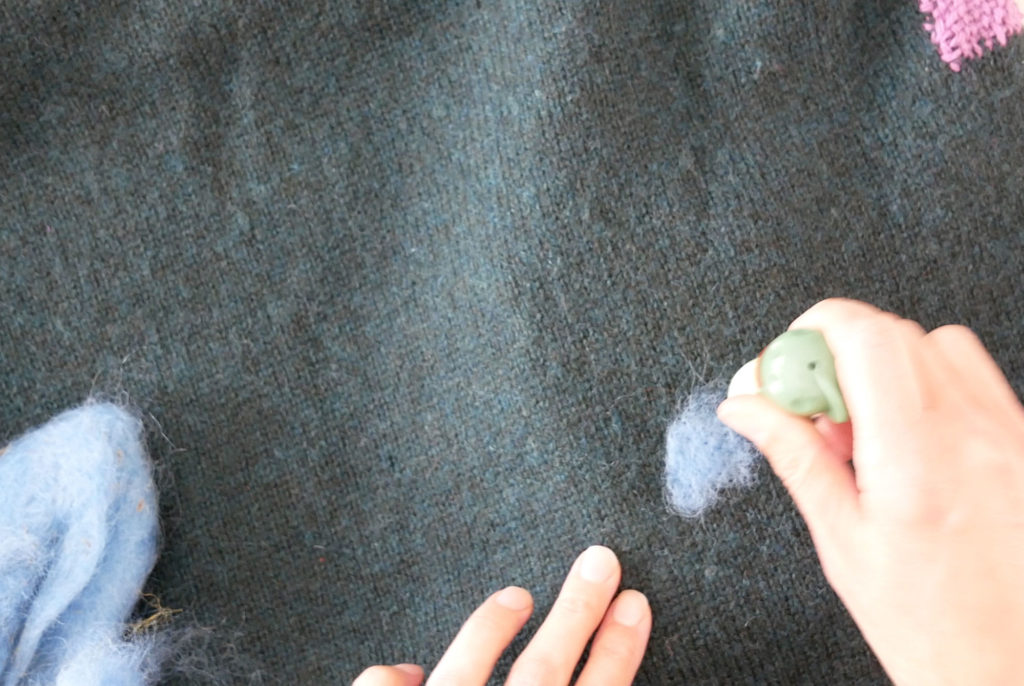
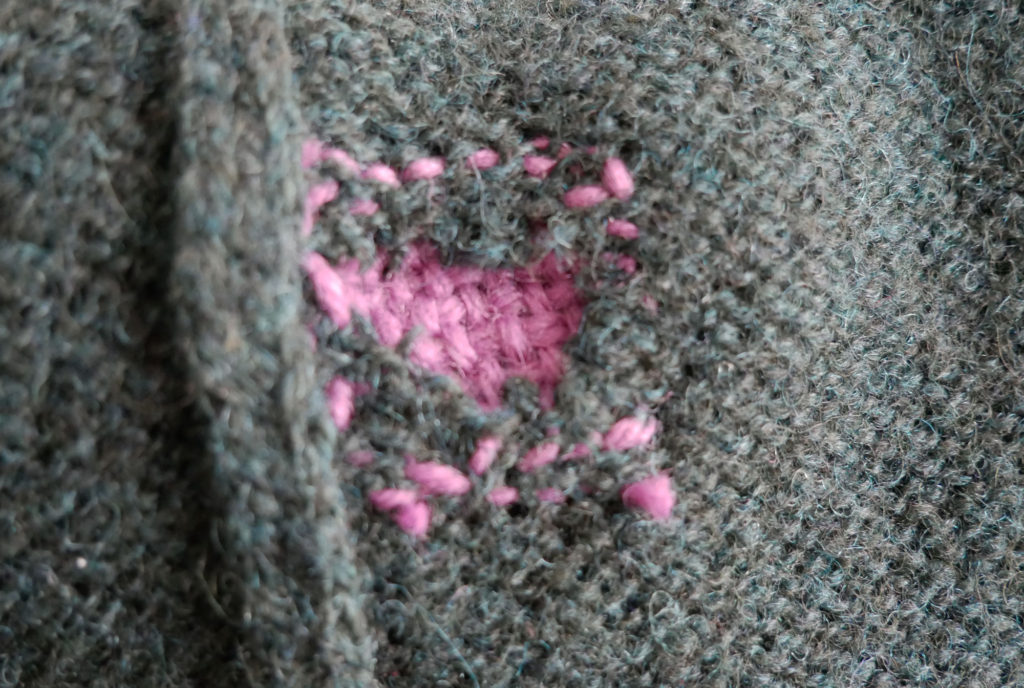
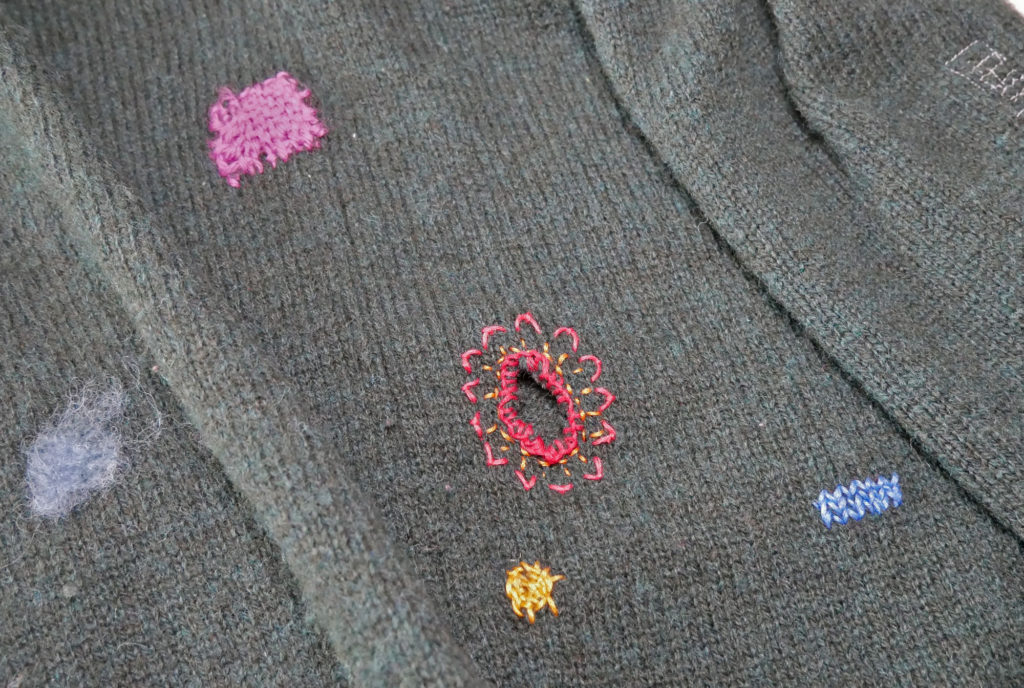
Needle Felting
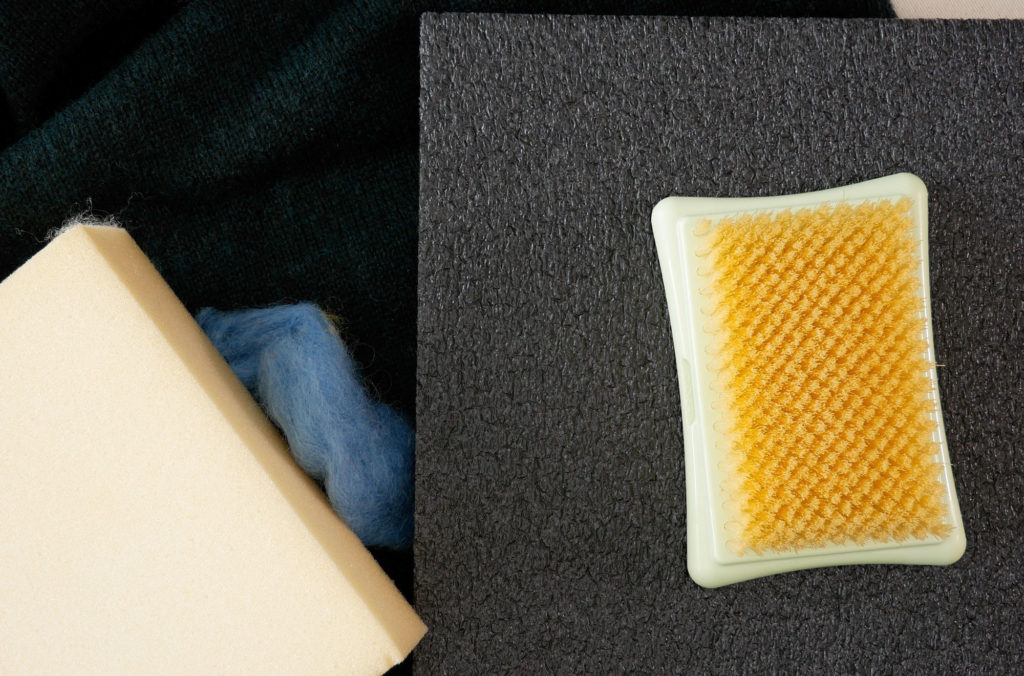
Wool roving can be needle felted over a small hole on wool sweaters, as long as you don’t use a towel as the felting surface. I did and I broke the needle. Use a needle felting mat or foam.
This really is best for small holes.
It will not work on plant fiber sweaters like cotton & rayon.
To avoid the felted patch from looking like you have a ball of lint stuck on your sweater, use either a color that blends into the sweater or make a very deliberate shape with the roving – like a perfect circle, or a heart.
The process is simple, place a small piece of roving over the hole and a little beyond. Have a needle felting mat under the hole. With a vertical up and down motion, move the felting needle in and out of the roving. The coarse animal fibers will start to tangle with each other. This adheres the roving to the sweater and covers the hole. You can add more roving as needed to cover the area. You will be surprised by how little you need. The more you felt the roving (the up & down motion of the needle) the more flattened the roving will become
Patching
There are a few approaches to patching. From what fabric to use for the patch and where the patch goes; under, over, or both.
Here is my post and video on all the how-tos of patching a sweater but let me summarize while we are on the topic
Materials to use
Usually, knits are recommended because they stretch as a sweater stretches. So you could use an old t-shirt, a sock, or, if you knit, you could knit a small patch.
If the patch fabric unravels (knits tend not to so another good reason to use for a patch) be sure to hem or overcast or zig-zag the edges of the patch first before sewing it down.
The patch should be about ½” or 1 cm larger than the hole on all sides.
Placement
The patch can be placed under the hole, over the hole or you could have a patch under the hole to keep it from growing and add strength to a worn-down area and then hide it all with a patch placed on top of the patched hole.
Sew the patch down to the sweater first around its perimeter and then around the edge of the hole. Finally, sew the raw edge of the hole down to the fabric patch.
You can add extra stitches here to strengthen the area or not.
A patch on the outside of the sweater covering a repair only needs to be sewn down around the patch’s edge.
Thank you for reading. I hope this was helpful. If you have any questions or tips to share about patching sleeves please put them in the comments below, and I’ll be sure to reply. Happy Sewing!
Such good information here! Thank you for this. I watched it on YouTube. I have a question about felting a patch. I mended a super wash merino wool sweater by felting a patch design on it. It looks so cool. Now I am wondering if I’ll be able to wash the sweater as usual? Any thoughts?
Well, on delicate cycle it should hold but if it did come off in the wash, could you felt it back on again? Or maybe, the roving is too smooth at this point to reattach? I suppose you could use tiny hand stitches around the felt patch, heck, even on the patch, to secure it to the sweater as well. I’m so glad you had success mending your sweater – and made it cooler 😉
Hi there,
I want to repair some holes in a pair of felted wool slippers (Glerups).
Wondering what is the stronger mend – basket darning or felting the holes?
Thank you for a great article and site!
I think basket darning would be stronger but I’m wondering id felting a patch would be easier – I guess it depends on location of the hole. What if you did a basket weave to fill in the hole with a wool yarn and then felted some wool roving over the darn? Ha! Is that overkill? If you can’t get the weave tight you could fill it in with roving. In my head this all works, of course. Let us know what you try
Thank you for this information! Well presented.