
All of us have asymmetrical bodies even asymmetrical faces. Yet all the clothes for sale are symmetrical. Usually, our body’s uniqueness can fit into these clothes but for some, especially those with scoliosis, a very common condition in which the spine can form a sideways S or C, finding clothing to fit well and be comfortable in isn’t that easy.
It helps if you can sew. In the last post, we talked about what styles and sewing patterns are best for women with Scoliosis.
But it’s also good to know how to alter a pattern to fit when one side of your back is fuller and higher than the other side. It’s not as easy as just adding length because we’re not just changing a back but an armhole, and possibly a sleeve too.
Well, after looking it up in a few reference books on fitting I found the following alteration suggested over and over. The best explanation though, that I found, was is in Sandra Betzina’s Fast Fit; Easy Pattern Alterations For Every Figure. My library had a copy and yours may too. It’s a good book but it is currently out of print. You can find it for sale used, I did.
But even Sandra’s explanation was a little confusing. I need pictures. Super clear instructions are a plus too.
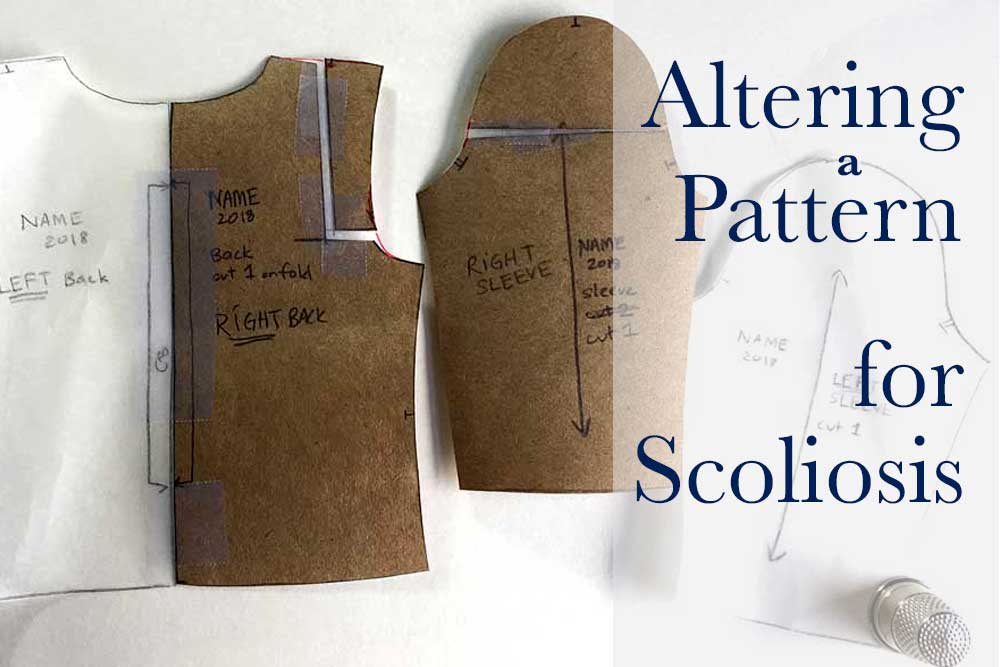
So, here goes, my take, with Sandra Betzina’s help, on how to alter the back bodice, and corresponding sleeve, to fit a higher and fuller back.
The Alteration
To fit an asymmetric back and shoulders you only need to do an alteration to one side of the pattern. The side that needs the added fullness.
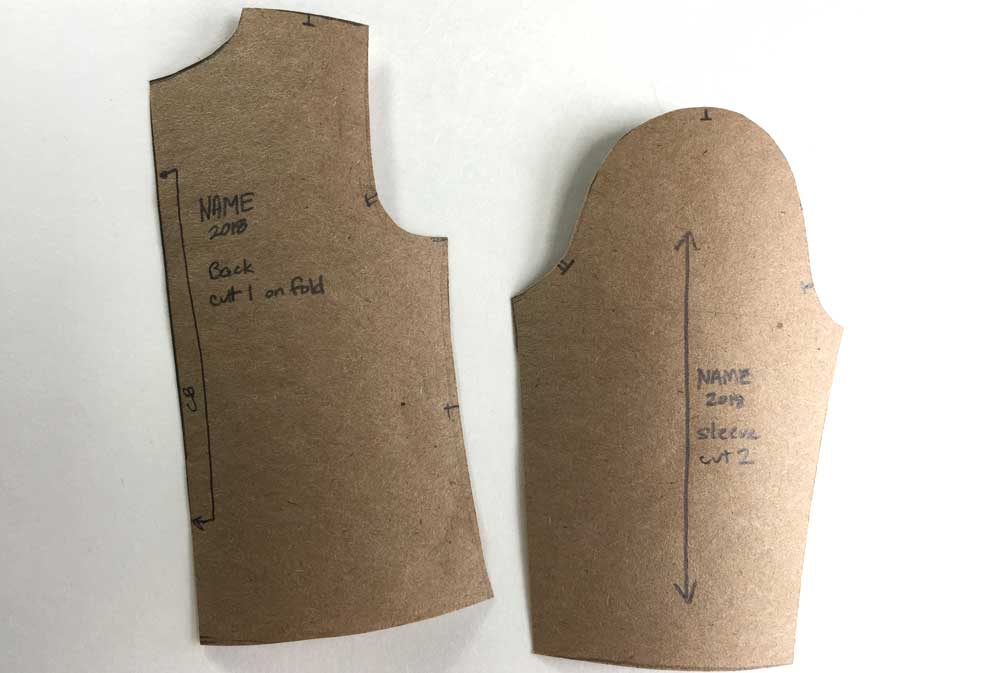
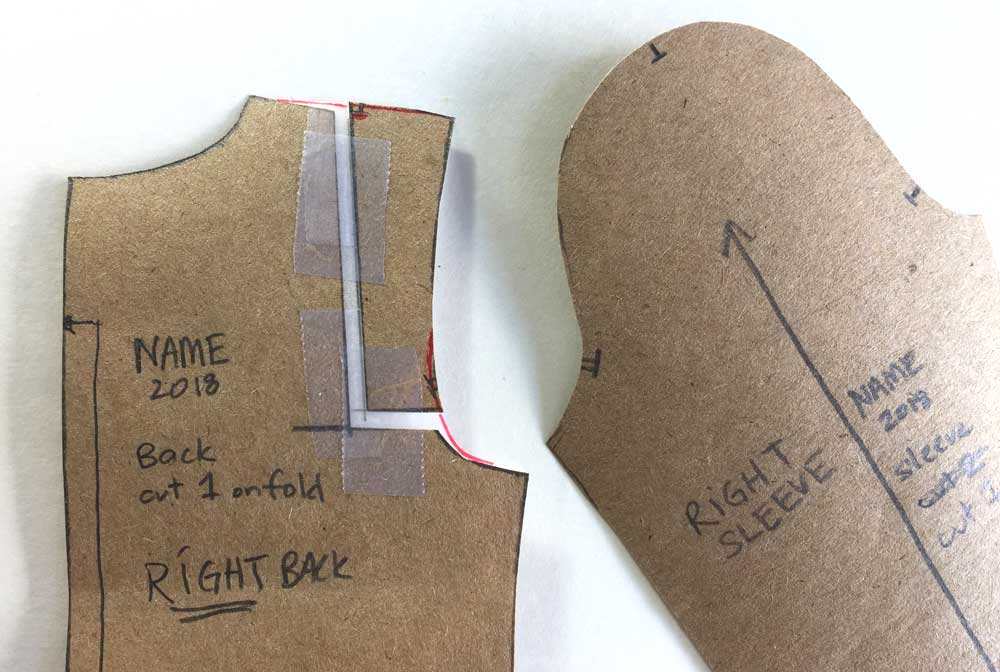
Since most patterns only come with one sleeve pattern and usually just half of a back bodice you’ll need to make another of each.
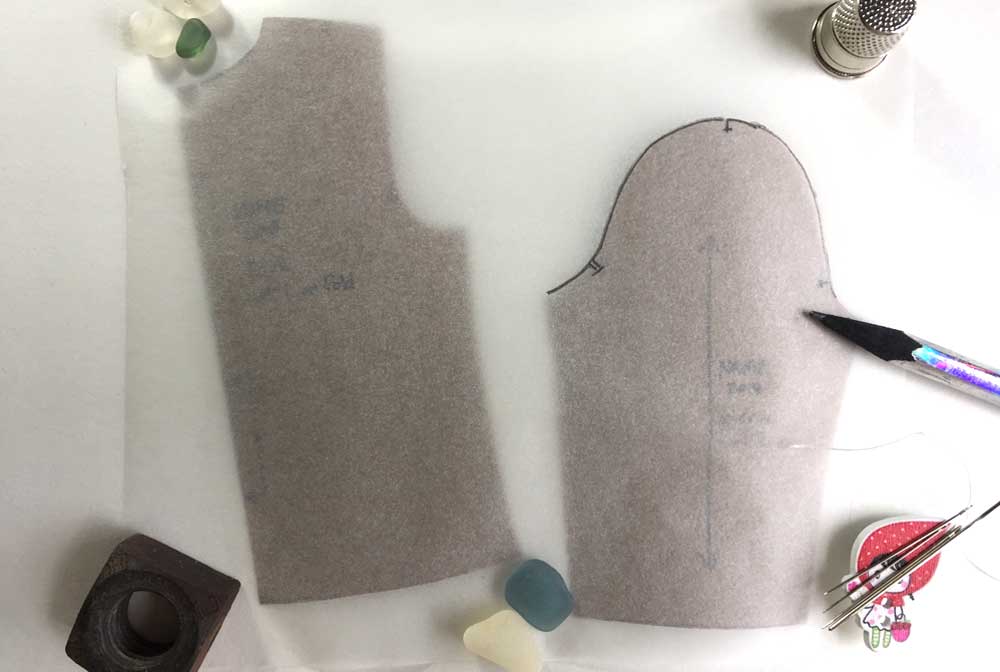
Trace the back bodice pattern and the sleeve pattern so you end up with two of each. Now you have a left and right sleeve and a left and right back bodice piece.
If your pattern, out of the package, has the back bodice labeled “cut on fold” you will still trace it to make a second pattern. After making alterations to the side that needs it you can tape the two halves together down center back OR you could add seam allowance to center back and make your garment with a center back seam.
If your pattern does have a whole back bodice piece, slice it up center back and do the alteration to the side you need. When done you can tape the two back pieces back together.
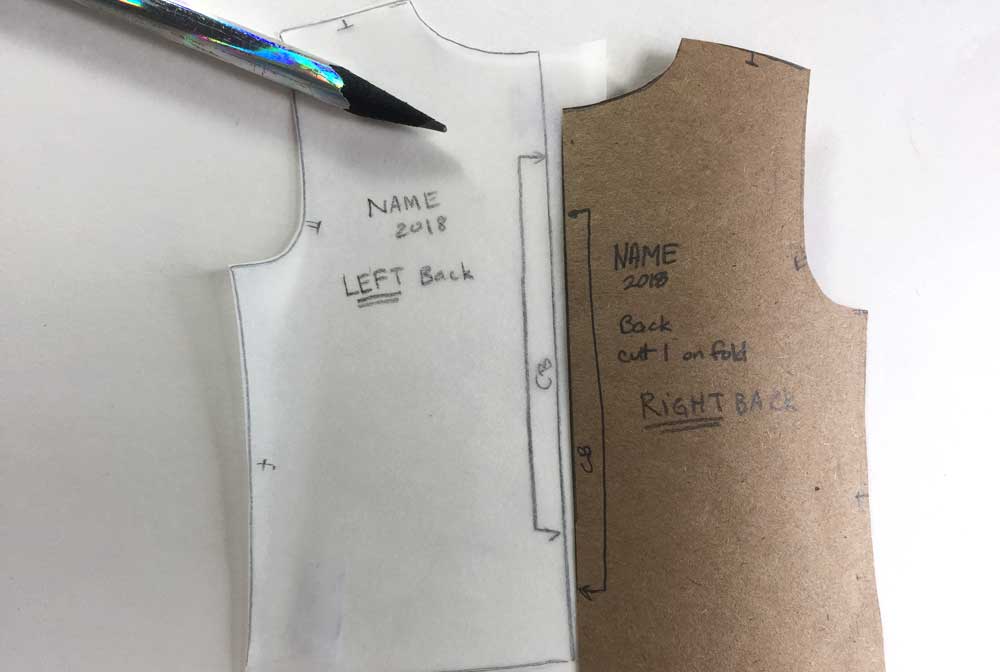
Label the patterns left or right and check that they are mirrored, you don’t want to end up with two right sleeves – you want one right and one left 😉 To be crystal clear before you cut into your fabric, label on the top side, not the backside to remind you which side of the pattern is up in order to be a mirrored piece.
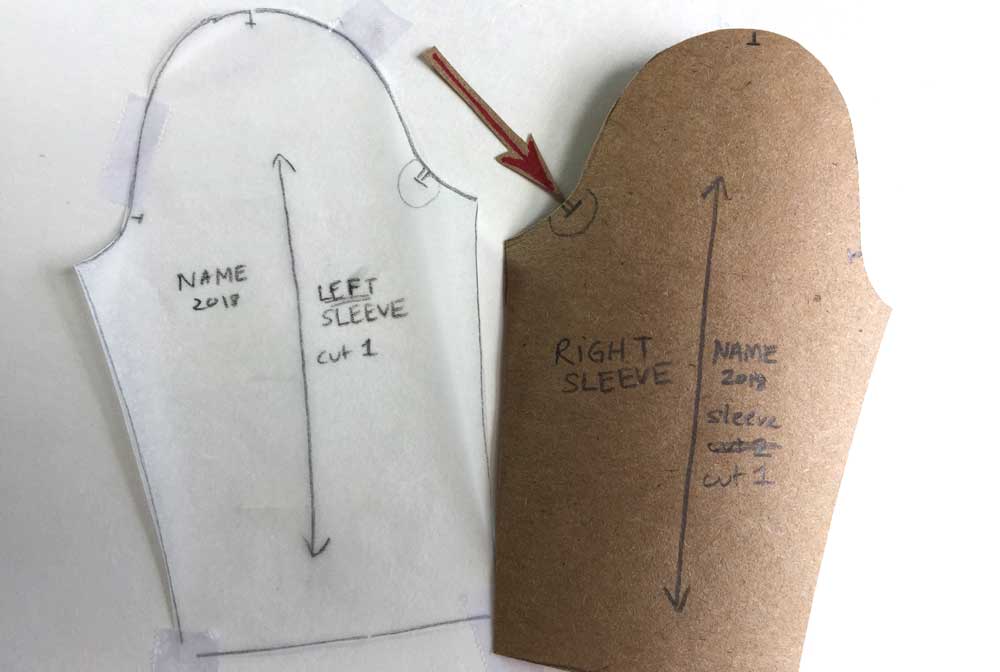
Sleeves are marked front and back with notches. The double notch in the sleeve is always the back. Set in sleeves are not symmetrical either. The backs of our human arms are fuller than the fronts and we move the upper arms forward most of the time so we need more fabric in the back of the sleeve to bring those arms forward.
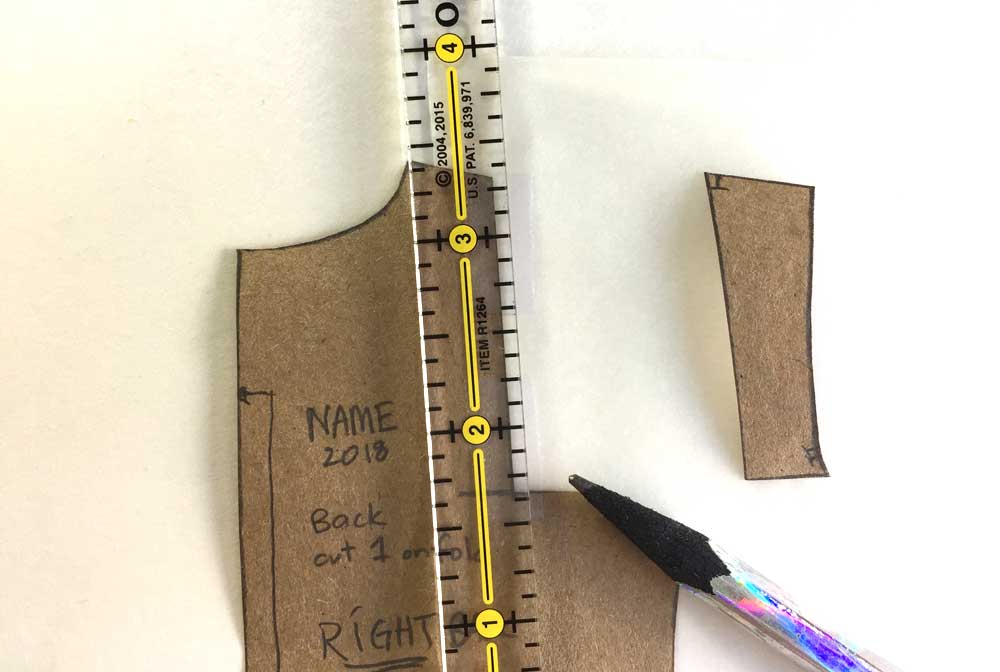
Determine which side represents the full side of your back, Right or Left? Which side do you need more fabric on? Remember the top side of the pattern represents the right side of the fabric.
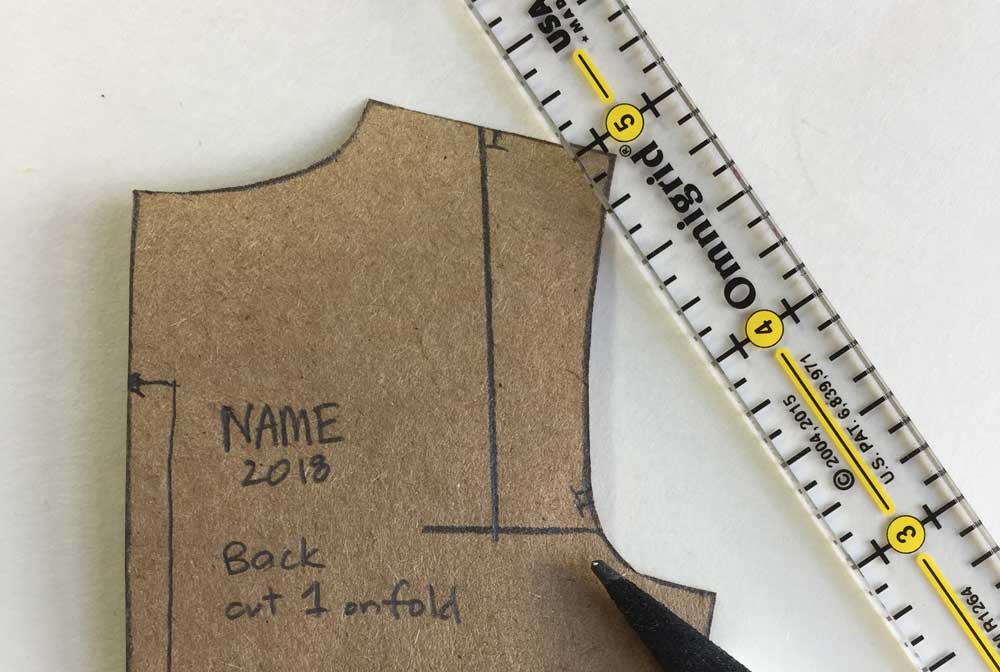
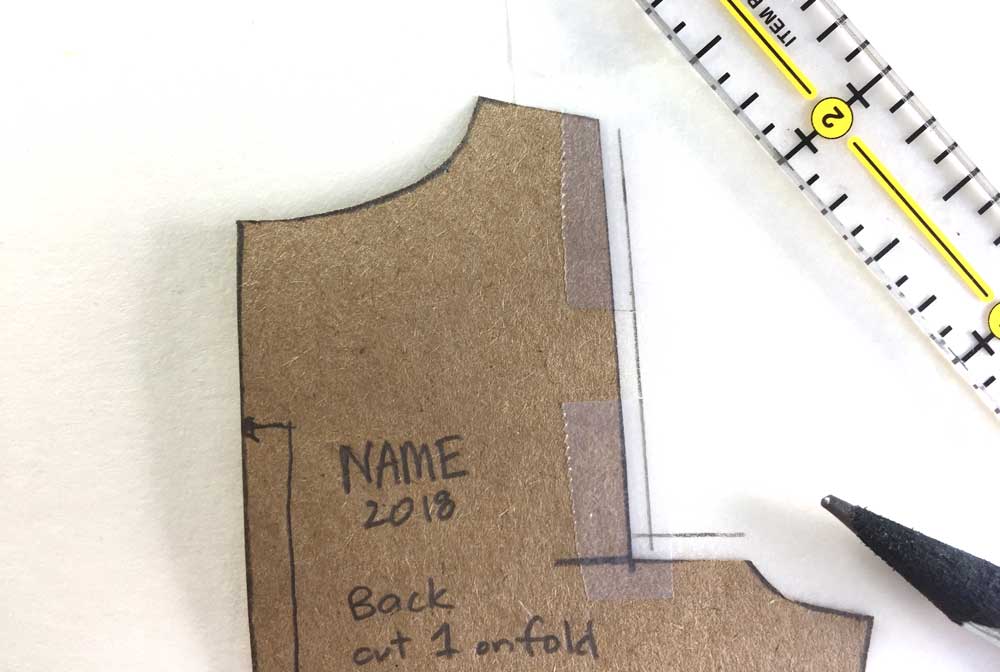
On the side representing your full side, draw an L (a backward L if it’s the left side or a normal L if it’s the right side) from halfway across the shoulder to the bottom of the armhole. Not the very bottom, just anywhere below that notch.
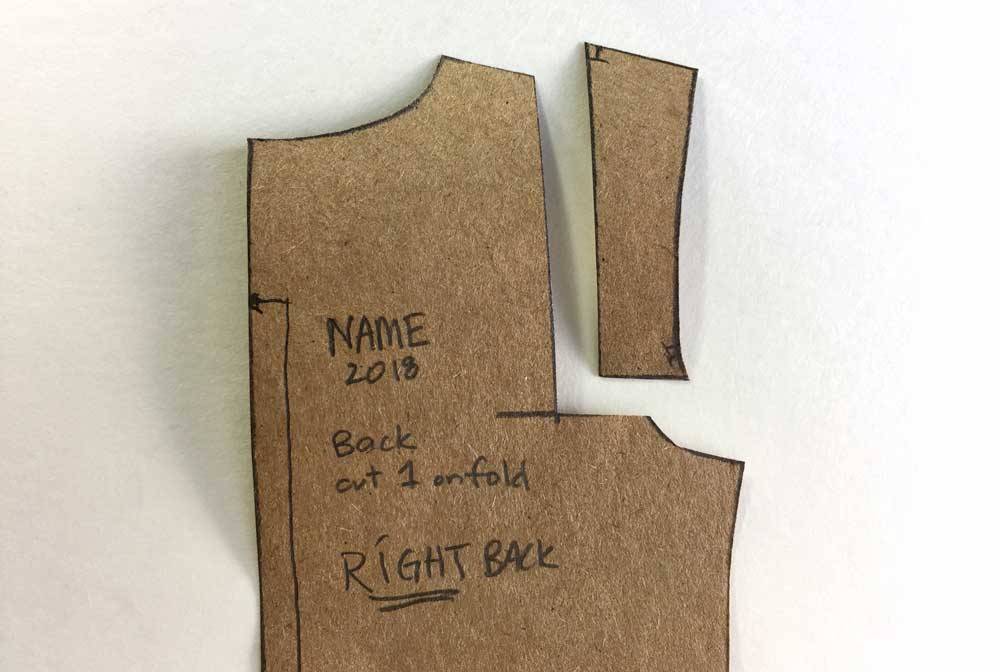
Cut the pattern apart on this line.
Tape some paper to the larger piece of the back bodice at the cut you just made.
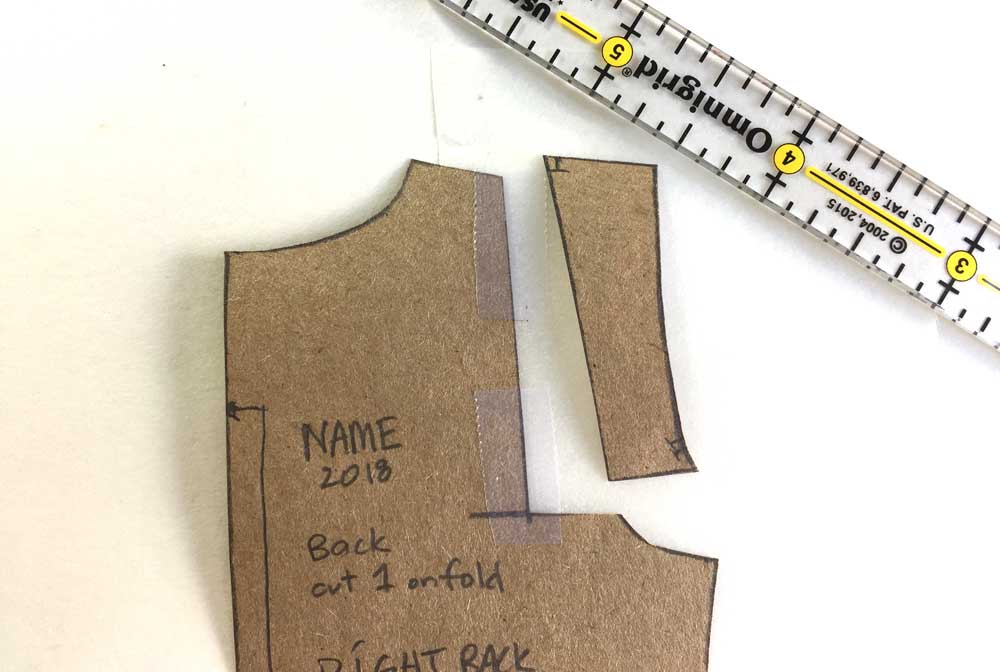
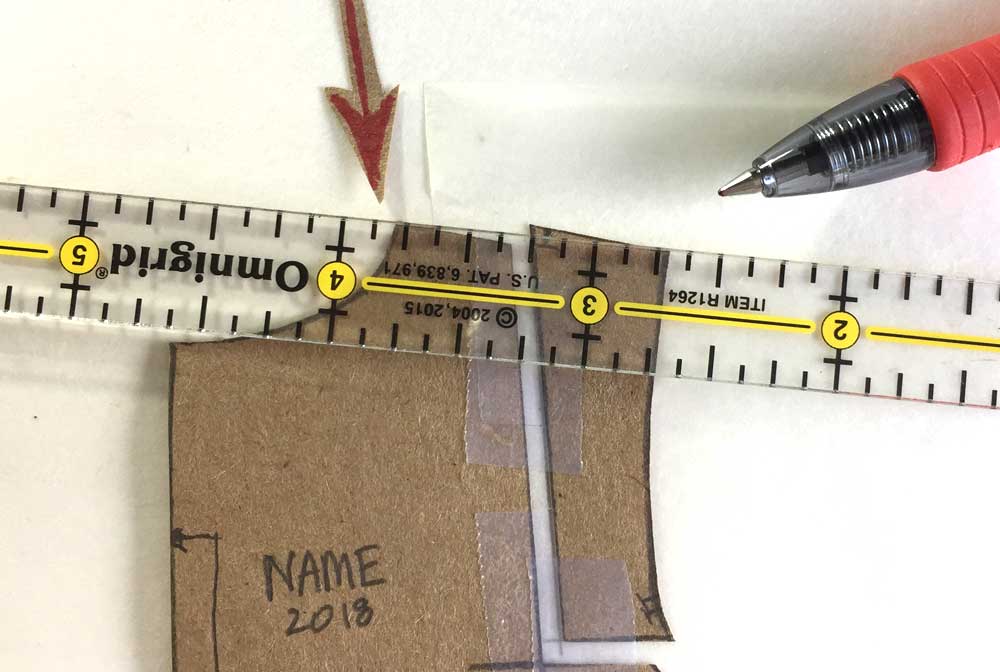
Measure out from the cut edges 1/2 inch or 2.5 cm.
A 1/2 inch (2.5 cm) away from the center back and a 1/2 inch up. Draw a line on the paper taped to the main pattern piece.
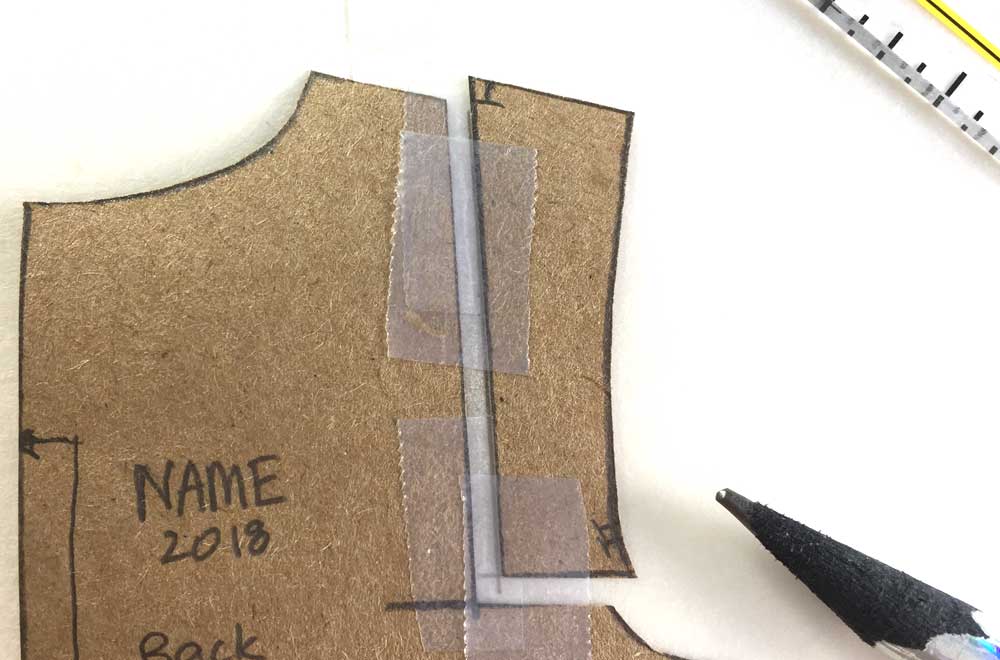
Tape the piece you cut away from the back bodice on to the lines you just drew.
You may need to adjust (increase or decrease) this amount after making the muslin of your garment. You will need more separation if the fabric still pulls across your back and less separation if the fabric “puddles” on your back.
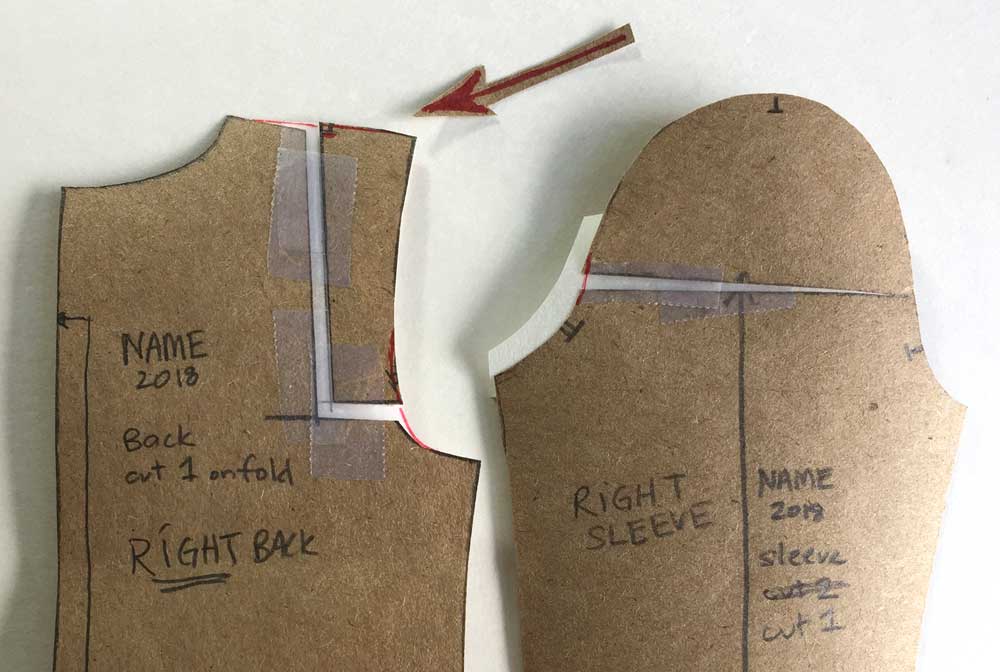
This alteration gives the full side of the back more length and width to fit over the fullness.
Smooth out the shoulder seam by keeping it the same (as it was before altering it) at the neck and letting it rise as it goes toward the armhole.
This is what Sandra Betzina said and I read that to mean placing a straight edge at the neck/shoulder corner and lining it up at the now raised shoulder/armscye corner. And that makes perfect sense.
Oh, and redraw that shoulder seam notch on your new cutting line

Smooth out the back armhole by splitting the difference between the two seamlines. Take away the same amount from the seam that is over as you add to the seam that is under. Use a curved ruler or french curve to find a pleasing and smooth curve that roughly splits the difference and draw it in.
Transfer the notches to the new seamline if you have to.
Back done, but what about the sleeve? It needs adjusting now that the back armhole is longer than the back of the sleeve.
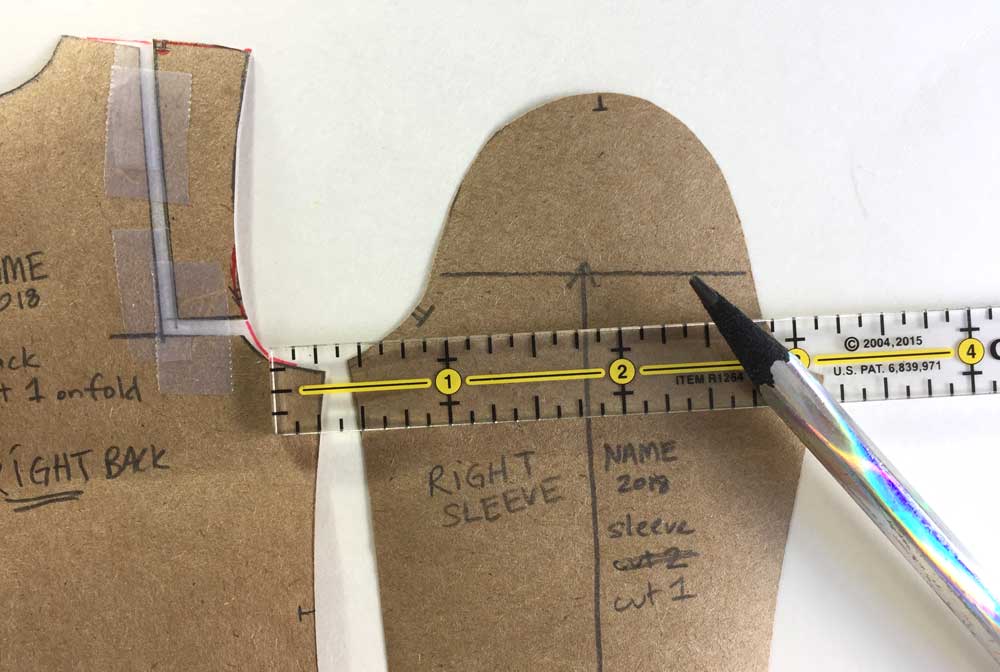
Draw a horizontal line across the sleeve cap above the sleeve notches. It needn’t be at a particular distance above the notches, just above them.
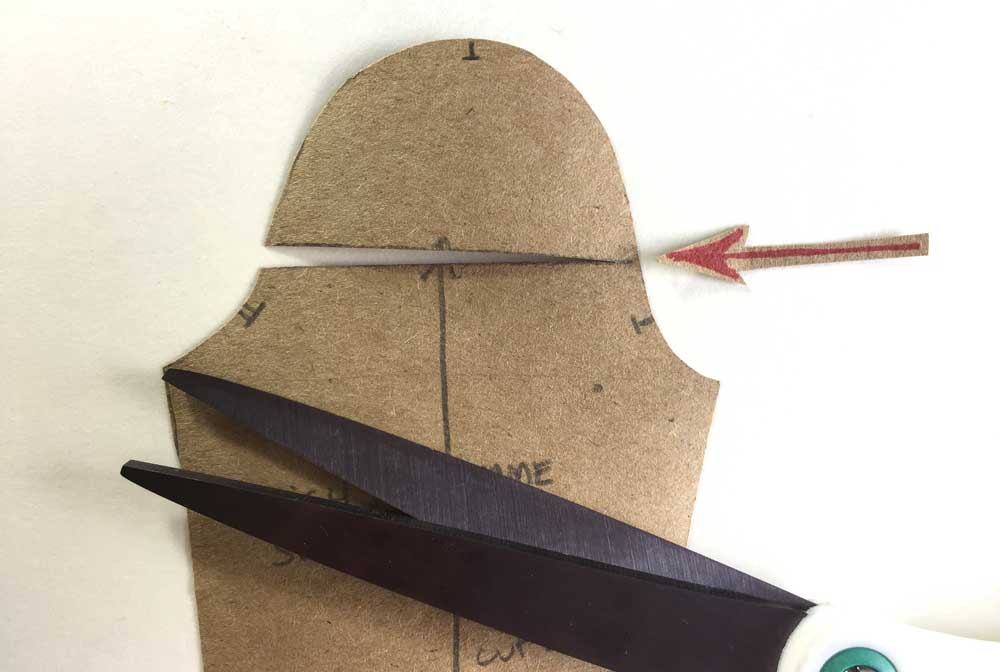
Cut to but not through the seam line at the front of the sleeve.
Lift the sleeve cap back the same amount you raised the bodice back (½” or 2.5 cms this first go around). By keeping the pattern attached at the front of the sleeve it will naturally taper the spread to zero at the front armhole.
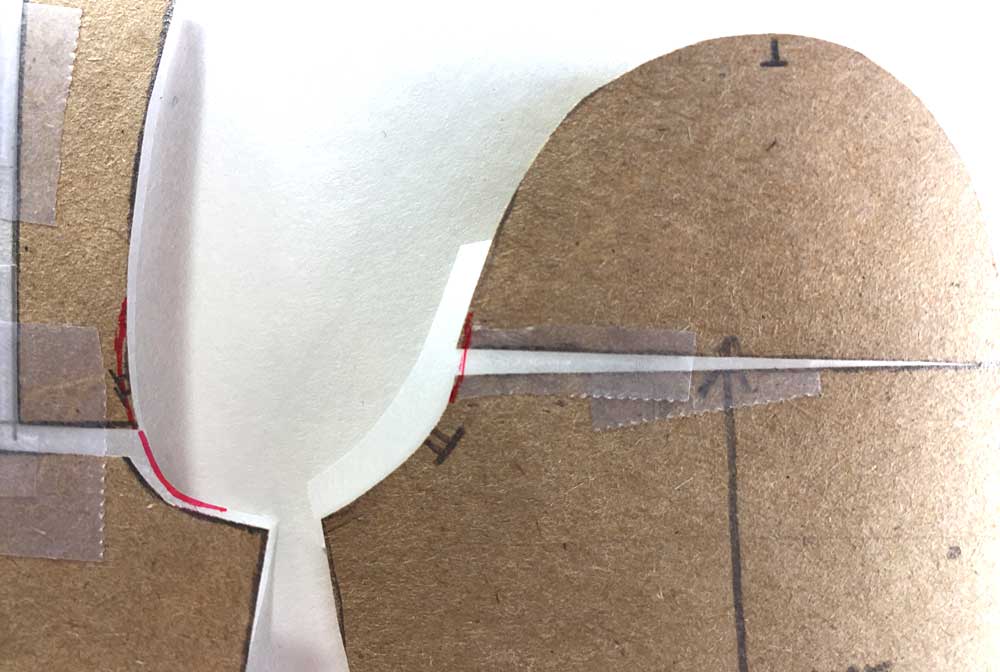
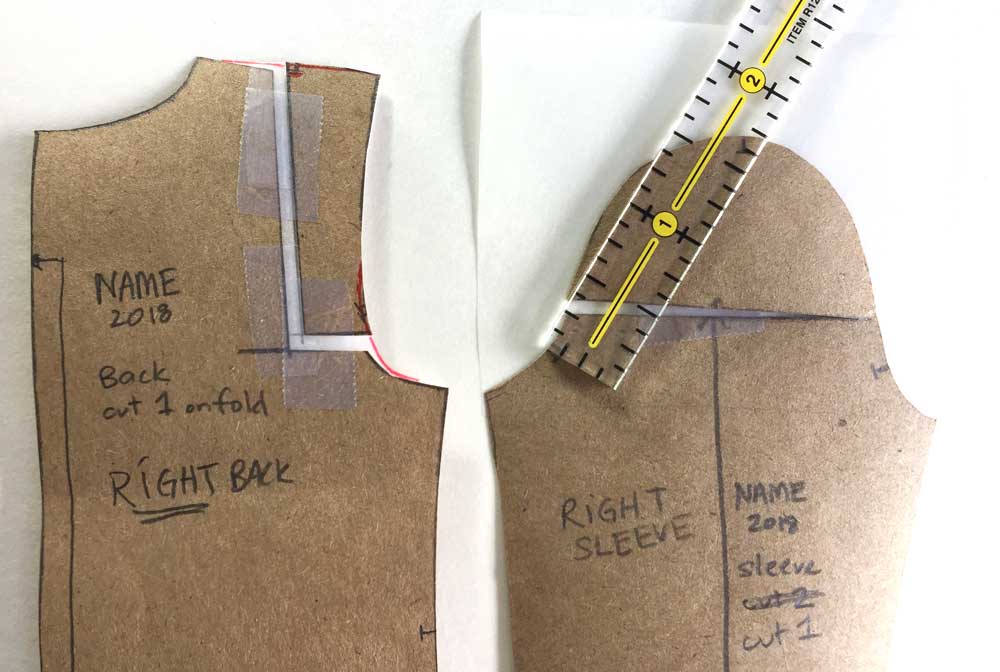
Again, tape in some paper to fill in the spread.
Smooth out the back sleeve cutting line the same way you’ve smoothed out the back armscye – split the difference.
The back shoulder seam on the full side is now longer than the front shoulder seam by a 1/2 inch. That’s okay. Instead of altering the front you will run an ease line (a row of long stitches) on that back shoulder seam. Pull slightly on the bobbin thread of that ease line to bring in or scrunch up the extra half inch. Of course, you want to spread the extra fabric evenly over the shoulder seam. Line up your shoulder seam notch when sewing it together. It should fit nicely.
Steam is always your friend (unless your fabric can’t handle it) to ease in fabric and after easing it in. Steaming can sometimes help you remove tiny puckers that occur when easing fabric.
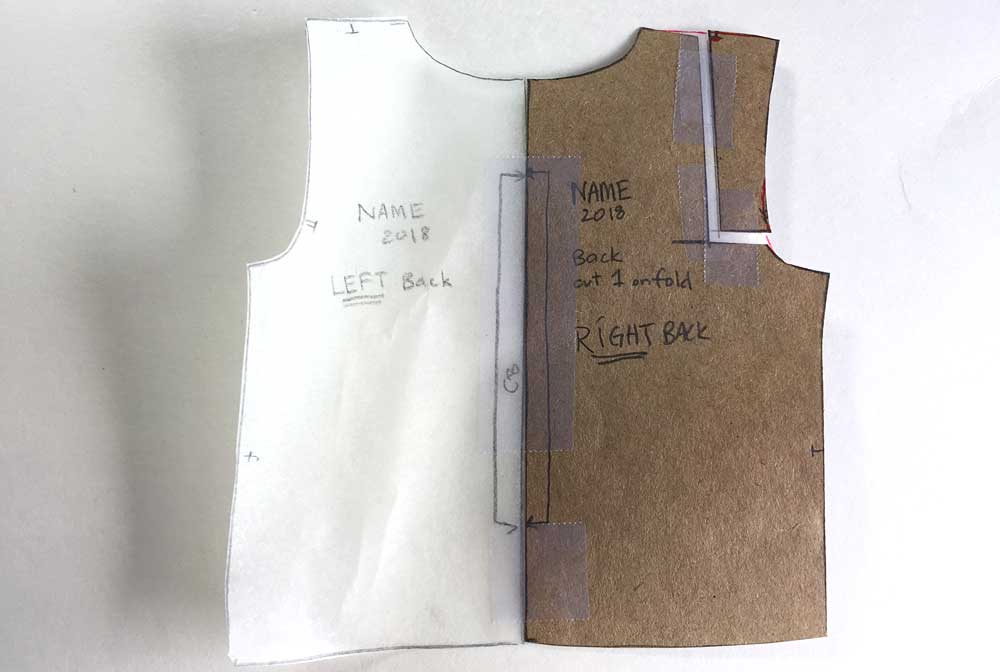
You’re done. You can tape the back pieces together along center back if it was marked “cut on fold”. With a whole back pattern you will not cut on the fold, but from a single layer of fabric instead.
Yokes and Raglan Sleeves
How do you alter backs that have a yoke across them or a raglan sleeve seam?
Simply put, you add what you need to those seams when you can.
You’ll still only alter the side of the pattern which corresponds to the fuller side of your back.
A yoke seam is a perfect place to add more length. Depending on where the yoke travels across your back, you might add a quarter inch to the back and to the yoke, or the entire 1/2 inch to the back bodice.
Then you will only cut down vertically to add width.
A raglan seam will work the same way.
I have plans to make more mini patterns and show you in detail how to do this back alteration for patterns that have back yokes or raglan sleeves. And when I do It will be right here. Thanks for your patience.
Thank you for these instructions! One question – when running the ease line on the sleeve cap after splitting the sleeve pattern piece and adding fullness in the back of the sleeve cap, would you place most of the “extra” just between the shoulder seam and the back notch? Or would you adjust the ease evenly between the front and back notches, going right over the shoulder seam?
I would ease the sleeve cap in evenly – well, line up that top notch in your sleeve pattern to the shoulder seam on the bodice. It’s usually a little forward just because you do need more room in the back of the sleeve. Then ease in the sleeve evenly between notches. That said, sometimes you have to tweak things for your own body. You can always play around with it – just baste 😉
Plus some patterns aren’t drafted all that great. If the sleeve pattern looks odd to you, it just may well be. You’re always allowed to change it
I’m glad you liked the instructions.
The alteration tips you’ve provided will help a lot with the “humped” side of my back, but what about the other side, which, because of the forward rotation of the rib cage on that side, is sort of concave, or “scooped out?” On that side clothes (tops/bodices) seem to be saggy. Any recommendations about addressing that? Thanks!
Ok, I had to think about this and what I keep coming back to is that you don’t want to overfit any garment. Overfitting is when you the garment is almost a second skin. You don’t want to overfit because you don’t want to accentuate the asymmetry. However, I hear you on the back bodice being too big. I have the same problem.
There are a couple “solutions” that come to mind – 1. Pad up the smaller side but I don’t think for this location that’s desirable or even doable
2. Follow the alterations for fitting a narrow back for both sides of the back bodice and still do the alteration for the shoulder blade on the side you need it. (narrow back first, then the shoulder blade)
3. You also probably have too much fabric length in the back since your torso is short. You need the length at the top of the back bodice to go over the shoulder blades. It’s from the mid-back down that there is excess fabric. Try shortening a pattern there, not just raising the hem to see if that helps.
4. Use a pattern that has a princess seam on the back bodice. It will be easy to take in some excess fabric in that seam on the one side that needs it.
5. Redraft a back bodice pattern to have a princess seam? I’m not sure about this one 😉 but no idea gets left behind
If you have a garment you made that is too big in the back try pinning out some length and some width where a princess seam would be. Just be careful to stay on grain so the garment isn’t skewed.
I sure hope this helps but you can always send me pictures (marysigler@gmail.com) to help me see what’s going on better.
Thank you for this article. I have spent many hundreds of dollars on dressmakers fittings and none of them have have come close to help me get it right. These articles have given me hope. I will read these again and again! God Bless You!
I’m glad you found these articles helpful. I really hope they will help you get a good fit.
I’m starting to sew. I have been trying to make the basic modeling of the body, but my measurements seem wrong for the model, there is a very big difference between the measurement of the height of the back and the height of front, could this be due to scoliosis?
I’m not certain. You may also have a slightly rounded upper back, a broad, muscular back or a shallow chest. The important thing is to remember everyone is asymmetrical. And to not overfit a garment. Overfitting would be similar to a leotard or a sloper (the basic block to make patterns from).
If you are modeling your torso to make a bodice sloper (or block) then you want to note all the differences. I suggest making a test garment in a solid basic fabric (muslin) for any non-knit garment you want to make. Test garments leave out details such as pockets. This post tells you more: http://www.thedailysew.com/2014/06/how-to-make-a-fit-muslin/
With the test garment on take pictures of your back and a good look at the front, so you can see where the fitting needs to be adjusted. Look for “puddles” and pulls in the fabric. Puddles indicate places to take in and pulls can be fabric straining, so more room is needed there. After a few garments and some good reference books like Sandra Betzina’s “Fast Fit” (check your library) you’ll know what adjustments your pattern needs before you even start.
Hi, I just found your article and it looks like something I need. I have scoliosis and the biggest problem is one hip higher than the other. It’s a pain when I have to hem a skirt. There is as much as a 2 ” difference and from one half of the back to the front.
I don’t have anyone to help me and so, I’m wondering if I can just make a skirt that doesn’t depend on it being even all the way around? Do you know of any patterns that I can look for?
Also, I think the idea that you have about wearing jackets and ss sweaters, not cover the hip area is a good one and looks good on me.
Thanks for the suggestions.
Hello, at first I thought of the handkerchief hem skirts and when I look for those patterns I found many skirts with asymmetric hems – So those might be an option. But, once you determine the difference between your hip height, you could alter the pattern before you even cut out the fabric, AND you don’t alter the hem, you add fabric between the hip and the waist. I’m going to write this up in a post to explain it all in detail
A high hip may not be so noticeable in a dress that does not have a waist seam, meaning, it hangs from your shoulders.
Here are some asymmetric skirt patterns to take a look at: McCalls 7813, McCalls 7725, Vogue 8956, and a knit option is Megan Nielsen’s Axel pattern
I have a client who is going to be in a wedding. She is wheelchair bound and I’m not sure if she has scoliosis but I want to do my best to help her. The dress is a simple V-neck bodice and V-back with spaghetti straps, attached to a skirt at the waist. I made a muslin copy of the top so I could get a better idea of how to alter her dress. In so doing, I could see that she is two inches shorter from under-pit to hip on her left side. The dress, when on, is way too high under the arm. My idea is to remove the boning which forces the dress to jab her and be very uncomfortable. Then tilt the skirt 2″ up, shortening the bodice on the left and reattaching the skirt. That would allow the dress to fall more appropriately under her arm. Of course it would look like I made a huge mistake while on the hanger but sitting in her chair it would look right. That’s my hope anyway and seems correct in my head. I’d like to ask what you think of this idea or if I’m way off in “re-engineering” the dress? If so, please offer advice. Many thanks.
That sounds right in my head too. I would make a muslin. The muslin doesn’t need to be a full length skirt just enough to give you an idea.
I’m away from home and all my books currently but I think you got it.
Thank you very much for this clear instruction! It has been so difficult to find information concerning this alteration and/or understand the information. A couple of questions about the process:
a) Do your brown pattern pieces as shown include seam allowances? Or, do you trace off the pattern pieces without the seam allowances (ie, before making the alterations)?
b) When drawing the “L” on the back bodice, should the longer leg of the “L” be perpendicular to the straight of grain? Or is it drawn at an angle?
c) I hope you can find the time to write about altering back patterns that have a yoke across them … or a raglan sleeve seam … as you mentioned. I get the general idea, but would welcome specifics …
Thanks again,
Great clarifying questions. I should have been clearer.
a) You can leave the seam allowance on your pattern to do this alteration.
b) the vertical line of the “L” is parallel to Center Back (Which is usually the grainline but not always) You don’t need to be super precise, just generally straight up and down.
and c) Yes, I need to add the instructions for yoke and raglan style tops. I am aware more and more of the exclusivity of clothing and I want to be a resource for helping to correct this problem.
Thanks for this post. I have a young client with scoliosis and her grad dress needs altering. She has a very prominent shoulder blade. How do I snug in the back zipper area to make the dress fit closer to her spine. Just synch in the side that is looser than the other. Suggestions are welcome
I would try a couple of approaches while keeping in mind not to “over fit” the garment.
1. pinch fabric out of that back, side piece next to the zipper or take the excess out at the zipper seam.
2. pinch out a fisheye dart below the shoulderblade to the waist. (and maybe some fabric comes out at the side seam?)
3. some padding might be added to the hollow area.
4. a combination of all of the above (adding the padding after the excess fabric is removed)
Unfortunately, I don’t have much alteration experience to really help here but this is where I would start.
Is any alteration necessary to the front garment pattern pieces? I’m trying to draft a pattern for a gentlman with scoliosis. His right shoulder blade is 1.5 inches higher than the left. So, this alteration is helpful for the back of the garment. Is it necessary to make any adjustment to the FRONT. I’m struggling with how to proceed with the yoke which extends over the shoulder. Thank you for any help.
yes. If the shoulder is higher you’ll have to adjust the front a bit as well. It’s adding in that extra height (1.5″) to where it’s needed, which happens to be bisected with a (shoulder) seam. In that case, I would add some extra length to the front and to the back. Probably not the same amount to both because the seam isn’t straight down the middle. Like most yokes, and shoulder seams, it sits a little forward so more length is added to the back than the front of the shirt/garment.
If you can drape on the client that’s the best. First, get the grainline straight down center back and center front then see where the shoulder seam should be on him, for each shoulder. From there you can trace off the muslin to make a flat pattern.
And, get those shoulders altered first since a top hangs from the shoulders. That adjustment will throw off everything below it, so work from the center out (grain line and width added) then the top down (shoulders, chest, waist, hem)
(since you are drafting a pattern for a client you probably know a lot of this already I just want to be clear for all readers 😉
Hi Mary. This is a great article. I have recently been diagnosed with scoliosis. Please can you tell me if you ever did the updates for yoke/raglan patterns that you mention at the end of the post. I can’t seem to find them. Many thanks. Laura
I’m happy this article is helpful and embarrassed that I never finished the post about the raglan and yoke patterns. At the same time, I appreciate the reminder to get it done and published.
Is there any other style you would be interested in learning how to adjust?
Can I send a photo of my T-shirt that pulls to the side at the back to the hip where I have a fatter shoulder blade I have made T-shirts that don’t do that but I have lost my pattern lam going crazy trying to fix this thanks if you can help
This is the clearest set of instructions for the scoliosis adjustment I’ve found. I am struggling to adapt them to a princess seam pattern. Is it possible to adapt this to both a sleeve princess seam and shoulder princess seam? Thank you!
Yes, You could adapt these to a bodice with a princess seam. If the princess seam goes up to the shoulder you could use the princess seam line as the vertical cut in the “L” . Add to the seam line a 1/4″ on each side and cut across the side back piece (somewhere above the sleeve notch) to get the horizontal cut of the “L”.
For a princess seam that ends at the sleeve seam, draw the “L” only on the center back piece (or the left or right half of the center back piece) The horizontal part of the “L” will be either above the princess seam, or, the princess seam line becomes the bottom of the “L”.
If it gets tricky, tape the bodice pattern pieces together as if sewn, trace off as one, do the alteration, and then redraft (copy off) the princess seam onto you altered pattern. You’ll cut the traced pattern on the princess seam and then add seam allowance to that seam. Good luck. You got this!