

When trying to teach myself how to knit I found decoding the pattern was, and still is, the highest hurdle.
If you want to sew but the sewing pattern is confusing, daunting, or just leaves you in doubt about even trying tp sew, let me clear things up for you, please.
This is your How To Read a Sewing Pattern 101 and if you rather watch How to Read a Sewing Pattern you can do that here:
When you hear folks say “the big 4” or “Commercial pattern companies” they are referring to Simplicity, McCalls, Butterick and Vogue patterns. Also included in that group should be New Look and Burda.
The big 4 have been in business for decades. Their patterns can be found nationwide in big retail stores and online. They’re drafted pretty well, the instructions are edited, and they look pretty similar to each other.
Independent pattern companies are all the other pattern companies. These were started by individuals or small partnerships to give hobbyists more choices and clearer instructions. This sounds awesome except for one major hiccup – the quality of pattern drafting can vary greatly and they draft their master pattern to whoever they want, usually themselves, so their standard might be long torsoed, curvy, slim, wide hips, small chested, etc. Basically, you will need to try a few before you find a company you like.
Read reviews – not IG feeds – and ask people you know who sew garments for companies they like to use.
But let’s move on to deciphering the pattern
The photos will show a few patterns from different companies to compare the differences and similarities from brand to brand.
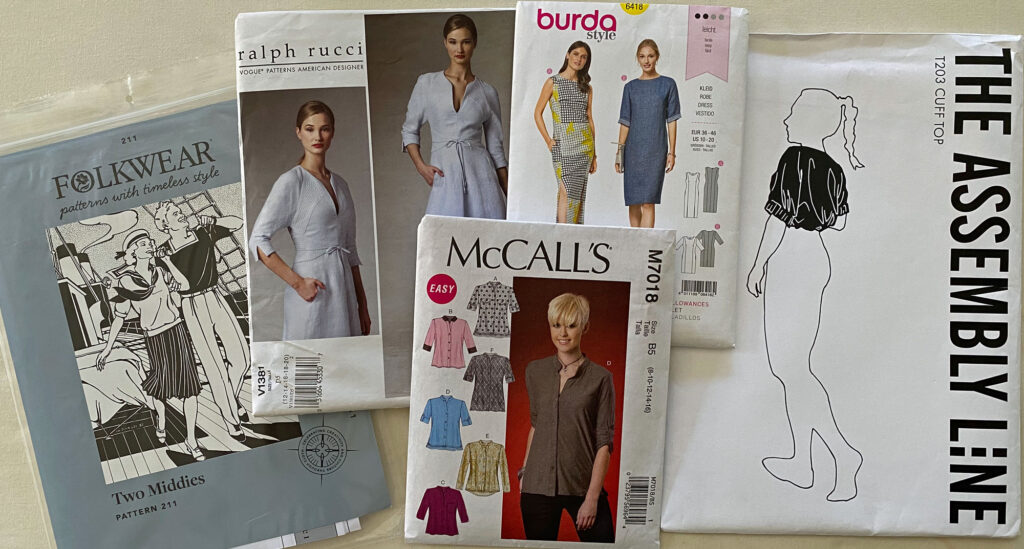
The Front of the Pattern Envelope
The Garment
The most obvious and necessary information is a picture or illustration of what garment the pattern will make. Some companies like to use photographs, others illustrations, sometimes you will see both.
The Name
Companies will name or number the style. For example, the McCalls pattern is named m7018. The Vogue pattern is a collaboration with the designer Ralph Rucci so it includes his name. Folkwear and The Assembly Line give both a name and a number to their styles.
The Sizes Found in the Envelope
Typically but not always on the front, is the size or sizes the pattern makes. Burda is a European company and therefore has Euro and US sizes. Some patterns put the included sizes on the back.
Pattern Variations
When a pattern has style variations they are shown on the front. Many times one style is photographed and the variations are illustrated

The Back of the Pattern Envelope
The back can look very different from brand to brand. They can be sparse, medium, or very dense with print.
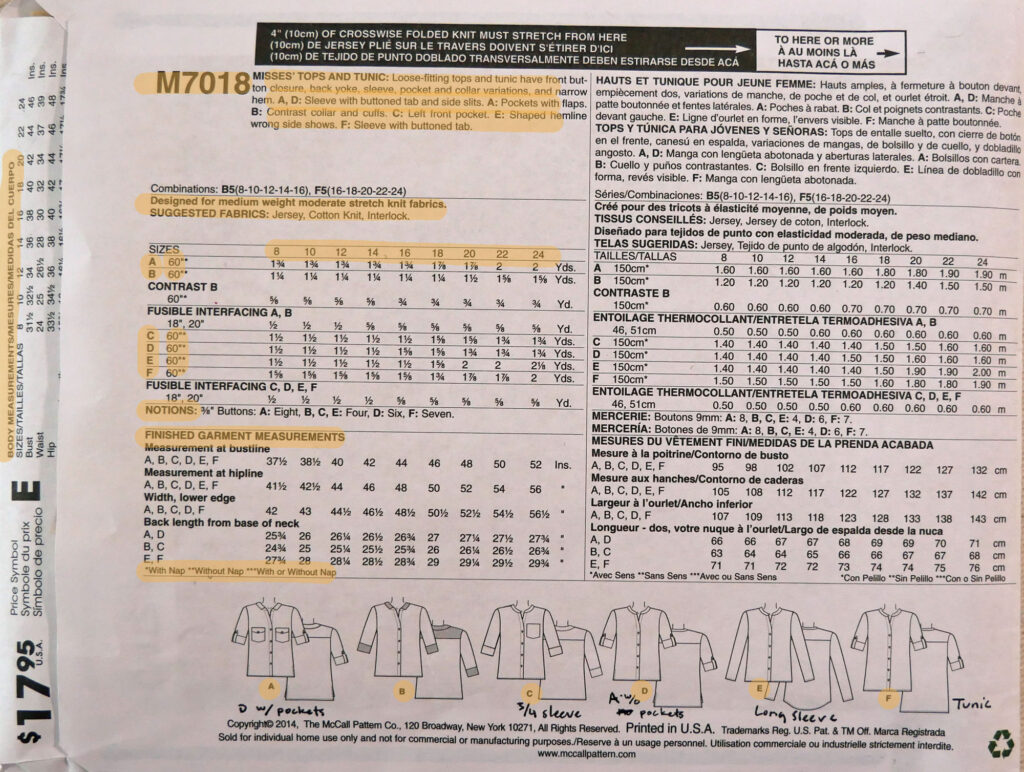
This McCalls pattern is a good example of a typical pattern envelope from the “Big 4”. It has a lot of information in two languages which makes it look more overwhelming than it is.
The Flats
The first thing I look at on the back of the envelope are the flats or technical drawings. They’re line drawings of the garment showing all the details like inseam pockets, topstitching and openings – is it buttons, a zipper, and if a zipper, where is it, center, side? They also reveal how much shape is designed in the garment; is it actually like the photo on the front or boxier?
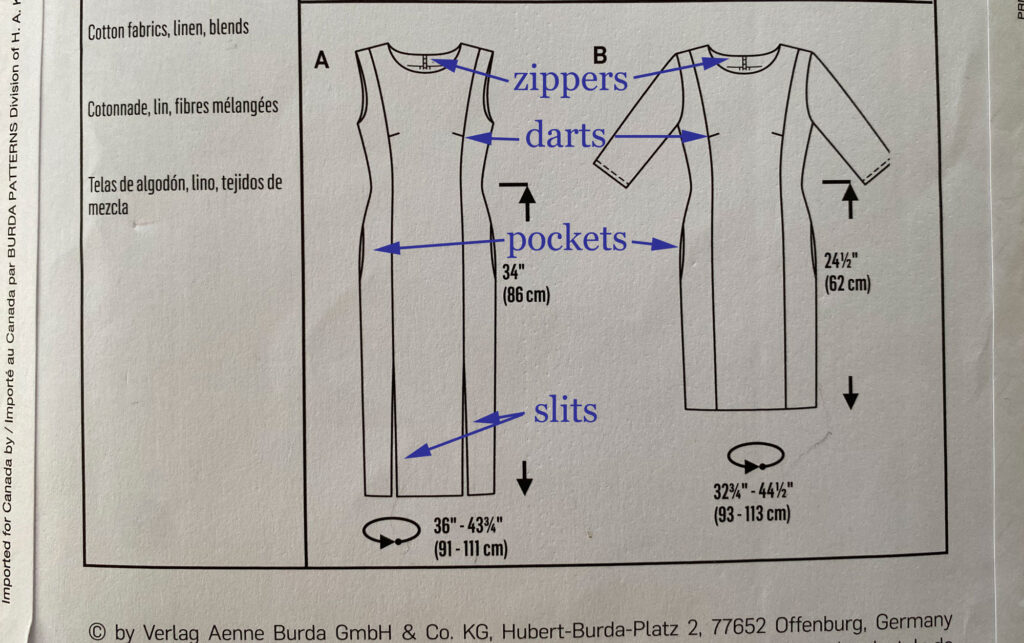
For this Burda pattern, I can see an inseam a pocket, a slit but just on one variation, a center back zipper, and two bust darts.
The technical drawings show you exactly what is happening.
The Description
Along with the drawings you’ll find a written description of the style for each variation They’re telling you what it looks like in case the photo and the drawing aren’t clear.
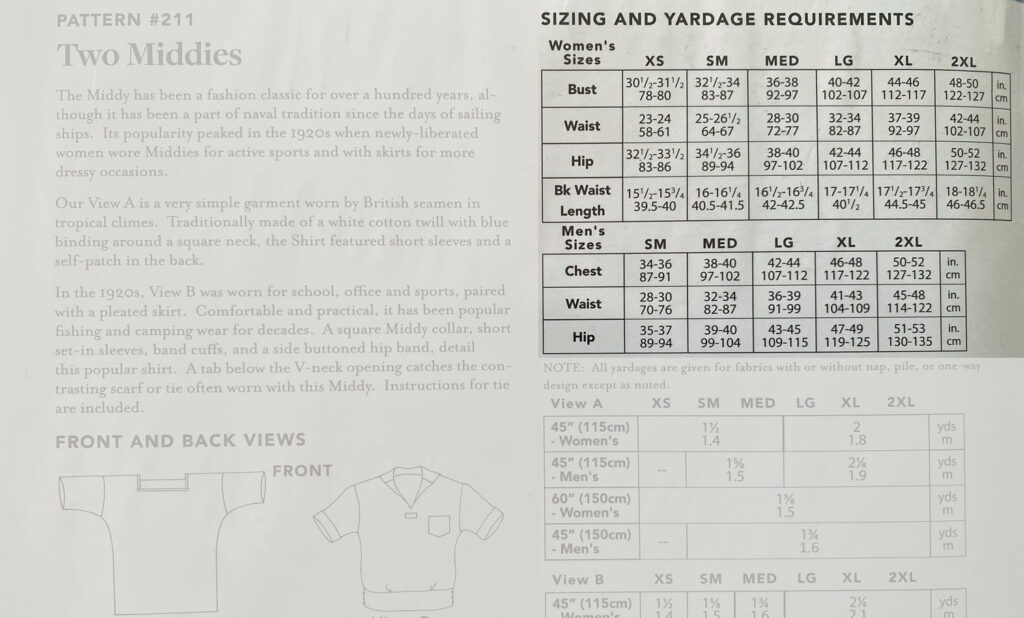
The Size Chart
You’ll also see a size chart on the envelope (Burda prints theirs on the pattern sheet)
Let’s talk about the size charts. This is important
The size chart on a pattern has no relationship to the sizes of garments you buy at the store.
And every pattern company has their own size standards so you might be a 16 in Vouge and a 10 in Liesl + Co.
Take your waist, bust, and hip measurements with a tape measurer over your underwear as you would wear the finished garment. Find your measurements on the pattern’s size chart and pick the corresponding size to sew. Remember it’s an arbitrary number the pattern company assigned to their size.
There are two schools of thought about choosing a size
- 1. Items like tops and dresses hang from your shoulders you choose the size that fits your shoulders. Pants and skirts hang from your waist so choose a size based on your waist
- 2. Choose the pattern size to fit your smallest part and then expand the pattern in areas you need it. The wisdom is that expanding a pattern is easier than shrinking it.
For example, If my waist is 40” my hips are 38”
- In School of Thought 1: I would choose the size for the 40” waist because the pants hang from my waist.
- In School of Thought 2: I would choose the pant size that fits my 38” hips and then add to the waist area and waistband.
Whichever way you go choose a size based on the pattern’s size chart and NOT, NOT on what size you wear in store-bought garments.
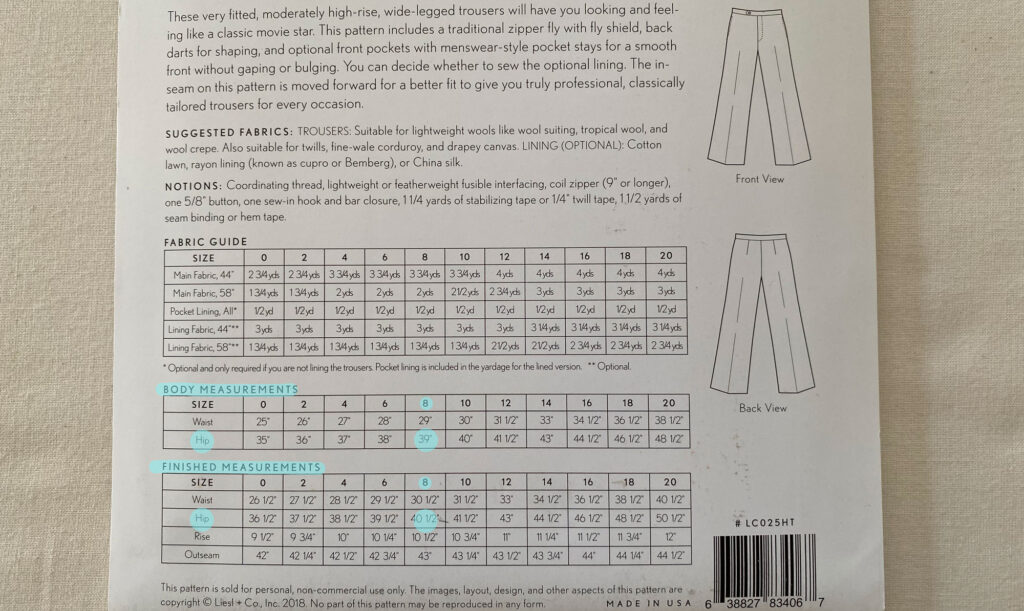
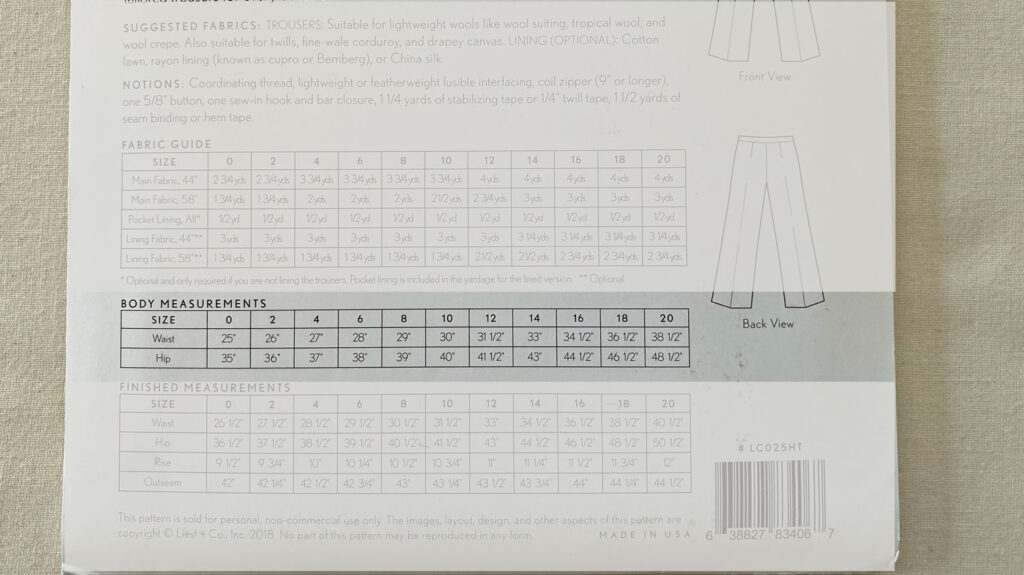
Finished Measurements
Quality patterns will also tell you some of the finished measurements of the garment. This lets you know how much ease is built into the style. Ease is also known as how loose or tight the garment is designed to be.
These trousers above are not jeans, they are designed to hang away from the body but they also aren’t baggy. We can see there is less than a 2” difference between the body measurement and the finished garment measurement.
Having the back length finished measurement, from the base of the neck to the waist, is handy because if your torso is longer or shorter you can lengthen or shorten the pattern before you cut the fabric.
The Fabric Chart
The back of the envelope also lets you know how much fabric you need in order to make the style and size you want.
This is almost always a chart. Pick the style and size you want to sew in one row or column and follow down or across to find the corresponding amount of fabric needed.
Always check the width of the fabric stated in the chart. Most fabric you buy in the store or through an online fabric retailer comes in one of two widths, 45” wide or 55” to 60” wide. (You can buy vintage and hand-woven fabrics narrower and quilting fabrics wider)
When a pattern gives the yardage for only wide fabric it is because a pattern piece for the style requires wide fabric or the fabric that the pattern suggests only comes in a wide width (as most knit fabrics do)
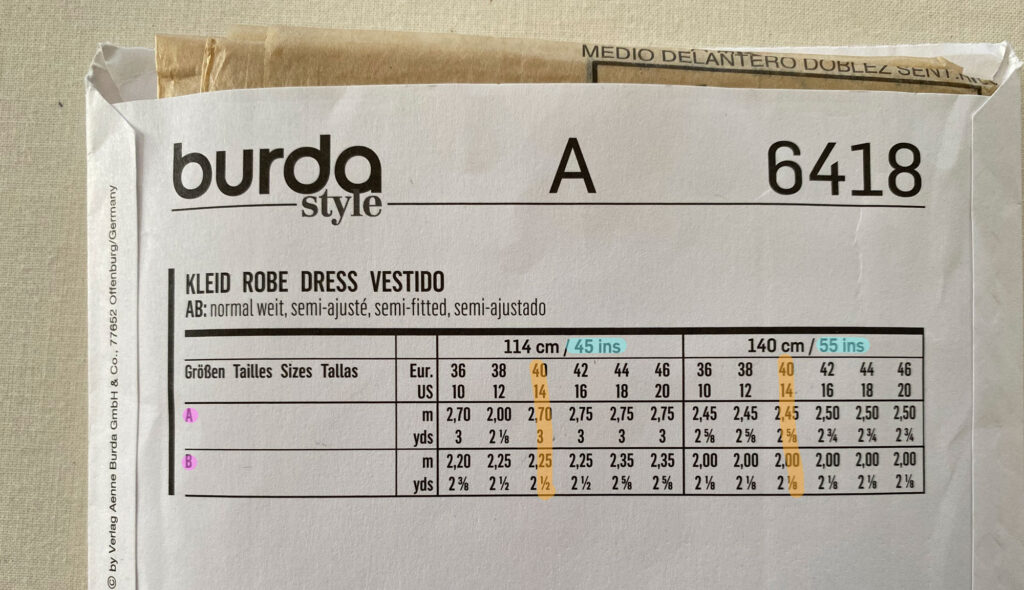
This Burda pattern fabric chart divides it by style (there are 2 variations in this pattern) and width of fabric. For example, if I am making a size 14 and I have 45” wide fabric I need 3 yards for style A and 2 1/2 yards for style B, or if I’m making a 14 and my fabric is 55 “ wide I need 2 ⅝ yards for style A and 2 1/8 yards for style B.
It’s important to know if the yardage given includes fabric nap and if any sort of print is unsuitable. Frequently you will see “Not suitable for obvious diagonals”
I have a post and video all about this called “What is Fabric Nap?”
A nap is a one-way design on the fabric or a pile like velvet. If you want to use a print fabric you need to look for fabric nap.

Yardage with nap included allows you to place all of the pattern pieces going in the same direction when you cut it from the fabric. If your fabric has a nap but your pattern’s yardage chart says “without nap” you will need to buy extra fabric to make that garment out of that fabric.
Some patterns do not mention nap and I have learned the hard way to assume it is without nap if they don’t mention it. (Looking at you The Assembly Line)
Fabric Suggestions
The fun part of sewing is picking fabric you love but check and double-check that the type of fabric you are buying works for the pattern you are sewing. You can find this under “Suggested Fabrics”
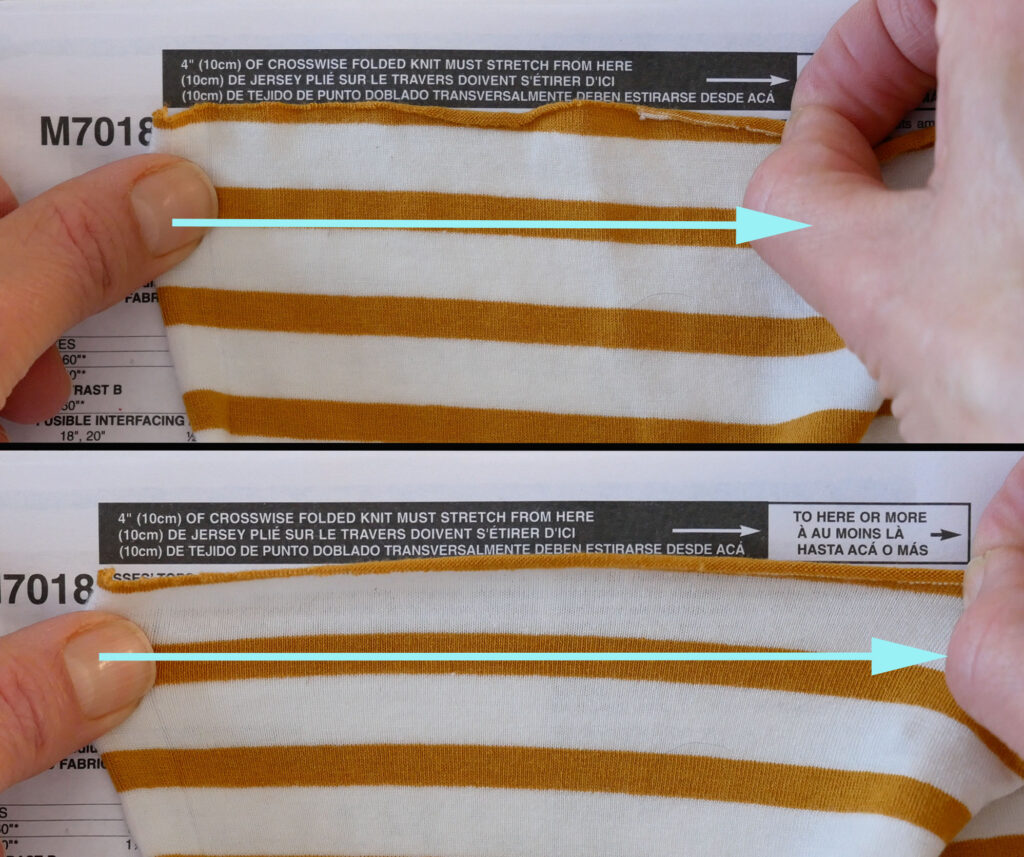
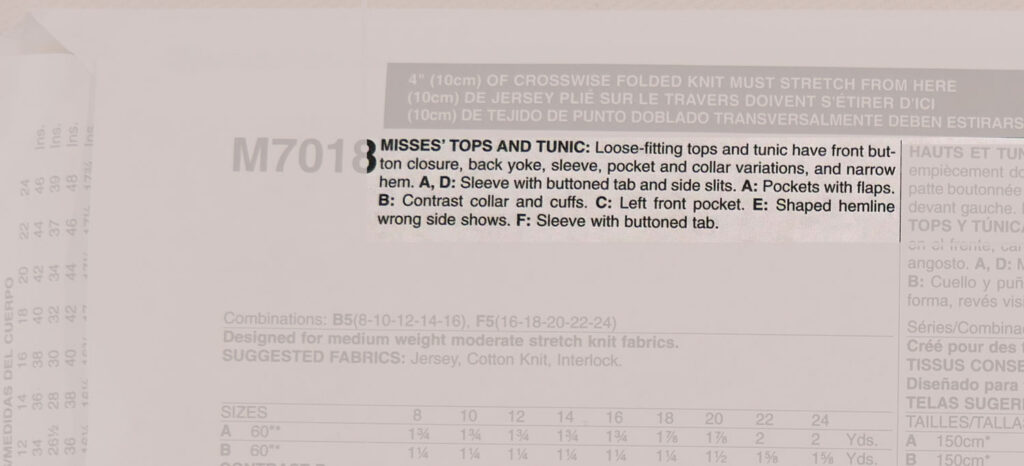
On patterns designed for knits you’ll almost always find a stretch guide showing you how much stretch the fabric needs to be suitable for this pattern. Sometimes they only tell you, “a 20% stretch” which is a pain as there is math involved and I can’t tell you the secret because I don’t know it.
But a stretch guide is the best. To use it line up your fabric on the printed guide nice and flat without pulling or stretching it. Then stretch the fabric to where the guide says it needs to stretch. If the fabric can stretch that far and recover then there’s enough stretch in the fabric to use for this pattern.
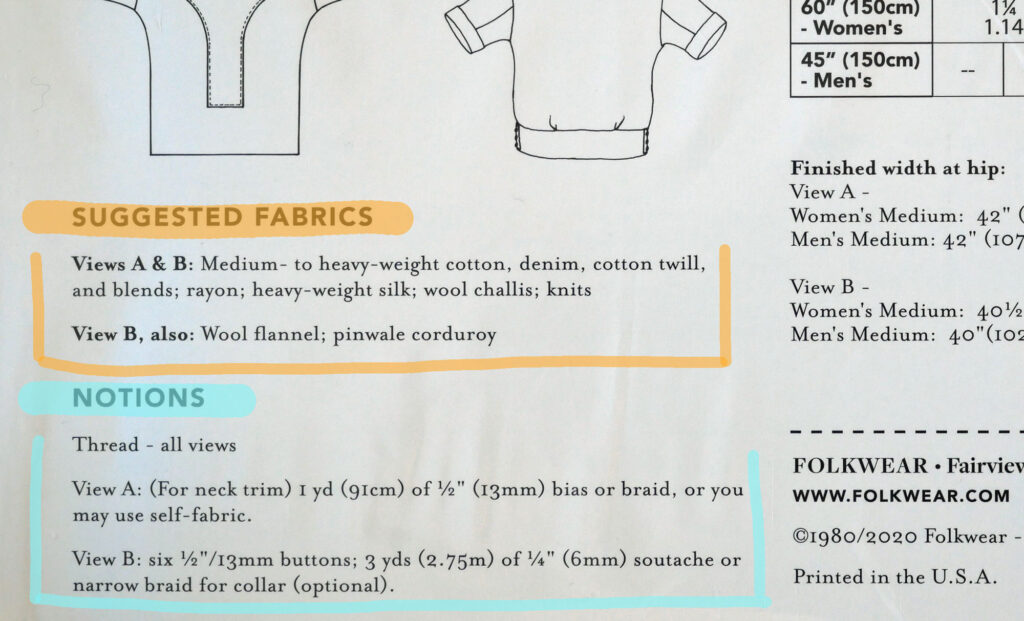
Take a look at Folkwear’s suggested fabrics for both views: medium to heavyweight cotton denim, cotton twill and blends, rayon, heavyweight silk, wool challis and Knits. View B can be done in Wool flannel and pinwale corduroy. All of these are pretty substantial fabrics so if I pick a knit for view A I’m going to pick one that has some heft to it not a really slinky or lightweight knit.
The Burda pattern suggests cotton Fabrics, linen and blends. It’s more vague but we know it’s a woven fabric, not knit, and that it probably is mediumweight.
All patterns will give you fabric suggestions. Some are more detailed and some are very vague but it is important to follow them if you want your project to turn out similar to the garment on the front because the type of fabric you use affects the drape of the garment.
Buying fabric in person can help with this as online descriptions can be lacking. There’s nothing like feeling the fabric to tell you how stiff, heavy, drapeable, sheer, etc, a fabric really is. Plus a dedicated fabric store has knowledgeable staff (I assume) that can help you decode any fabric suggestion.
Alas, if you live in a smaller city or town like myself you are forced to buy online and search out fabric stores when traveling. (Not always a bad thing)
The Notions
Notions are what else you need to construct this garment. What you need, like buttons, zippers, elastic, what size you need it, ½” buttons, 7” zipper or ¾” wide elastic, and how much or many you need, like 6 buttons, 1 zipper, and 1 yard of elastic. And if the pattern has style variations the pattern will tell you the notions for each variation because it can differ.
Often you’ll also need interfacing and lining which are listed under yardage needed because these items come on the bolt and you buy them by the yard.
What is Inside the Pattern Envelope?
Inside you will find, the pattern sheets, with the pattern pieces printed on them and the instruction sheet(s)
The Instruction Sheet
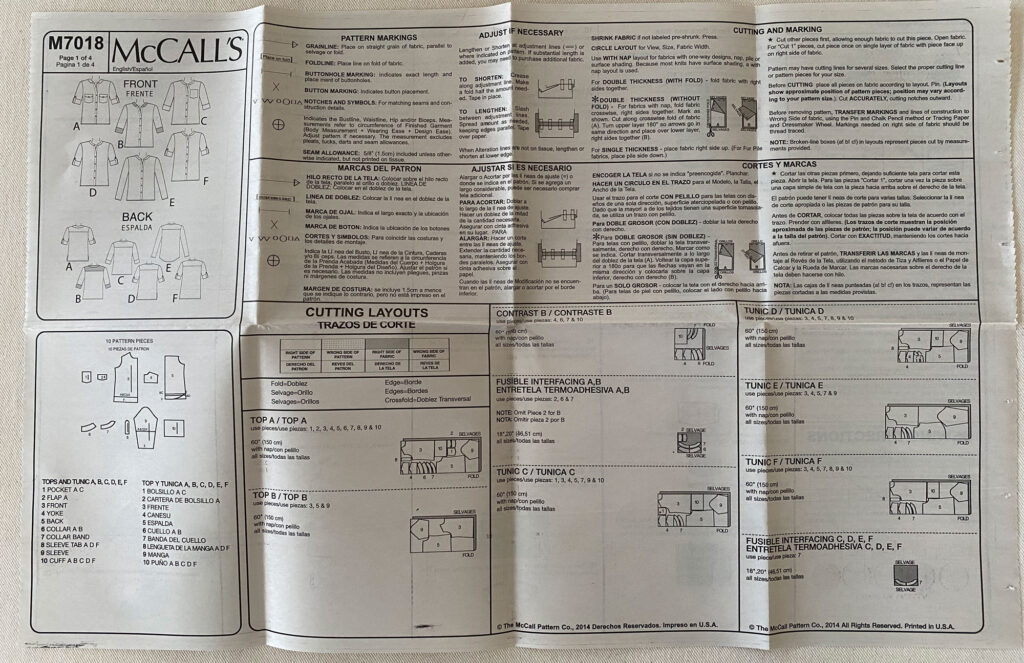
The instruction sheet has more than just the instructions on it. The sheets should be numbered. The “Big 4” patterns use large double-sided instruction sheets that are numbered 1 of 4 or 2 of 4 meaning this is the first or second sheet out of four total. Many independent pattern companies will print the instructions as a booklet.
The Drawings
Not always but sometimes, the flats are reprinted on the instruction sheet so you do not have to refer back to the envelope to remember which variation you are sewing
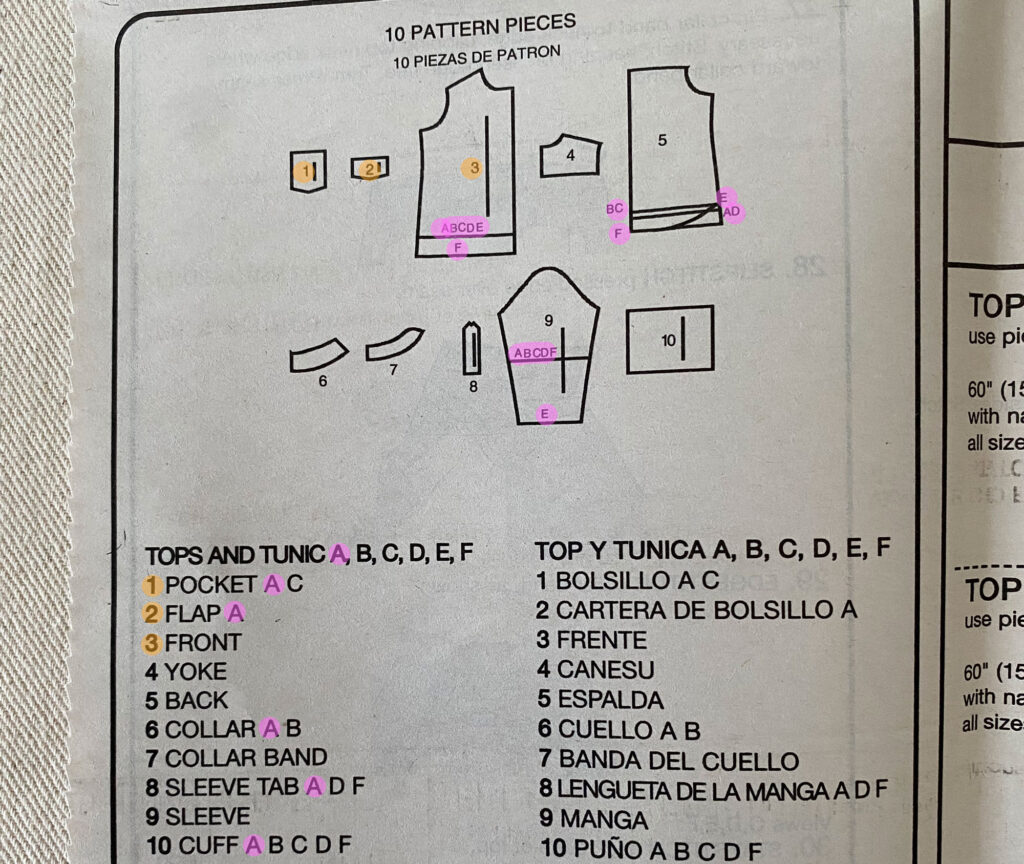
There is also an illustrated guide to the pattern pieces. All the pieces are illustrated and numbered as they are on the pattern sheet. On patterns with variations which pieces you need for the different variations is noted. For example, the pocket, piece number 1, is used on views A & C. So the pocket piece, number 1, is followed by an A and a C. The front piece, number 3, is used in all the variations and therefore has no view letters following it in the key.
The guide above shows us that one front, one back and one sleeve pattern are to be used for both the long and short-length variations. You see the cutting line going across those pieces for the shorter versions.
The Writing
There is a lot of writing but don’t let that put you off. We can break it down, section by section.
All instructions should have a key for the symbols they use on the pattern pieces, like a map. (Highlighted in blue above)
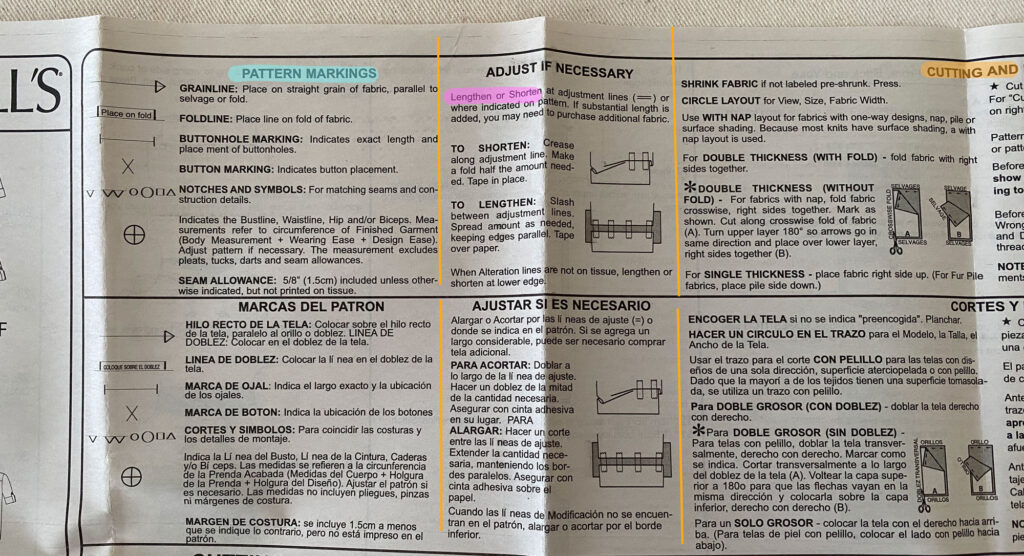
Sometimes they have simple explanations for pattern alterations you can do before you cut the fabric. This McCalls pattern above shows you how to lengthen or shorten a pattern and the symbol, two close together horizontal lines, you will find on the pattern for where to do this alteration (highlighted in pink above)
Liesl + Co always includes an explanation for how to do a bust adjustment.
Another helpful extra is the Cutting and Marking tips (highlighted in Orange above). These are tips for prepping and cutting out the fabric, cutting the pattern, and marking the pattern for construction – I’ll have a post and video all about this in a couple of weeks, and when it’s out a link for it here.
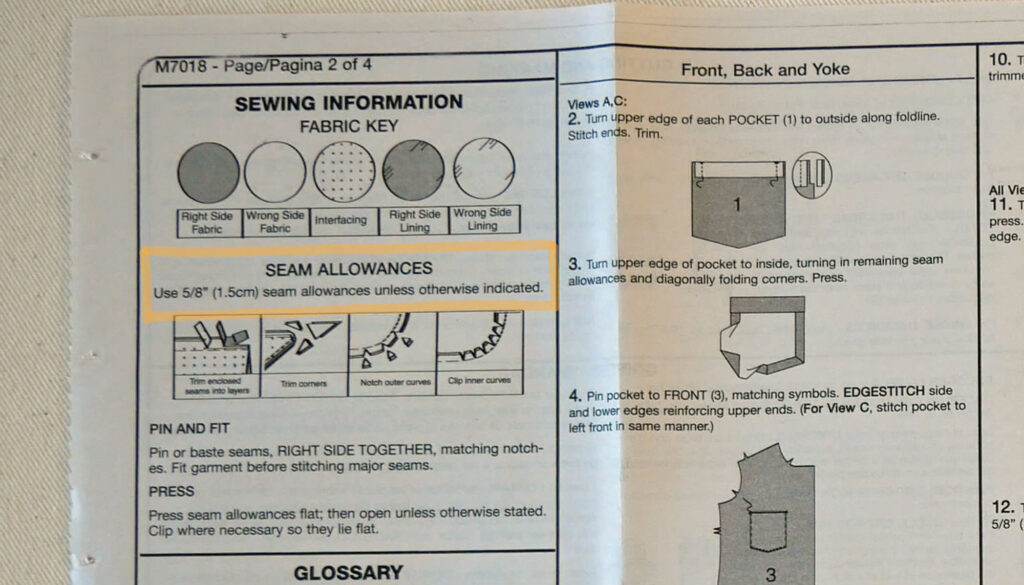
The most important information to look for is what seam allowance you will be sewing with. Not all companies use the same amount and not all patterns will use the same seam allowance for every seam – pay attention.
I find it particularly lazy and cruel on the pattern companies’ part to hide the seam allowance information in amongst paragraphs of text. Please, put it in bold, extra large, and all by itself.

The Cutting Layouts
The cutting layouts are little maps showing how to place the pattern pieces on the fabric so they all fit. Sometimes these are printed on the pattern sheet, not the instruction sheet.
It’s very important to match the correct layout guide for the view, and size you are cutting and the width of your fabric.
The guide will tell you how to and if to, fold the fabric for cutting. You will have a separate guide for lining and sometimes a guide for interfacing. Refer back to the illustrations’ key for the wrong side and right side of the fabric to read the layout guides.
Ultimately, you choose to cut with the right or wrong side of the fabric up but when starting out it’s always suggested to follow the instructions. As my professor use to say, “You have to know the rules to break the rules”
The Glossary and Construction Tips
There is almost always a glossary for construction terms that will be used in the sewing instructions in case you are unfamiliar with them. Some independent pattern companies define every little term which is helpful if you are a beginner.
You will not see an over-explanation in vintage patterns because every home sewist used to have a copy of a general sewing reference book. Either Vogue Sewing (my favorite) or Reader’s Digest Complete Guide to Sewing. Nowadays you can turn to YouTube – and by that I mean you can watch The Daily Sew on YouTube, of course 😉
And usually, there are some sewing and construction tips like how to clip curves and a reminder to press your seams as you go. And yes, pressing seams is actually important and makes a huge difference in the appearance of your finished sewing project.
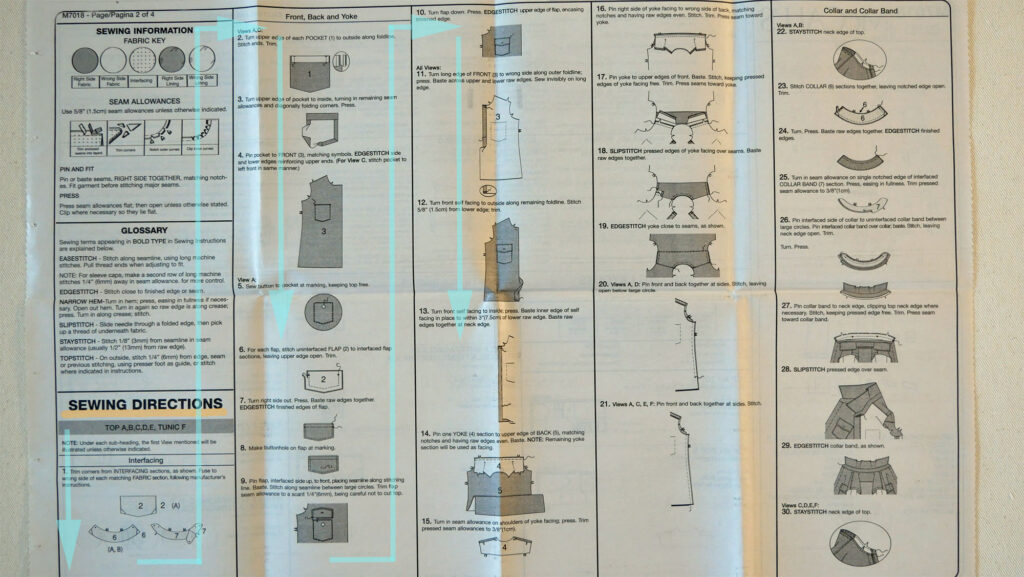
The Instructions
Finally, we get to the step-by-step instructions for the construction of the garment. And if you’re lucky there are lots of illustrations. Plus you should have an illustration key nearby to clarify what color or shading represents the right and wrong sides of the fabric, and the interfacing, in the illustrations.
Some independent pattern companies like to use photographs and not illustrations. I have mixed feelings. The photographs, unless printed at a very high resolution and in color (costly?) can be muddy and not as clear as a simple line drawing would be. This is for both independent patterns you buy printed and PDF patterns that you print at home. And I print my pdf instructions because I want a break from screens when I sew.
Note: sometimes an independent pattern company’s illustrations are WRONG. I’m always miffed when this happens but it happens more frequently than it should. I think it is because they hired a freelance illustrator to illustrate a photo. Someone who probably draws for a hobby – not sews – and they misinterpret the photo. That can easily happen. But the problem is the patternmaker doesn’t catch the mistake and it will leave you scratching your head.
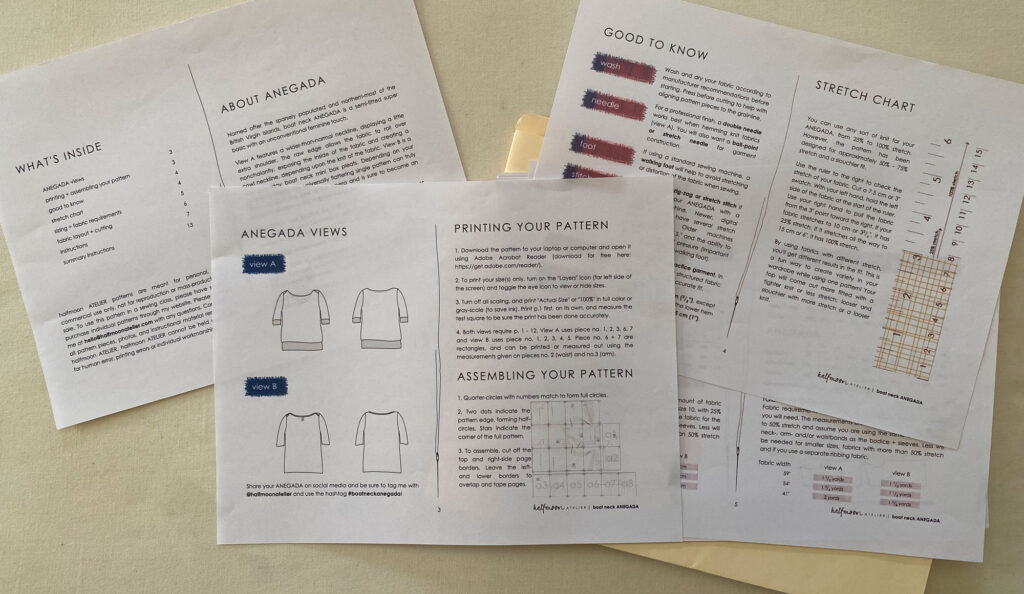
PDF Sewing Patterns
Every pattern company seems to offer PDF patterns. These are electronic files of the pattern and the instructions. After purchasing you are given a link to download the file and can print at home when you are ready to make the garment.
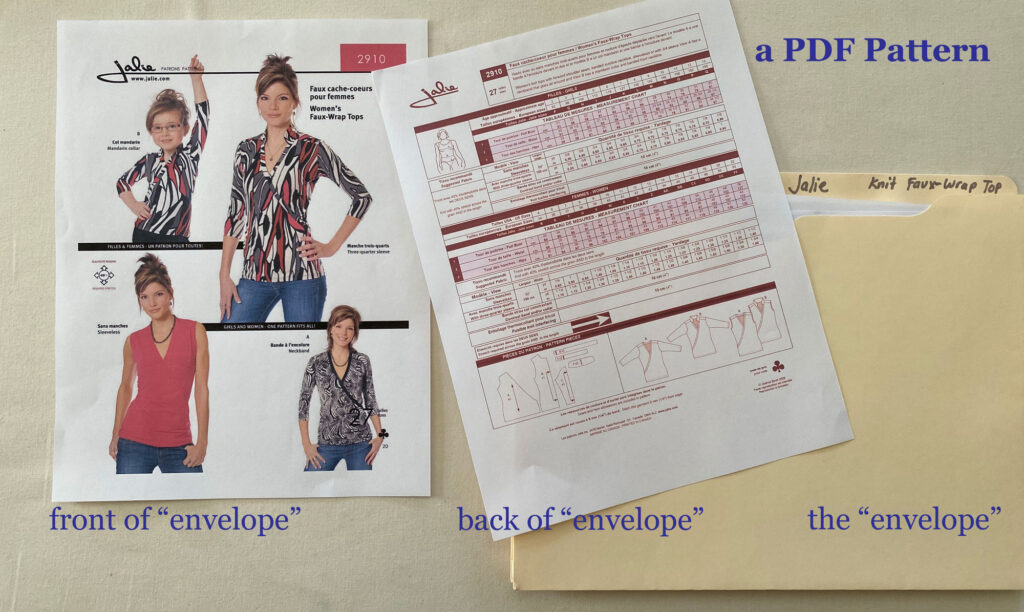
The information provided and how it is presented varies widely by company but it should include all the vital things you see on a printed pattern. Instead of an envelope though you will have a page for the front and a page or a few pages (In different order depending on the company) with the information you would find on the envelope back and instruction sheet.
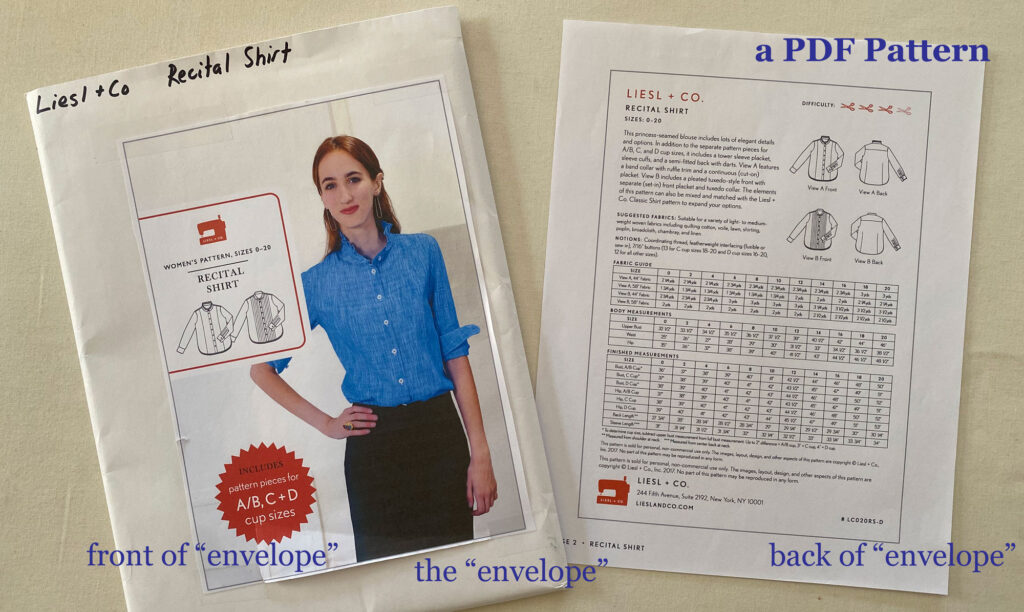
You can see from the pictures how different the instruction sheets are from three reputable, pattern companies.
Really, PDF patterns are just like printed patterns except you have to provide an envelope, which I used to do, but now I prefer manila folders, closed on 3 sides that I can easily place everything into.
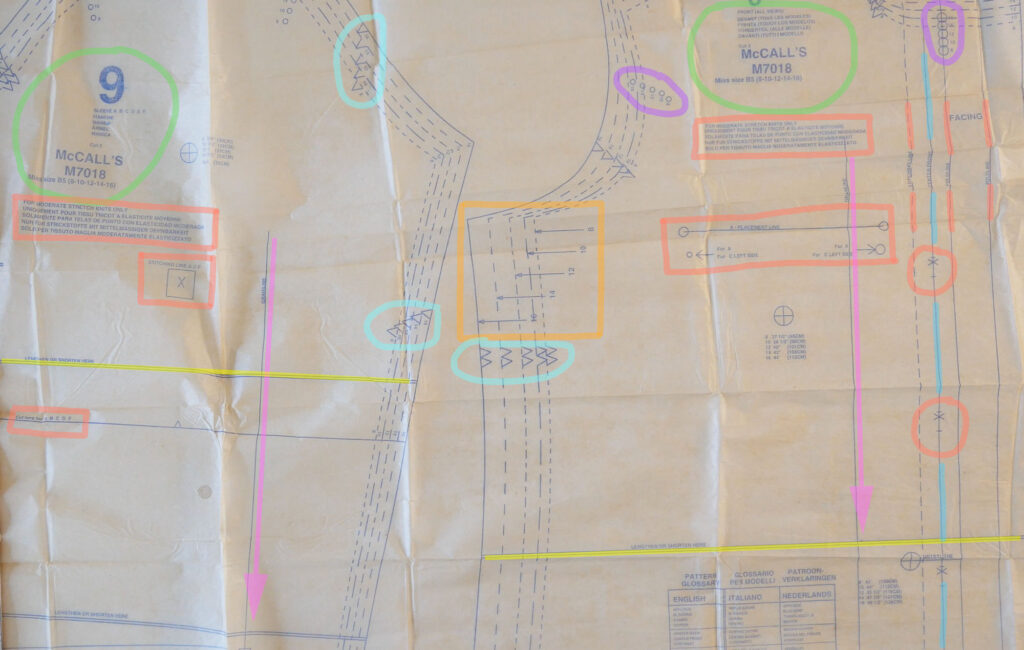
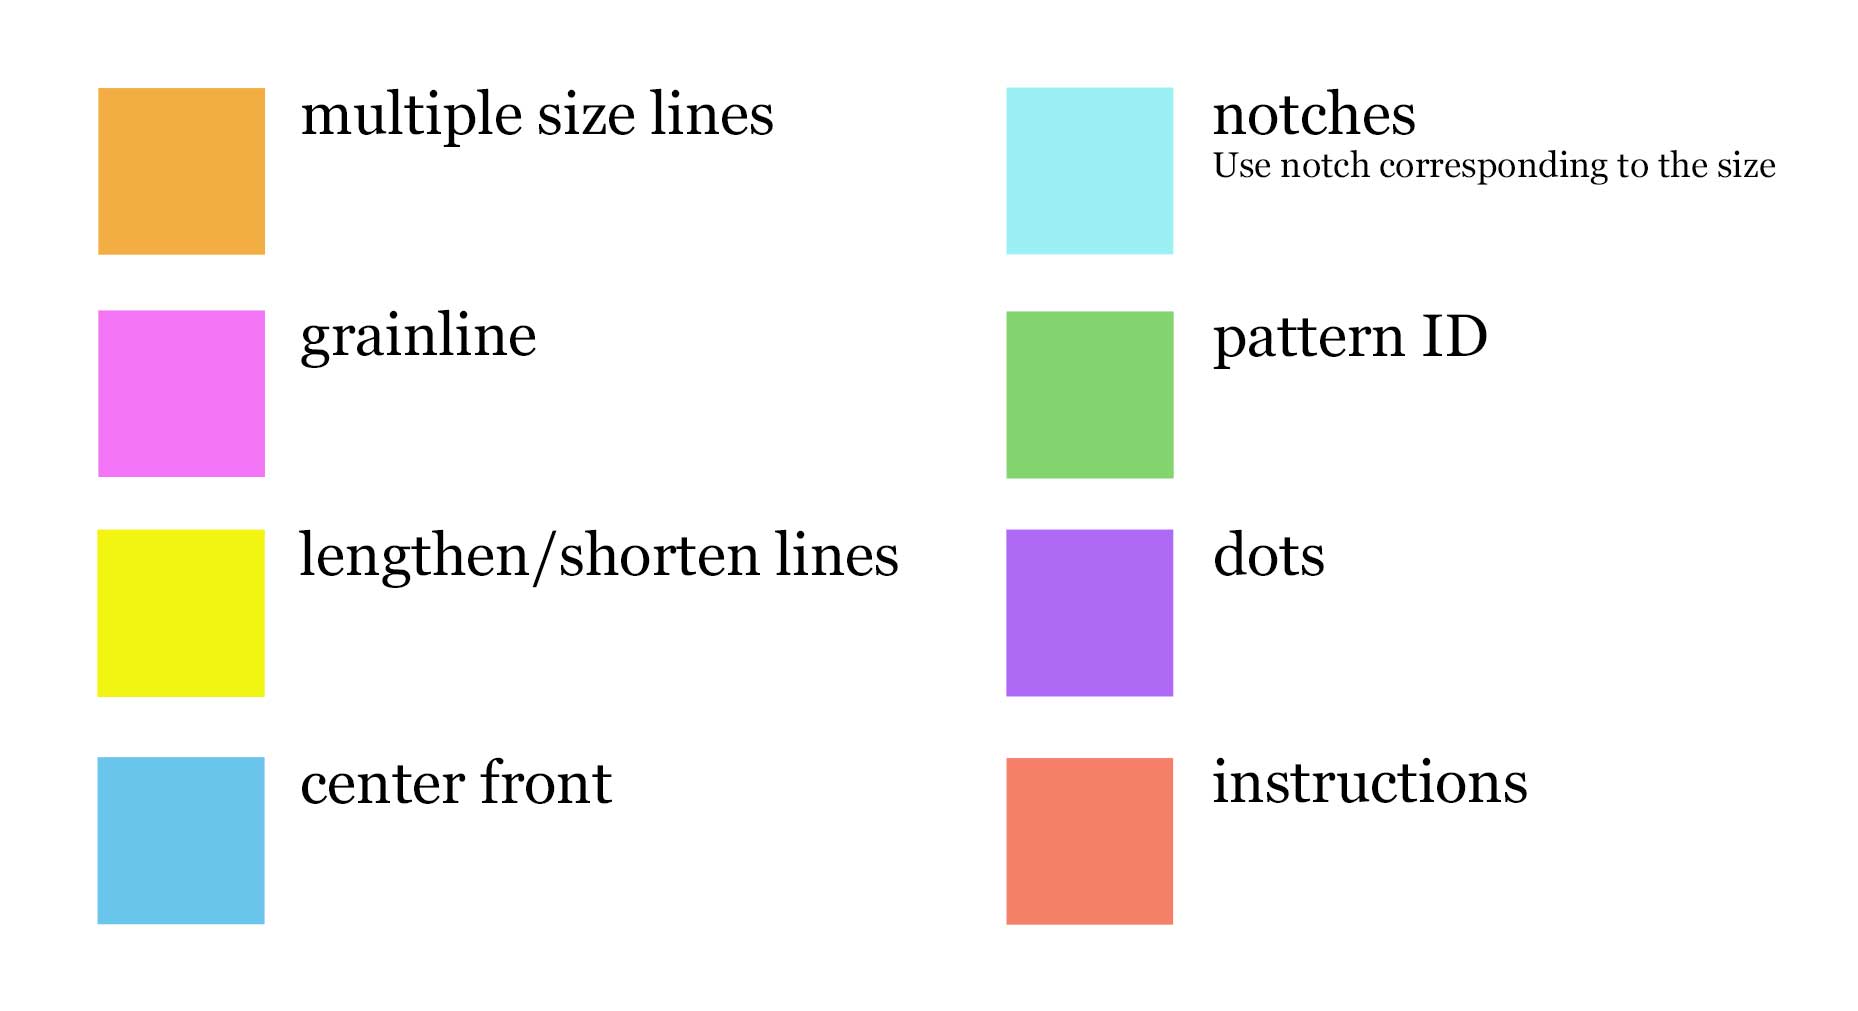
The Sewing Pattern Pieces
The first thing you may notice is a bunch of lines. (see orange box in photo above) On multi-size patterns, each line represents a different size. Find the line for your size. That is your cutting line, not your sewing line. The seam line is rarely indicated on patterns these days but you might see them on older patterns.
Every pattern piece will have a grainline. (see pink arrows in photo above) It might be long or short depending on the pattern piece. It will be labeled and should have an arrow at one or both ends. This is an important mark.
Every pattern piece should have a Pattern ID; the company’s name, the style’s name or number and the size(s). (see green box in photo above) After the pattern pieces are cut apart, should one become separated the ID helps you get it reunited with the pattern it belongs to.
If the pattern company identified the individual pattern pieces you will see a large number or letter (the identification) on each piece. This identification will correspond to the guide on the instruction sheet.
There could also be instructions on the pattern pieces. (see salmon box in photo above) Instructions such as a change in the seam allowance, where you need to attach a pocket, where you might need to snip to when constructing. Other instructions include how many of this piece you need to cut and if you cut it on fold – which the cutting layout guide will also tell you.
Lengthen and shorten lines are marked with two close-together parallel lines going across the pattern. (see yellow lines in photo above or below) Remember on the instruction sheet they explain how to lengthen or shorten a pattern.
Here is where you do that alteration but honestly, you may need to lengthen or shorten in different places than where these lines are drawn.
You might see fold lines on the piece and they are marked “fold line”. This is where you fold the garment in the construction process. (see salmon lines in photo above)
The center front is always marked with a line on front pieces and the center back is shown on back pieces. (see darker blue line in photo above)
Other markings on the pattern are; button and buttonhole markings (salmon), darts, waist and bust markings dots (purple) and notches (light blue). Refer back to the key on the instruction sheet.
Note that notches are sometimes drawn as a short line and sometimes a triangle. They are important to constructing the garment correctly so don’t ignore them. (again, a post and video coming about about transferring these marks to the fabric is coming very soon)
You might see a single notch, a double notch and/or a triple notch There’s a tradition to this but it’s widely ignored nowadays days so don’t worry about how many there are. Just know you need them
PDF patterns will have the same type of markings on them. You just have to print them out and put all the pieces together first.
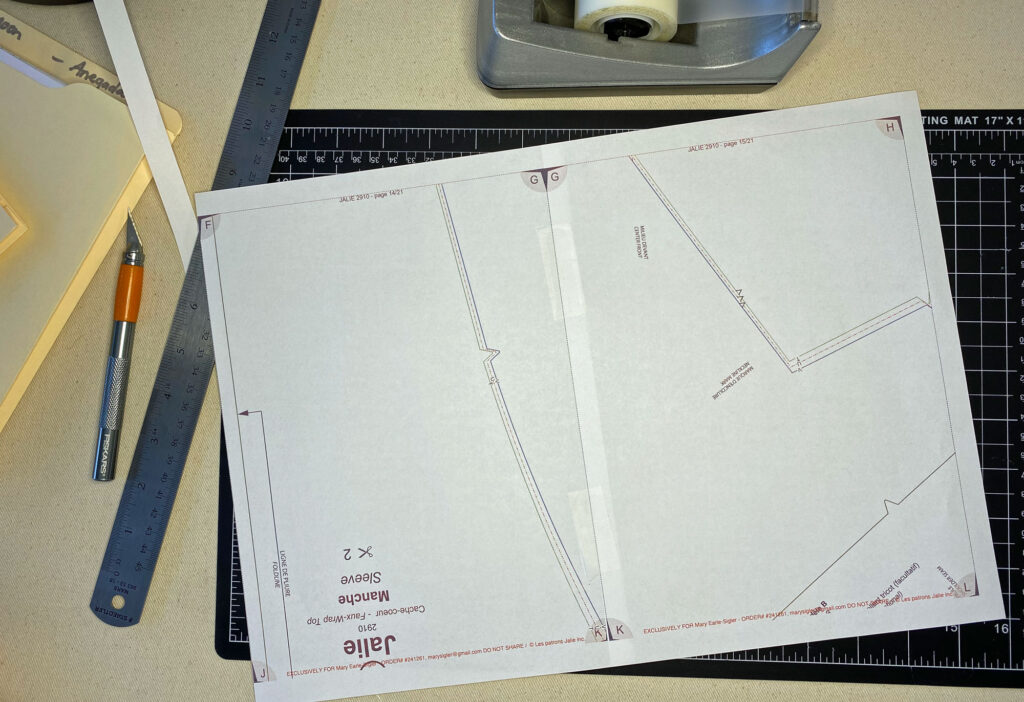
Putting Together a PDF Sewing Pattern
Putting together a PDF pattern isn’t hard. Usually, there will be a guide or tiling map to show you which pages match up to which pages, and the pages are numbered. Find the sheets that go together and trim off one side of the paper and either the top or bottom of each sheet.
Line them up carefully and tape them together.
Does this take a lot of tape – yes
Does it take a lot of time – most definitely
Can being off just a fraction grow into big mistakes as you tape more pieces together – absolutely
But that is how you put together a PDF pattern
Now, if that’s a lot to ask, and it is for the price you’ll pay, many PDF patterns now come with a large format file that you send to a copy shop and have them print it for you onto one or two large sheets of paper for an additional cost.
PDFPlotting is the company I use and once in a while, they will run a special discount.
There is a lot of information on a pattern – and it may look confusing, but I promise, it’s not. Just break it down, one piece at a time, and refer back to all the written terms and tips when needed. Plus, you can always ask me.
Thanks for reading and Happy Sewing.
In case you are interested you can find some of these patterns here:
- Folkwear Patterns
- McCalls, Vogue and Burda
- The Assembly Line
- Jalie Patterns
- Halfmoon Atelier
- Liesl + Co