
A sewing friend recently joked that sewing was actually only 50% sewing and 50% cutting, pressing, and fussing. She’s pretty accurate.
But let’s not let that stop us from sewing. We’ll just accept it as part of the process.
This post and video are all about the process of laying out your pattern pieces and cutting the fabric. There’s more to it than you would think at first, but nothing so daunting as to keep you from sewing. In fact, in just the 15 minutes it takes to watch this video you’ll see all the major points you need to watch out for when cutting out your garment for a successful project.
Of course, you can read the post instead – I’ve included lots of pictures.
As Professor Schwarz used to say, “It’s all downhill after you cut it out.”
After deciding on a pattern and procuring the right fabric the next step is pretreating that fabric.
The Rule: Treat the fabric as you will treat the garment after you sew it.
If you want to throw your me-made skirt in the washer and dryer, check the fabric care instructions that it can be thrown into the washer and dryer. Then do just that before cutting it.
If you know the fabric is linen, treat the fabric as you would a linen garment (some people dry clean linen to keep it crisp. Some, wash in the washer to relax it). Rayon? Hand or machine wash cold, line dry. Deep-dyed denim? Wash, wash, and maybe wash again.
Whatever fabric you are going to use, remember to pretreat it now as you will the garment when it’s sewn. This pretreatment washes away the finishing chemicals, relaxes the fibers, and preshrinks the fabric before you take the time to sew something with it.
Let’s say you were using a fabric that cannot go in the washer or dryer, like Wool. It still needs to be pretreated before cutting it. Dry cleaning is typically recommended for wool garments and you can take your wool yardage to a dry cleaner and have them preshrink it. I was taught to pretreat wool yardage with steam, a lot of steam. Lay the wool fabric out flat on your ironing surface and iron it a few times (iron setting: wool), using a lot of steam.
Side note from personal experience: Last year I made a wool blazer. I steamed that fabric well and good. However, when I was applying all the fusible interfacing (it was a structured blazer) it shrunk a bit more. I noticed it later as I was sewing those pieces to pieces that did not have fusible interfacing applied to them. So – never enough steaming, I guess, especially for looser woven wools like my tweed.
Read the fiber content and any care instructions when you buy the fabric. It’s on the end of the bolt. If you know the fiber content you can look up care instructions on the internet or in a great and favorite book of mine, Clair Shaeffer’s Fabric Sewing Guide.
Fabric pretreated – check.
Now, Iron It
Why? (I know some of you dread ironing. I’m sorry. Think of it as Pressing instead if it helps)
Cutting a pattern out across wrinkles in the fabric will give you a jagged line cut line which will affect the construction since the cut line is used to get an accurate seam line and an accurate seam line gives you an accurate fit. (check what heat setting you need for your fiber content)
That said, some fabrics will never be completely wrinkle-free but do your best.
Do You Have Nap?
One more thing before cutting your fabric: check if it has a nap.
The term, in sewing, refers to direction. If it is a print fabric does the print have a direction? An up, or down? This is a nap.
Some fabrics have a dimensional nap like velvet, fake fur, and corduroy. The fabric when rubbed one way looks lighter and darker when rubbed in the opposite direction. This is a nap.
Plaids can be symmetrical and avoid having a direction. Many plaids are asymmetrical and therefore have a nap.
When a print has no obvious direction you can choose which way is up or ignore it.
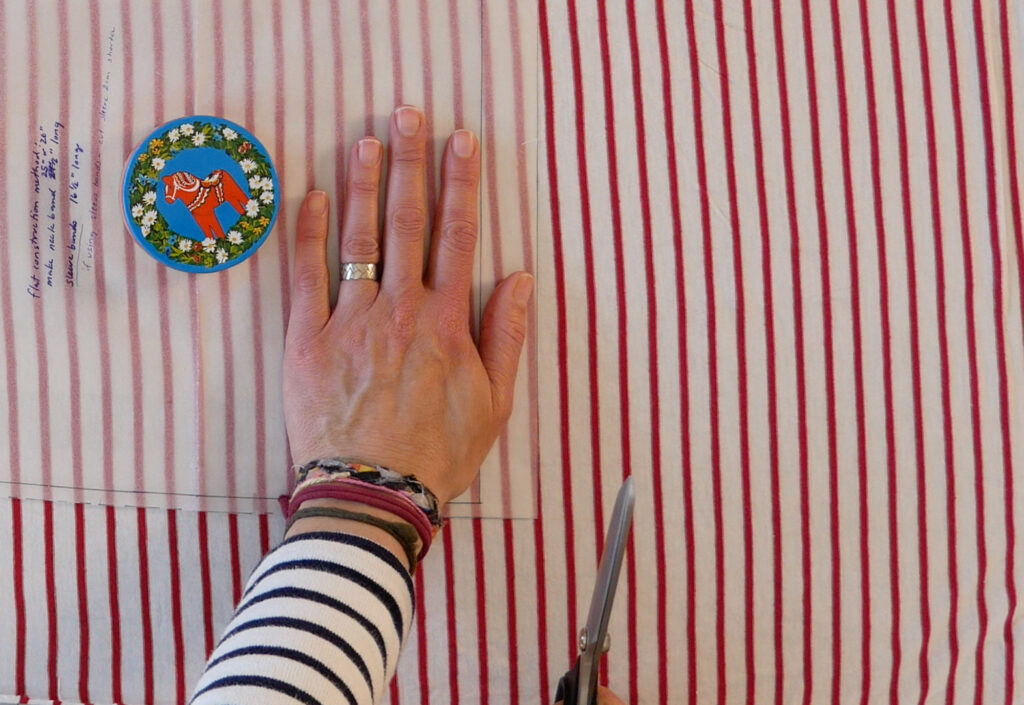
Time to Cut – Almost
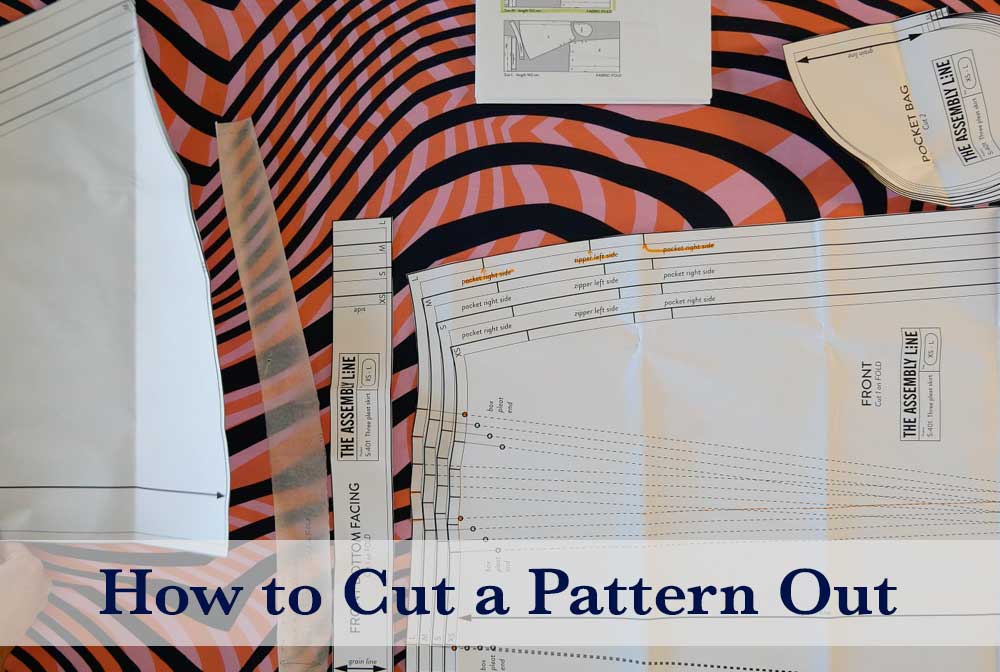
Lay the fabric out, and find the layout guide in the pattern’s instructions for the style and size you’re sewing and for the width of your fabric. I know it sounds obvious but some patterns have more than a few guides and it can get confusing which one you need. A quick double-check now might save you heartache and fabric later.
Look first at how the fabric is folded, if it is folded, for cutting out the pattern.
You need two of many pieces, i.e. 2 sleeves, 2 pockets, 2 pant legs. By cutting these on folded fabric (double layer) you only have to cut the pattern piece once.
Some pattern pieces are only half a pattern. Many times you are given half of the skirt front. This is placed on the fold of the fabric so you cut out half, open the fold, and voila – a whole skirt front is cut out.
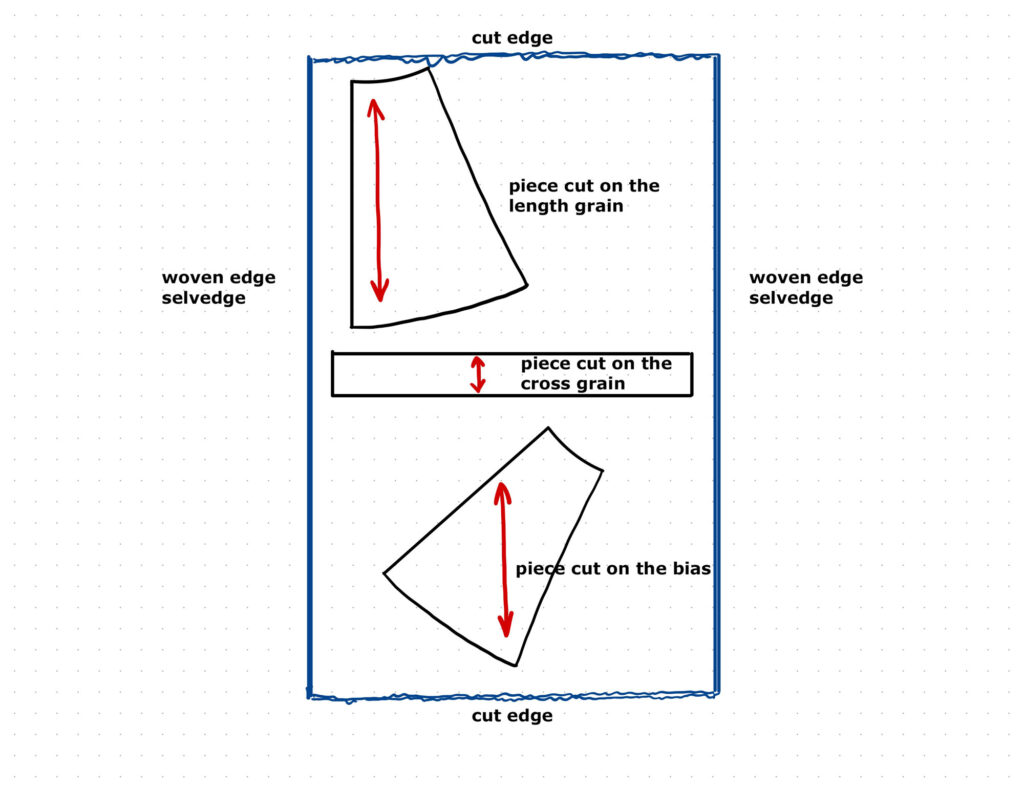
Most times the fabric is meant to be folded lengthwise with the selvedge edges of the fabric lined up to each other. You will see the term “selvedges” or “selvages” marked on the layout guide.
The selvedge edge is the woven edge of the fabric, the other edge is the cut edge – where the fabric was cut off the bolt when you bought it.
In circumstances like the picture above, when the pattern shows two layout guides for a single style, follow the guides left to right as they are printed on the instructions. Like reading words; left to right.
Since your fabric is one long piece, for the pattern pictured above, you would fold and cut out the pieces in the left layout guide, then open up the fabric and cut out the pieces in the guide on the right. The guide on the right shows a single layer of fabric.
Folding Fabric
When you fold your fabric lengthwise, the cut edge may or may not line up. Typically it does not line up so don’t try too hard to make it.
The selvedge edge is a woven edge. It doesn’t fray like a cut edge.
On printed fabrics, there is typically a white margin on the selvedge. Usually, it’s a narrow margin but they can be wide – and of course, the margin is unusable so watch that you don’t lay your pattern pieces in the margins.
Fold the fabric so it is lying flat and smooth. If the fold is lying flat, and the selvedges are lined up, your fabric is probably on grain.
If the fold has diagonal wrinkles coming from it, your fabric may be off-grain and you need to tug on it at a 45-degree angle and or adjust the top layer of fabric until it is smooth at the fold.
Right Side Up or Wrong Side Up
Whether you cut with your fabric right side up or right side down is a personal preference. I usually cut with the right side up especially when cutting prints. This gives me more control over design placement on the garment.
For instance, have you ever seen a print top that has large flowers that end up, when one wears it, on the breast very oddly? I try to avoid oddly placed design elements and by laying the tissue pattern on top of a printed fabric that is right-side up, I can see where the design elements of that fabric are landing on that pattern piece.
But double-check your layout guide because sometimes it has to be done face up or face down.
Laying Out on Woven Fabrics
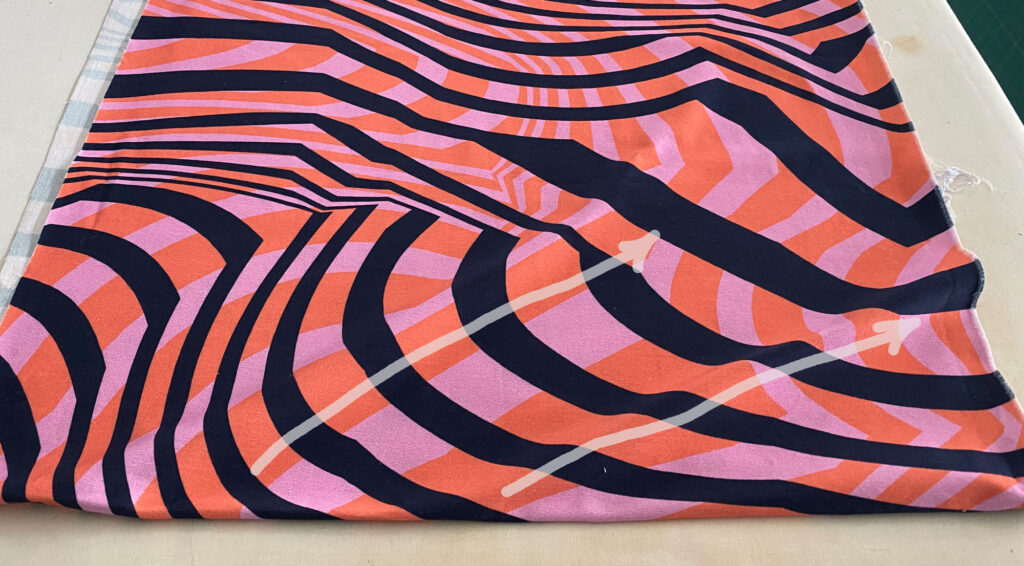
When cutting woven fabrics, if you only remember one thing, remember this: The Grainline is King. You must follow the grain line of the fabric and the pattern pieces.
Grainlines are marked on the pattern piece by a line that should have an arrowhead at one or both ends. The line is usually labeled “grainline”.
There will be a grainline marked on every pattern piece.
The pattern grainline always goes lengthwise, in the same direction as the selvedge edges of the fabric, not the cut edge. (see illustration above) It doesn’t mean the pattern piece is laid lengthwise but the gainline drawn on it is unless it says otherwise.
If you ignore the grainline on the pattern when cutting it out you’re finished garment isn’t going to hang from the body as it was designed to hang. It will twist or shift awkwardly. Have you ever had a pair of pants where one leg’s side seam twisted to the front? Or a T-shirt with a side seam twisted forward? Those garments were cut off-grain.
Respect the grainline.
Laying Out on Knit Fabrics
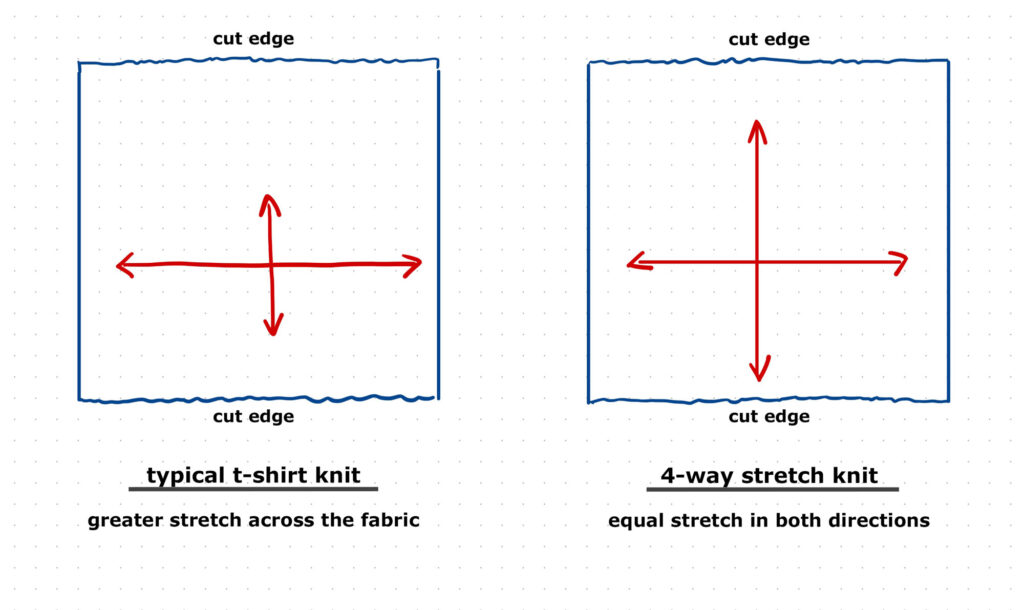
Knit fabrics also have a selvedge and a cut edge but the rule here is different.
The rule for knit fabric: Direction of the Most Stretch goes Across the Body
Knit fabric stretches in both directions (and diagonally). A typical T-shirt knit will stretch in both directions but stretches more going across the fabric (from selvedge to selvedge). Fabrics labeled “4-way stretch”, like athletic knits, stretch the same amount both across the fabric and along the fabric.
Pattern pieces are laid out on the fabric so the direction of most stretch goes across the body.
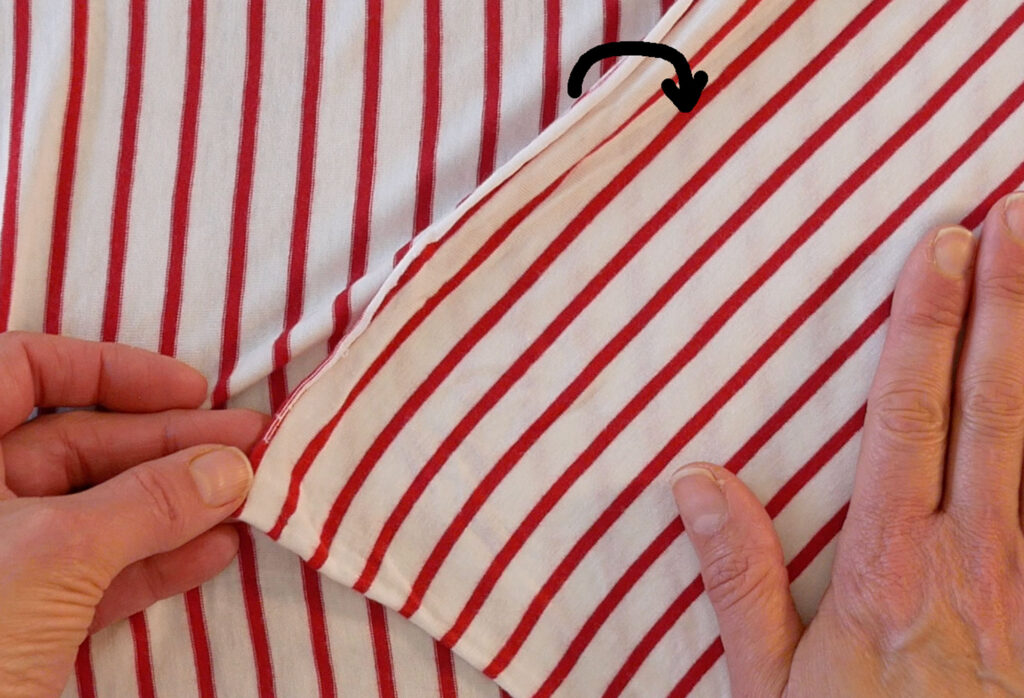
To tell the right side from the wrong side of a knit fabric (especially with a solid color fabric) check the cut edge. It will almost always curl toward the right side of the fabric
Knit fabrics can be slippery, and hard to keep flat and smooth for cutting out. So even though layout guides want me to cut knit fabric folded, I cut them as a single layer of fabric. However, to cut out a single layer of fabric you need to make any half pattern (designed to be cut on a fold) into a whole pattern.
Easy enough, just another step, but worth it.
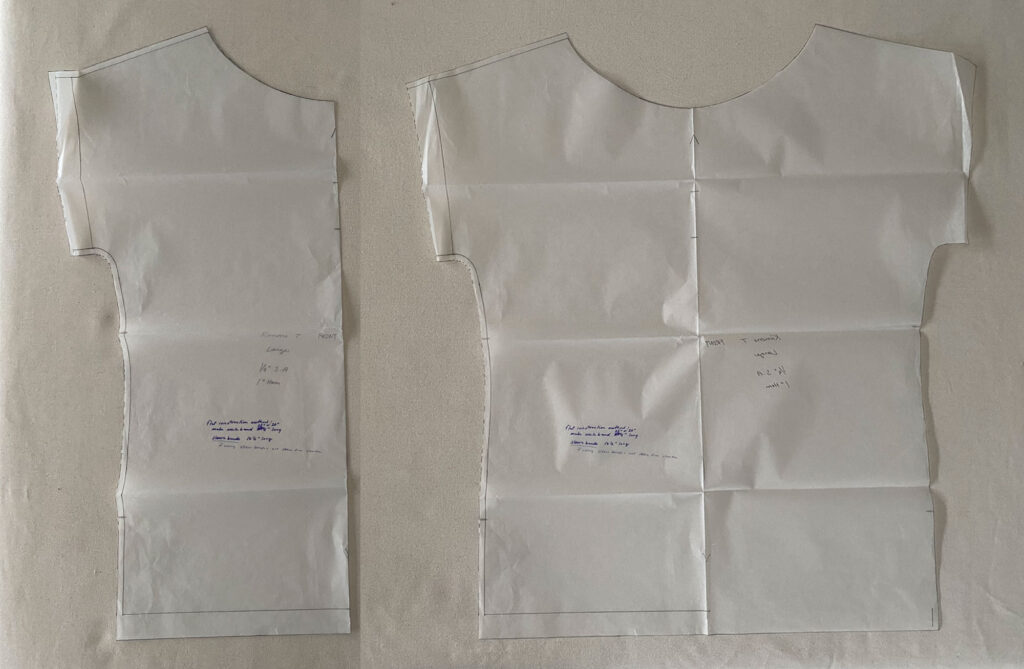
To make a whole pattern trace off the half pattern piece on a large sheet of paper. Tape more paper to the pattern edge labeled, “place on fold” or “cut on fold”. Fold the attached paper on the line you attached it to and cut out both layers as one. Like cutting out a paper heart. When you unfold it you will have a whole pattern.
Whole patterns are the only way I cut out shifty and slippery fabric.
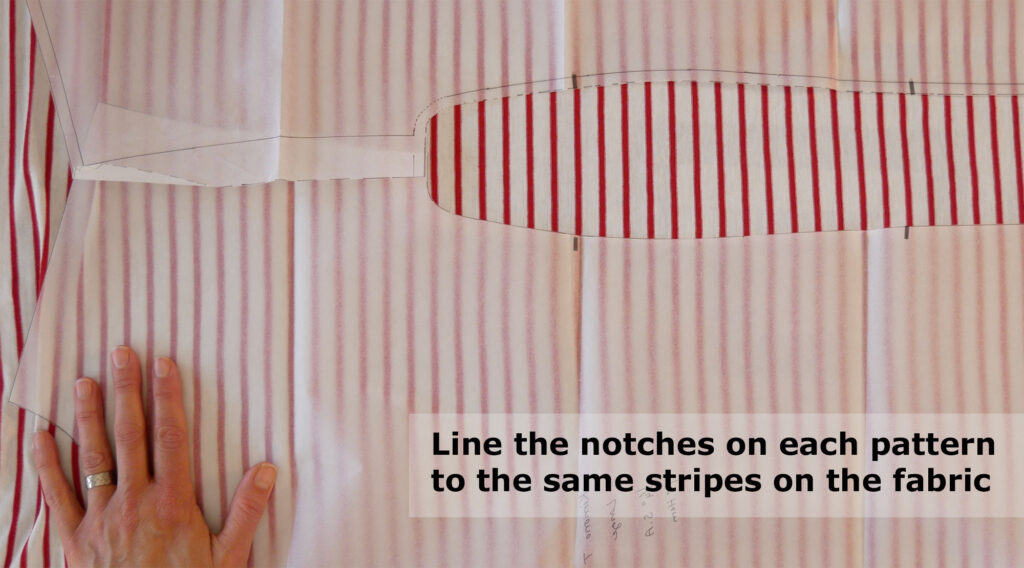
Plus whole patterns on a single layer of fabric allow you to control and match up the print placement. With whole patterns, you can be sure the stripe going across your body is straight across, not tilting, and you can place pattern pieces that will be sewn together on the same stripes so that when you sew the seam the stripes will line up. See my post on how to match fabric at the seams.
Other Layout Tips
Follow your layout guide when placing your pattern pieces onto your fabric for cutting but if you have a direction to your fabric, or think you might make sure all the tops of pieces are facing the same way.
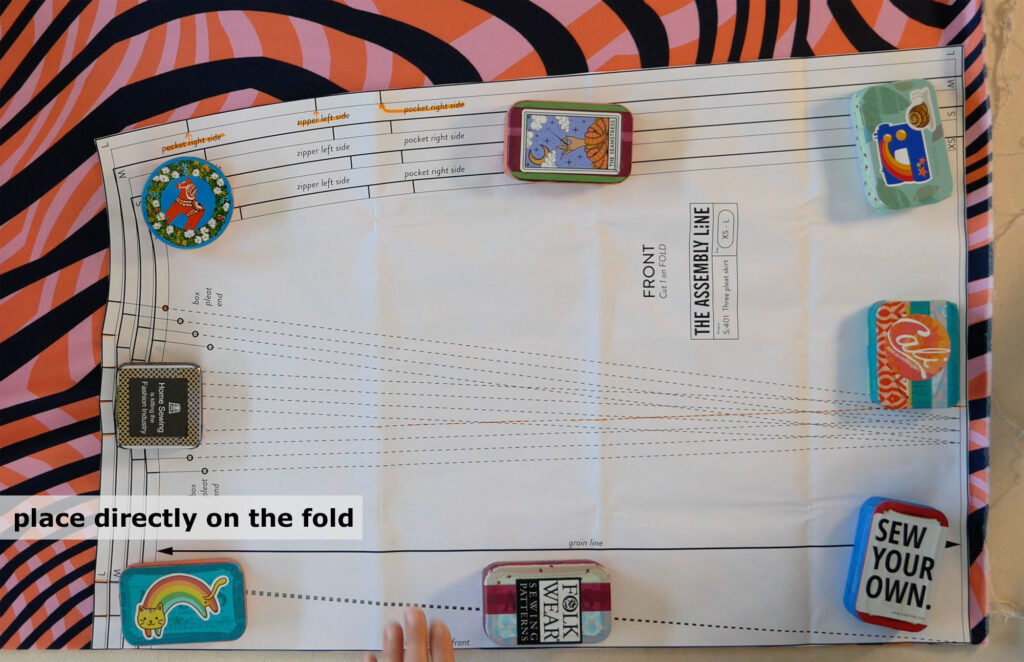
Pieces that need to be placed on the fold should be placed first on the fabric. Always start with the large pieces. Place them directly on the fold.
Other pieces can be placed pretty much anywhere on the fabric but look at the layout guide. Just don’t forget to follow the grainline if it’s a woven fabric or the direction of the most stretch if it’s a knit fabric.
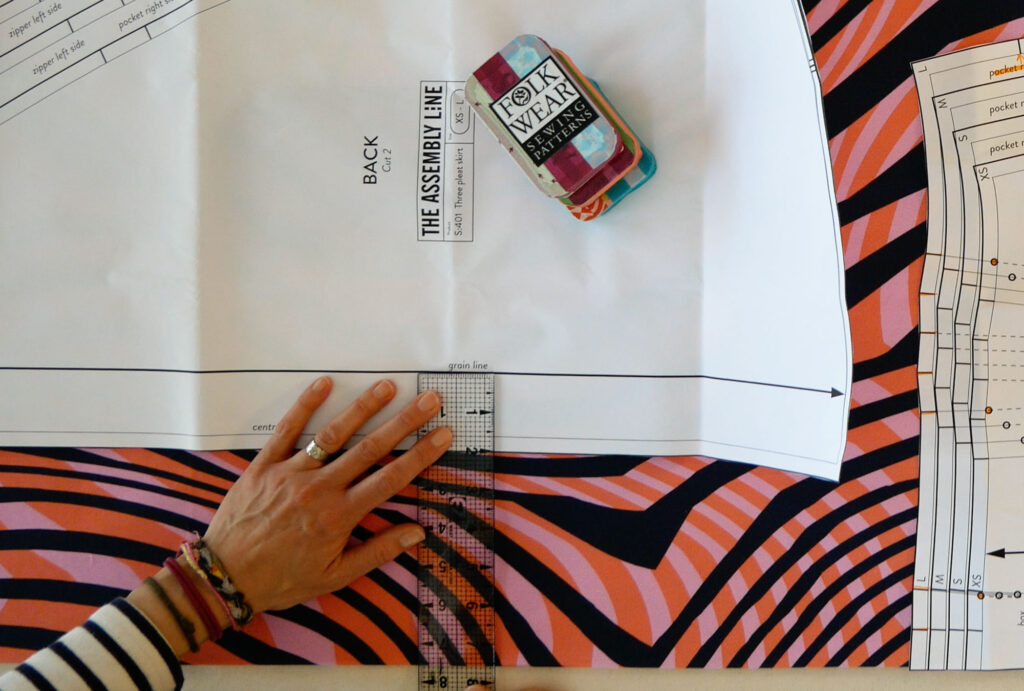
Usually, almost always you can eyeball if your pattern piece is following the grain of the fabric but when it matters to you please feel free to get out the ruler and measure from the selvedge or the fold to the printed grainline in a few spots. If you have 8” from the fold to the pattern’s grainline at the top of the pattern you should have 8” from the fold to the grainline at the bottom of the pattern.
I check with a ruler on large pattern pieces because it suits my sewing style. However, I have had eye rolls directed at me when the ruler comes out.
To each their own.
By the way: If your patterns are strongly creased you can press them. Use a dry iron on the lowest setting. Be sure it is DRY. Steam and paper do not mix.
3 Ways to Secure and Cut Out Your Pattern Pieces
- Pins and scissors – Pin the pattern to the fabric and cut out with scissors
- Weights and tracing and scissors – weigh down the pattern, trace around the outline, lift the pattern off the fabric, and cut with scissors
- Weights and a Rotary Cutter – slip a cutting mat under the fabric, weigh down the pattern, and cut around the edge with a rotary cutter.
Pins
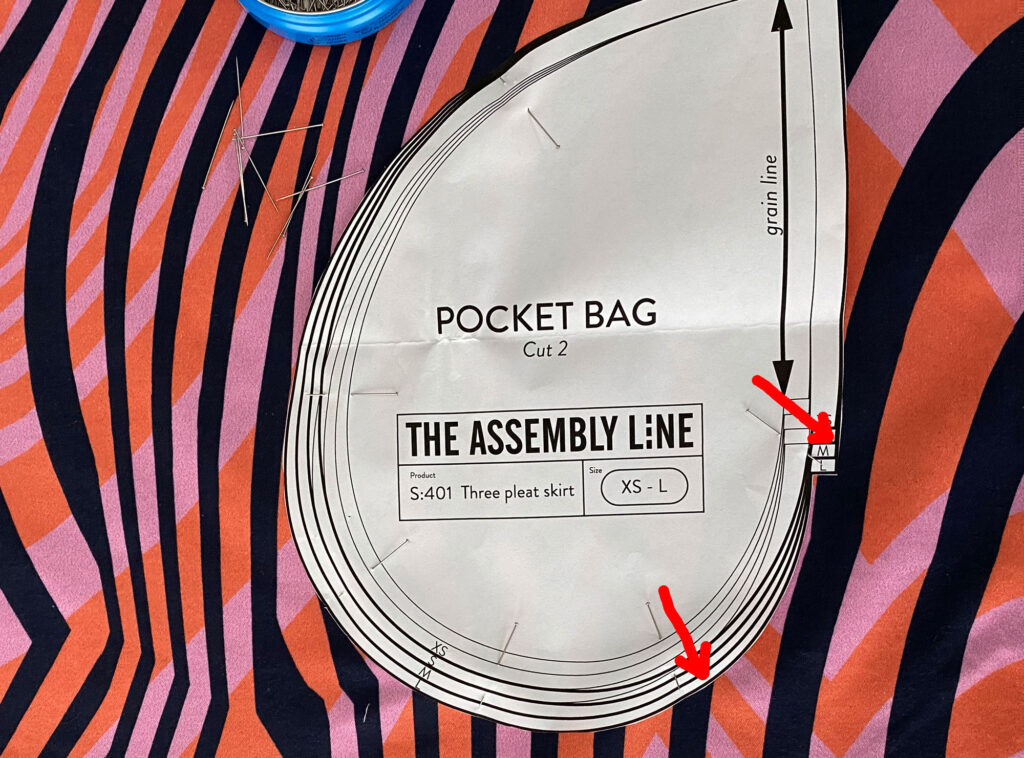
When pinning the pattern to the fabric pin the far corners first, making sure the pattern is flat, and readjust, repin, as needed. The pin goes through all the layers; the pattern and the fabric (one or two layers) and back in to come out on top.
Secure the edge along the fold and the corners. Use more pins in the curves than in the straight parts.
I place my pins perpendicular to the edge of the pattern, especially in the corner. Some people place pins parallel to the edge. I used to think they were wrong but now I realize they think I’m wrong – so again, each their own.
Whichever direction, you don’t need a lot of pins.
Weights
When using weights start by placing all the weights in the middle of the pattern piece and slide one at a time out to the edges. As with pins you want to really secure the edge on the fold, the corners, and any curves but you don’t need a lot of weights
Cutting Tips
If you find when you cut you’re not getting a smooth cut line you may want to try this trick: Cut to the left of the pattern if you’re right-handed, and to the right of the pattern if you are left-handed.
Never cut in the air – it distorts the shape of the piece you are cutting
Shifty or Slippery fabric can be challenging to cut. a rotary cutter for these.
If you use scissors to cut out a pattern from slippery or shifty fabric try laying the palm of your free hand down next to where you are cutting as you cut to hold the fabric still.
Really slippery fabrics are best cut with paper laid underneath the fabric and cutting through the fabric and the paper as one.
Remember – do not cut where you placed it on the fold.
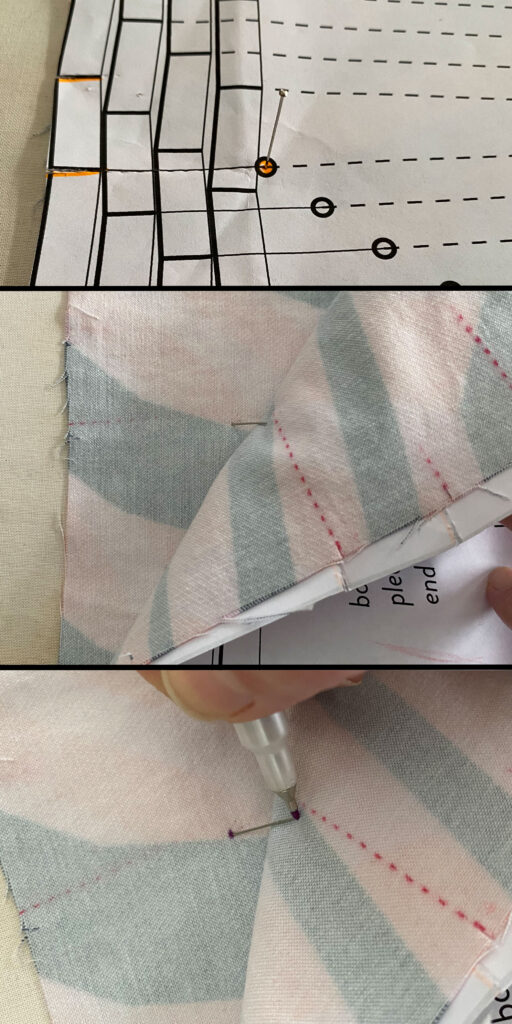
Notches and Dots
After cutting out the piece be sure to make a small snip where any notches are marked on the pattern and transfer any other important markings like dots.
To transfer the dots on the pattern to the fabric, I stick a pin straight through the dots and both layers. Then I peel the fabric back and mark with a fabric marker on the wrong side of the garment where the pin is. Because, where the pin is is where the dot is and the dot location is important when I go to sew.
There are many different ways to mark your fabric and I’ll have a video on that soon. The important thing is to get the information transferred from pattern to fabric
Remember, “it’s all downhill after the cutting” You’re on Easy Street now. Plug in that sewing machine.
Thank you so much for the comprehensive and clear information.
thanks
Thank you. Would love to receive additional tips from you as a beginner sewer.
I’m glad this post was helpful. I wanted to tell you my biggest tip for beginners but I don’t have one, well, maybe, be patient, only sew what you like (not worth your time otherwise), don’t tell people you sew unless you can say “no” when they ask you to fix a zipper or hem their pants, and everyone has their own sewing style, the way they plan, the way they organize their tools, fabric, patterns, the machines they prefer, the tools they “can’t live without”, so take your time and you’ll figure out what works best for you.
Were you educated in the Pollak building with said Professor Swartz? I had a Mr.Swartz too, and I love him more than life itself. Always sew with a scewdriver- did you cut this with a brick? I graduated 2011,same as when your website started. I am teaching tomorrow and was looking around for a simple way to explain the hardest part: cutting. Thanks for your article!
Yes! Professor Swartz, everyone’s favorite 🙂 He use to always tell us to make sure we had a pocket (on our designs) to hold our gum. I graduated in 1994 – quite a bit before you. I’m glad the article helped but even more pleased to be reminded of Professor Swartz. Go Rams! (ha!)
Thank you for this! I just started trying to sew and my last few attempts have barely made it past the cutting stage. I keep getting things uneven and even when I pin, it still gets uneven and off-center. I do have a question about your markings- how do you get them so straight? I have trouble either getting through to the fabric or getting it straight. I’m a very literal and visual learner so I pretty much always have to have detailed step-by-step instructions.
You’re welcome! thanks for reading. Fabric and patterns shifting as you pin and cut happens to everyone. Don’t let them tell you otherwise. As you get more experience it’s shifts a lot less but it’s never perfect. Try your best to keep things in place and cut on or next to the cutting line. Your outer cut edges become the visual guide for sewing the seam so if it has to be really accurate it has to be cut as accurately as possible. Again, experience helps. I transfer markings to the fabric a number of different ways. Typically I only transfer the minimum. I’ll turn a line into a dot at the ends of the line. If the line goes off the edge and into a seam allowance I’ll turn it into a notch (A little snip into the seam allowance). To transfer the dots I stick a pin through the pattern and the layers of fabric while the piece is still flat on the table. Then I carefully lift one edge or corner of the paper and use a chalk pencil or fabric marker (with disappearing ink or water soluble ink) to mark where the pin is going through the fabric. Try to always mark on the wrong side of your fabric. If I have to transfer a long mark I slip dressmaker’s tracing paper (it’s sort of like carbon paper) under the pattern so the marking side is on the wrong side of the fabric. Then I trace the marks I need with a tracing wheel. It will leave very clear little dots that form a line. Remember, cutting is time intensive for everyone. Put on some good music or a good audiobook and enjoy it as best you can 😉
Thank you. Wish l had looked at this before. I’m a complete beginner.
But now you know – and that’s good, right?