
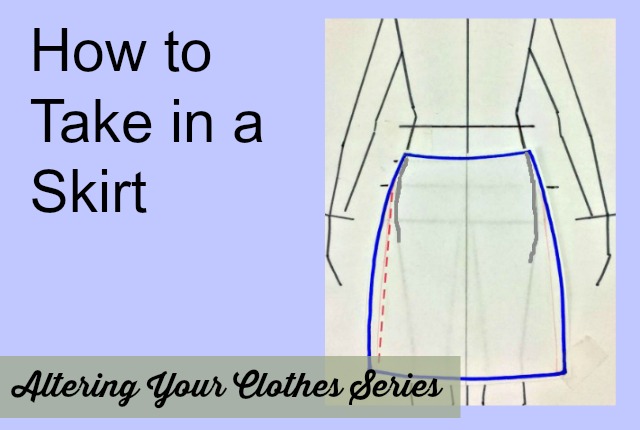
Ever have a skirt (or dress) that’s just too big on the sides? The fabric sticks out in an odd bell like shape? Having no crotch seam to stop us we wear our skirts at different places on our torso out of comfort or habit than the designer intended. This is why you may find many of your ready to wear skirts (or new skirt patterns muslins) are just too big around the upper thighs.
-
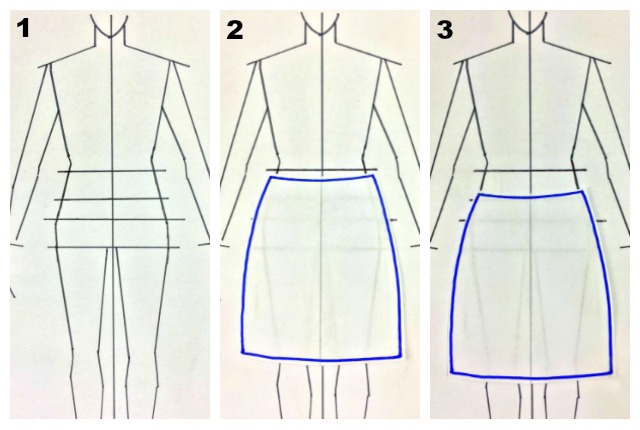
- The body
-
- Where this example skirt was designed to sit; just below natural waist
- Where you like to wear your skirt, a few inches lower
Hips are usually the widest area of the lower body and skirts need to be widest at the hip line for sitting as well as fitting over your hips. If the hip line on a pencil, a-line, or straight skirt doesn’t line up with the widest area of your lower body then there will be extra fabric where the designer thought your hips would be. If the fabric is stiff this extra fabric on the sides is going to stick out on it’s own and make an odd shape. It’s an easy fix though so there’s no reason your skirts can’t look perfect on you.

-
- How your body is under the skirt
- Where to take the skirt in to tame the bell the shape
This alteration assumes the waist band, or the skirt at the waist if there is no band, fits you fine. This alteration will only remove excess fabric from your hip level down. We are not messing with the waist or side seam zippers. They will stay as is.
 How to Tame the Bell:
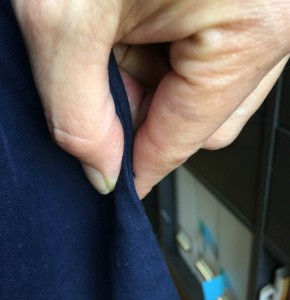
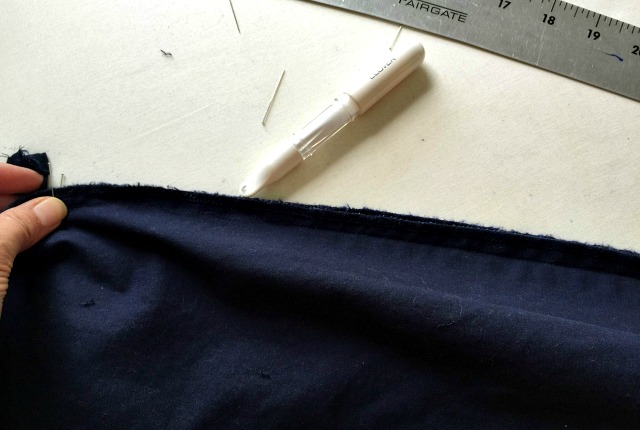
Put the skirt on wrong side out. When the skirt is on your body wrong side out the left side of the skirt will be on your right side and vise versa but most of us have hips which are are fairly equal to each other in height and size so putting on the skirt wrong side out not only works but it will make the fitting/alteration go faster.
Stand in front of a mirror so as you pin you can check to see the new shape. Pinch and pin one side seam to gather the excess fabric on that side as much or as little as you need until you are satisfied with the shape you have pinned out. Try to keep the center front of the skirt on center front. You only need to pin out the excess fabric on one side of the skirt. If you have a side zipper pin the side the zipper is in starting under the zipper. Be careful not to pull the fabric too tight as you pin or you may pull the skirt off center. You don’t want to remove all the excess fabric from the skirt from just the left side.
Pinch out the same amount from both the front and back of the skirt at the side seam as well. If your side seam is really off; if it’s too far forward (your front needs more fabric) or too far back (your back needs more fabric) you can pinch out more from the front or back of the skirt which ever one you need. If your side seam is just a smudge off I wouldn’t bother with this level of fine tuning.
After pinning, with the skirt still on sit down and make sure you are comfortable and that you did not pinch out all of the wearing ease.
NOW is the time to decide if you want to shorten or lengthen (if possible) the skirt. You will be taking out the hem at the sides for this alteration so while the hem is partial removed, do you want to change it? Look in the mirror and decide. If you want to shorten it pin the hem up too to see where you want it.
Take the skirt off and lay it on your work surface. (If you pinned the skirt when it was right side out you’ll need to turn the skirt wrong side out and transfer your pins to the inside of the skirt.)
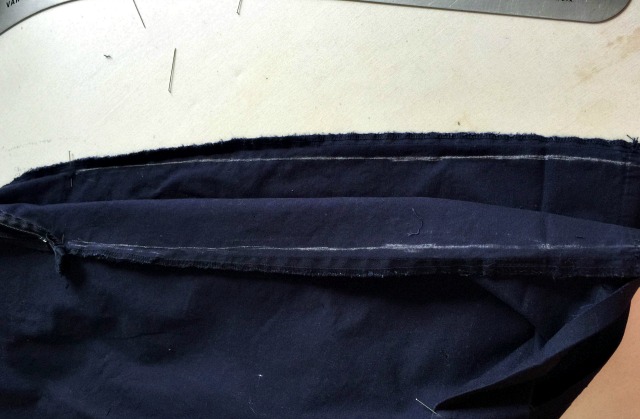
Take the hem out at the side seams unless the side seam at the hem is unaffected by your alteration (like a skirt that flares out). Most alterations like this will take in fabric from the hip to the hem. Take out enough of the hem on both sides of the side seams to sew your new stitch line plus an inch to two inches on beyond the side seam on the front and the back. If you want to shorten the skirt take the entire hem out.
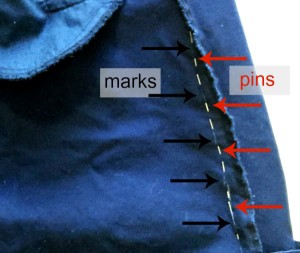
Mark where the pins are with a tailor’s chalk or a chalk based marker (Clover’s Chaco Marker is my favorite). I make a line where I feel the straight pin under the fabric but mark in a way to show you where the pins are (everyone has their own methods and tricks). The marks show you how much fabric to take away from the side seam. Take the pins out after marking.
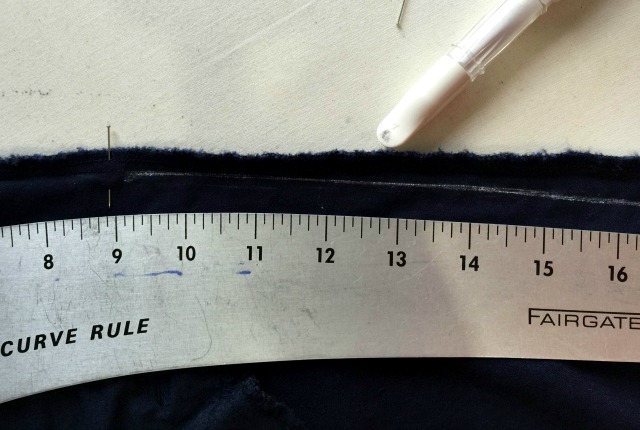
Place a curved form ruler or a hip curve on the original seam line a little above where you started to pinch in the fabric (this distance will vary) or just under the side zipper if you have one.
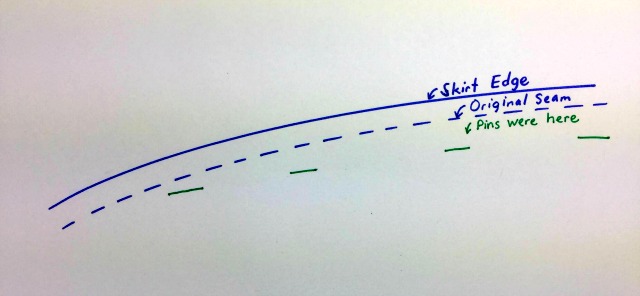
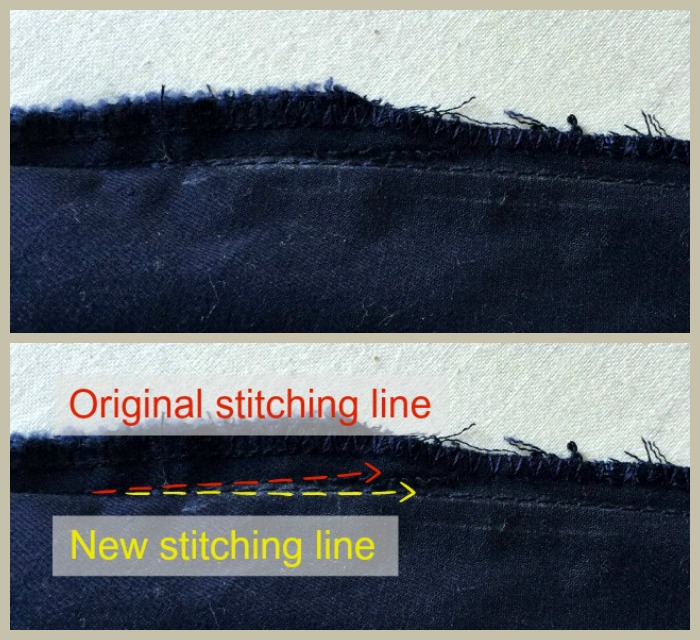
This illustration shows the side seam of the skirt in a horizontal position in blue. The green dashes represent the marks made to show where the pins were.

Place the curved ruler on the original seam at the start of your new line (arrow on the left) and on your marks you made to tell where the pins were (middle and right arrows). Line these up as best as you can with the curved ruler. You may not line the curved ruler up with every mark; that’s normal actually. Aim for a happy compromise and a gentle looking curve.
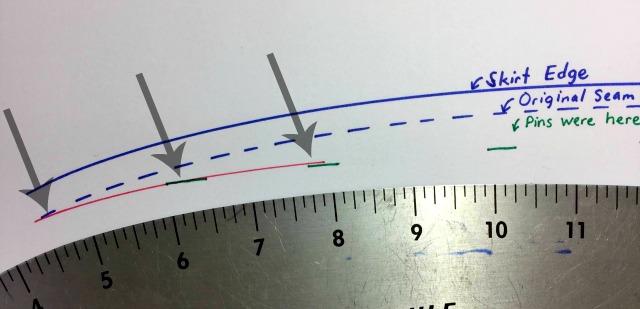
You will move the curved ruler up and down the marks, maybe even flip it around until you find the sweet spot, where the curved ruler and most of the marks line up and it’s a pleasing curve.

Sometimes it takes three different places on your curve form ruler or hip curve to get your new stitch line.
The start of your new line is just inside the seam allowance and flows smoothly into the original seam before going it’s own way. If your marked line is faint go back over it again using the same chalk based marking tool.
Fold the skirt in half vertically (along center front or center back). Line up edges at the waist and hem. With your hand, press the skirt along the outside edge where the line is (you don’t see the line right now). This pressing will transfer the chalk from the side you drew it on to to the side with no chalk. Keep the skirt sides in place when you press to transfer an accurate line.
Unfold the skirt. The chalk marking stayed where you drew it and transferred the line to the opposite side when the sides were pressed together. Yay – time saver!
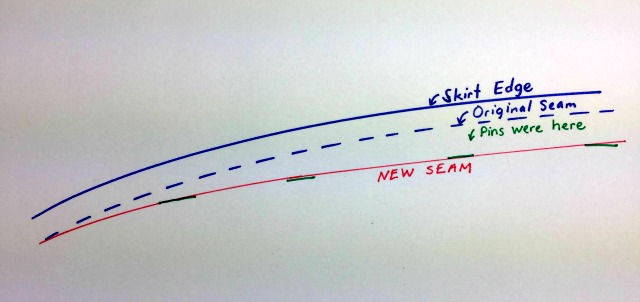
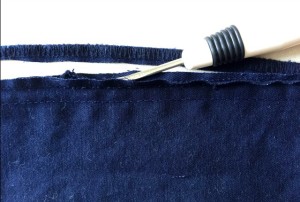
Simply sew the front and the back of the skirt on your new side seam lines. Start sewing in the seam allowance, merge smoothly onto the original stitching and then, smoothly veer off onto your marked line finishing at the bottom of the skirt
.
 Press the stitches from the hem to where you started to sew (the opposite directions from how you sewed it) with an iron. Cut off the excess seam allowance.
You may need to open up the original seam and some overlocked seam allowance so you can press your new seam allowance open. With an iron press the seam allowance open. After pressing them open you can bring the seam allowances together to overlock them or apply a zig zag stitch to each raw edge.
Shortening the skirt is the next step if you need to do that. If you are done with alterations simply put the hem back in at the side seams, press it, and you really are done. Your skirt looks better on you and a good fit makes the difference if you’ll wear an item of clothing or not.
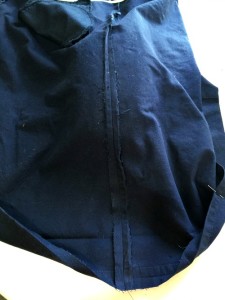
(A kind of embarrassing true story about my skirt: I packed this skirt for our two week long trip in Italy and I packed light so this skirt was worn a lot. It wasn’t until I started looking at the photos we were taking that I realized the skirt stuck out so much on the sides. I looked like a walking bell or someone with hips just above my knees. So chic. Oh well it’s fixed now, finally)

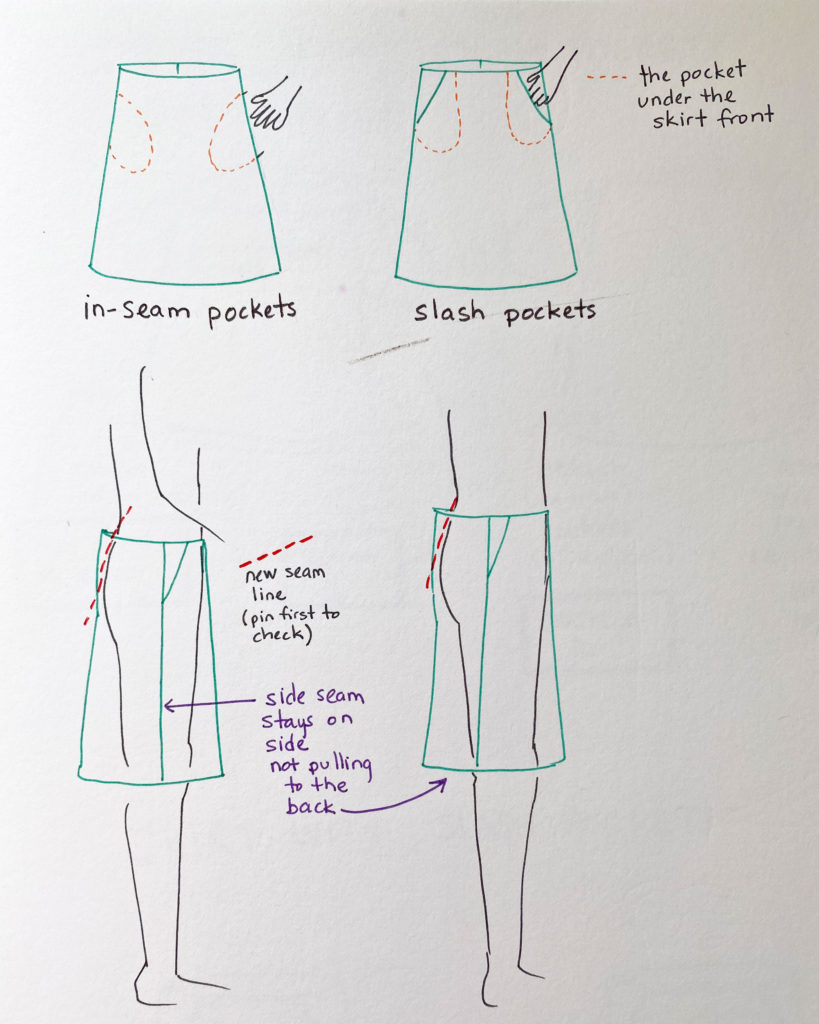
What if There are Side Pockets?
Someone asked me how would they go about taking in the sides if there are side pockets? Well…
Take it out of the back
Check first if you can take out the excess from the center back. Put the skirt on and pinch all the extra fabric (keep it loose enough to sit down in) from the back.
Now turn sideways and check that your side seam is running down the middle of your side. It should not be a diagonal line. It should not be on your backside.
If the seam is going down the middle of your side then you can take the excess fabric out of the center back (as described above for the side seams) and keep your pockets.
Many Ready-to-Wear skirts and pants are made with a back panel much larger than the front. When this is the case you can take any extra fabric out of the back and keep the side seams in place.
Take it out of the sides anyway
But what if taking the extra out of the back isn’t going to work for your skirt with pockets? Well, the easiest fix is to take out the extra fabric at the sides as described above and sacrifice the pockets. (Heresy!)
And if you want to keep the pockets?
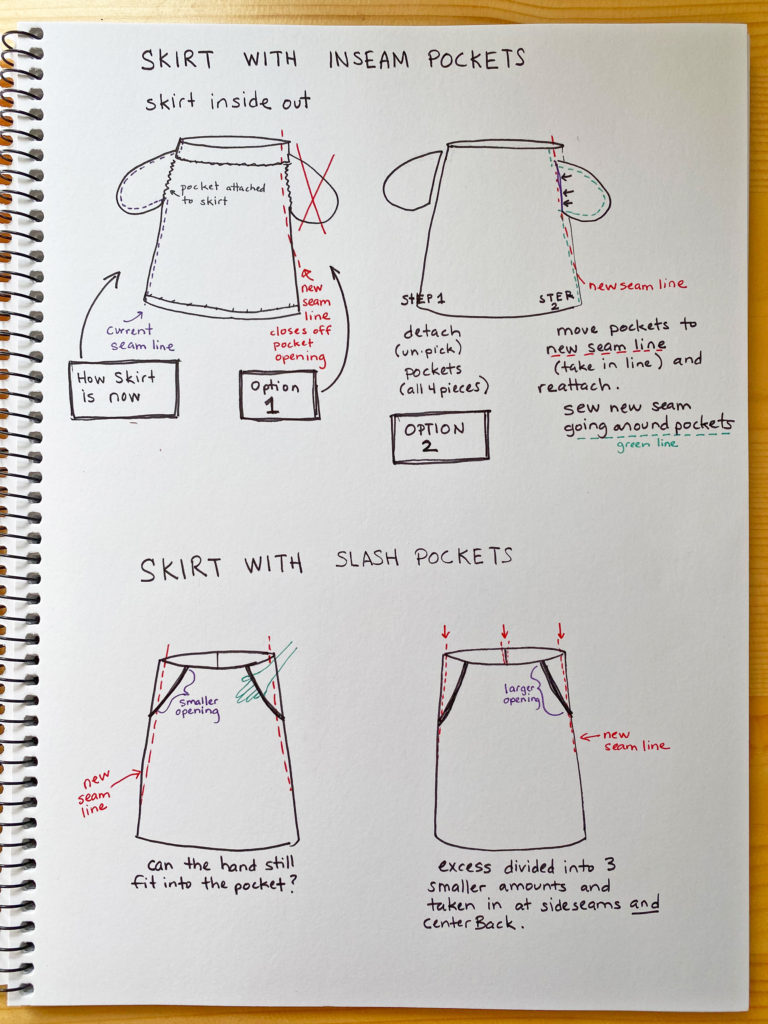
If your skirt has in-seam pockets sewing the only way to save them when taking in at the sides is to unpick the pockets from each other, the skirt front and skirt back. Then attach them to the skirt front and back on your newly marked side seam.
You may want to take out the entire side seam. Then cut away not on the new marked line (where you’re taking it in) but the same distance away from the line as you want seam allowance. With the skirt panels cut down, you can easily reattach the pocket pieces.
If your skirt has slash pockets you can still take the skirt in at the side seams but you will lose a little of the pocket opening. How much you lose depends on how much fabric you need to take in at the sides.
Pin the sides up and try putting your hand in the pocket. The pocket may still be big enough to put your hand in and if so, you’re golden. However, if the opening is now too small you could try taking a little less out of the sides and taking some out of the center back
For example, You need to reduce the circumference of the skirt a total of 3 inches. Instead of taking out 1 1/2 inches out from both sides try pinning out one inch from each side and one inch from the back. Again, you just want your side seams to be falling down the middle of your side. In this case falling down a smidge to the rear of middle might be ok.
I hope that helps. I had fun trying to figure this out so thank you for the question.
Thank you for this! Its the first how-to guide Ive seen that makes sense to me. Do you have one on how to alter a skirt to be smaller that has side pockets? Im having a hard time wrapping my head around that part
Are the pockets in the seam? – Meaning you don’t see any pocket. Or are they a slash pocket where the top of the pocket is toward the front of the skirt? (I wish I could post a drawing in the comments)
Either way, I’ll put some thought into this and get back to you.
I just added some instructions and pictures to the end of the post about taking in a skirt when it has pockets. I hope it helps you get your skirt to fit just as you like it.
Thank you so much 💓
Hi Mary, I just found your post and I would like to ask you how to fix a pencil(denim with some elastine) and A-line skirt (polyester), that at the back, in the middle at the bottom of the skirt (where some skirts have the slit) sticks out (forming a peak).
Strange. Is the center area of the back hem also peaking – or going up? Or just the area a few inches up from the hem? And is there a seam there – where the peak is? Let me know and I’ll also scan my fitting books.
This article is well written and comprehensive. I’ve gotten back into sewing and was nervous about altering my friend’s skirt. This article really helps. You’re a lifesaver! 😉
Yay! So glad to hear it was helpful – And your friend is lucky to have you, it’s only for special people we alter clothes 😉
I have a multi panelled skirt it’s a size 18 and I’m a 14/16, the panels vary in fabric and it’s fully lined, zip on the side, waist has no actual band just a thin material strip to finish it, like a binding. Is it best to remove one of the panels completely?
If one of the panels’ size is equal to the amount you need to take out of the skirt you could just remove it. Or you can take out a bit from two panels where they are joined (like when taking out at the side seam in the post but you could do this in center back instead of both sides). To reduce at the waist unpick the waist seam above the section your taking in – where the lining, skirt and strip of fabric are sewn together. Take out the seam a few inches above this area your taking in. Then take in the skirt and the lining the same amount but individually. Then sew the skirt and lining back together at the waist.
So glad your able to alter this skirt to fix.
I have a elastic waistband and inseam pockets. The waist is fine but extremely to wide in the hips.the skirt has been completely sewed. Is there anyway to take in the sides without unpicking the whole skirt. Very new to sewing.
If you want to keep the pockets you will have to unpick the side seams and the pockets. If the skirt is really wide in the hips you could possibly cut the stitches off. But first put the skirt on and decide how much you need to take in and how far down from the top of the skirt you are taking in. Example: 2” down I need to take in 1/2”, 3” down I need to take in 1”, etc. Be sure to write this down- It’s so easy to forget how much where. And, of course, taking in the same amount on both sides.
Take out the hem a few inches beyond the side seams in each direction. You don’t have to take out the entire hem. If you are taking in an 1” or more you can cut very close to the stitches to remove them up to where you are not taking in enough to leave a seam allowance. Unpick the pockets from the sides (but you can cut the stitches and seam allowance off the pockets instead of unpicking that seam).
With everything loose at the sides, but still attached at the waist, draw in chalk or fabric pen your new stitch line – refer back to how far down and how much. Reattach your pockets – see my post Easy Pajama Pants, it explains the pockets well. then sew the new side seams and re-hem those sides.
Good luck;-)
Thank you so much
So so so helpful! Thank you!
Thank you.
This is so helpful and clear! I’m so glad I read it *before* attempting to alter a fairly expensive dress, I know I definitely wouldn’t have done nearly as good of a job if I’d just gone on instinct. Thank you!
I’m glad this helped. I have to stop myself from leaping into projects (from enthusiasm) before researching. I learned this the hard way 😉
I have a maxi skirt that is smocked at the waste but is too large . Do I sew just one side to bring it in or a bit from both sides? Also do I unpick and cut away the excess material from the smocked waistband?
Thankyou
(Sorry for the late reply, I somehow missed I got a comment). I would take in both sides. Take it in first. Then you can trim away the old seam if it’s too bulky. I would be afraid the smocking would come undone if you unpicked it first.
Hi! I was wondering what is the best way to take in the sides of a skirt if it has a zipper on the side. There is no seam on back of skirt and I do not know how to take it in. If you could please help me, that would be awesome!!! Thanks!
If you just need to take it in a little at the hips you could take all of the excess out of the one hip that doesn’t have a zipper. Just have to be careful to not throw the skirt off grain. The proper alteration would be to take the waistband off above the zipper and unpick the zipper from the skirt. Now your side seam allowances can “grow” – what was 1/2″ can now be 3/4″ if you are taking in a half inch at each side seam (1″ reduction in the skirt total = 1/2″ reduction at both side seams = 1/4″ reduction of front piece and 1/4″ reduction of back piece on both the right and left side). Mark your new side seam line and replace the side zipper so the teeth are on the seam line. Reattach the waistband. It will now be larger than the skirt is around so you’ll have to trim it, or have the overlap a little longer than it was. On the right side you simply sew on the new seam line. – it sounds like a lot of work but it won’t take that long and if it’s a special skirt it’s worth it.