
Many of us know the names of stitches, and we know some stitches, but we don’t always know the name of the stitch we use or how to get started on the stitch we need.
This is one of five posts covering 10 commonly used and much-needed hand stitches for garment sewing and mending, with the accompanying video demonstration. I’ve included the time stamp with the instructions below so you can jump right to it in the video.
Oh! and don’t forget to press your stitches when you’re done sewing. It helps set the thread and makes the finished work so much better looking.
So if you’re ready, let’s go
The video demonstrates the Blanket Stitch and the Bar Tack. If you know which stitch you want, the time stamp for each stitch is listed in the video description as well as below with the stitch explanation.
Blanket Stitch
The Blanket Stitch can be found at 00:19 seconds in the video
The blanket stitch is good for sewing on patches and appliqué work. It is also used as a decorative stitch. Most commonly, the edges of woolen goods like blankets and Melton wool coats. When used as a decorative stitch, it can be made any size you want.
Decorative stitches are often worked with a thicker thread to make them more prominent on the garment. You could use button thread or embroidery floss.
- How you start
- The blanket stitch is typically worked on and over the edge of a fabric, left-to-right for right-handed folks, and right-to-left for left-handed folks, which is unusual, so pay attention.
- Have the edge you are stitching facing you, not turned away from you.
- Bring the needle up from the back to the top, close to the edge you are stitching. (A) This anchors the knot on the underside. (Where to start the blanket stitch is always the hardest thing to remember about this stitch. The first stitch can often look distorted, so try placing it in an inconspicuous spot.)
- First step
- The needle is inserted back down through the top of the fabric, to the right and away from the edge (B). About ¼” or 6mm in both directions. I pretend there is a little box. My needle and thread have come up at the lower left corner and will go back into the fabric at the upper right corner.
- Second step
- The needle exits out the back at the point of entry. (It goes straight through the fabric.)
- The needle then comes towards you and the edge of the fabric.
- Third step
- As the needle tip becomes visible to you, place the thread so the needle passes over it (C).
- Pull the needle to form the stitch
- Repeat
- Knot and clip the thread
- To finish on an edge, take the needle to the back side.
- Take a small stitch in the fabric if it won’t show on the front, and knot. Or loop the needle and thread through the last stitch on the back and knot it around that stitch.
- To finish when attaching a patch or shape, as in appliqué, insert the needle between the patch and the base fabric. Exit out to the back side and knot.
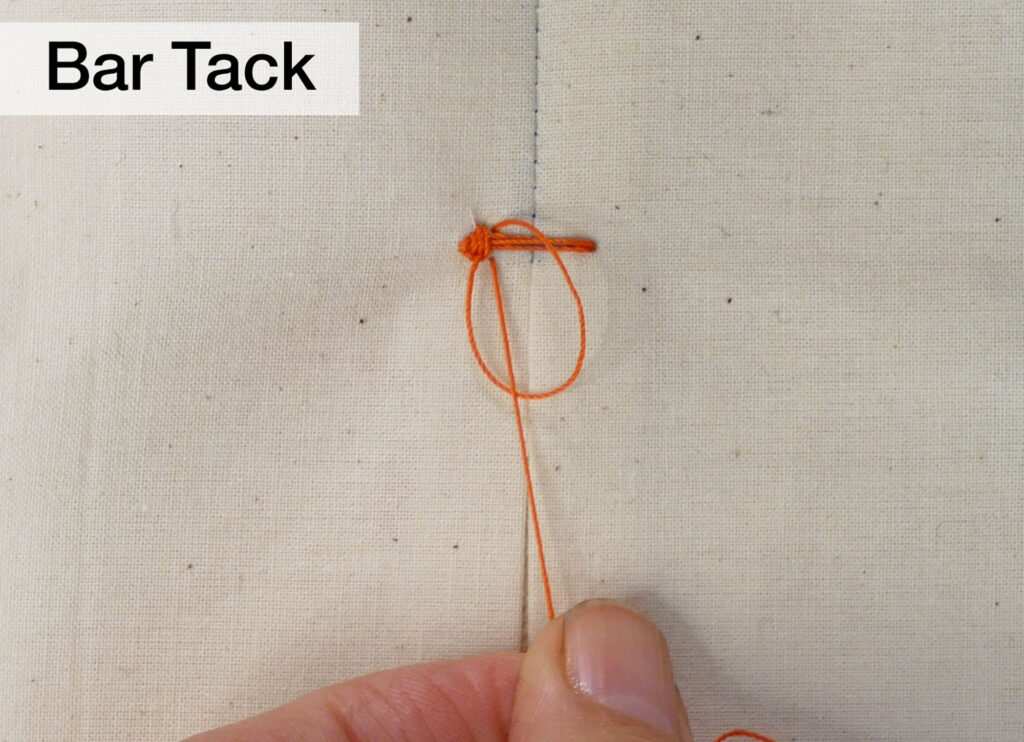
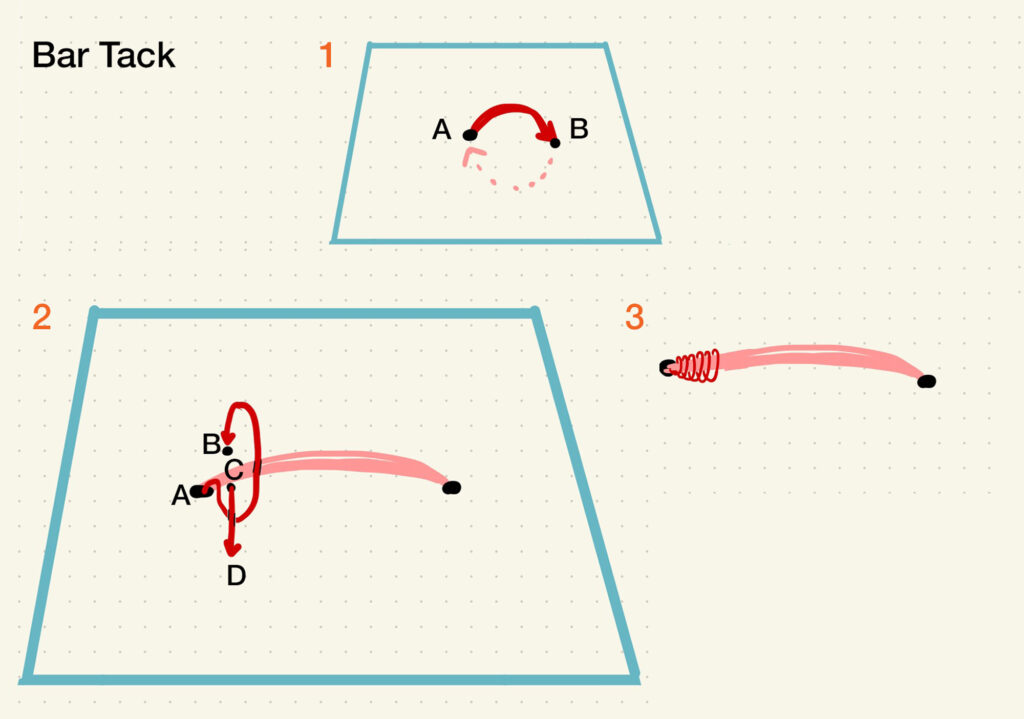
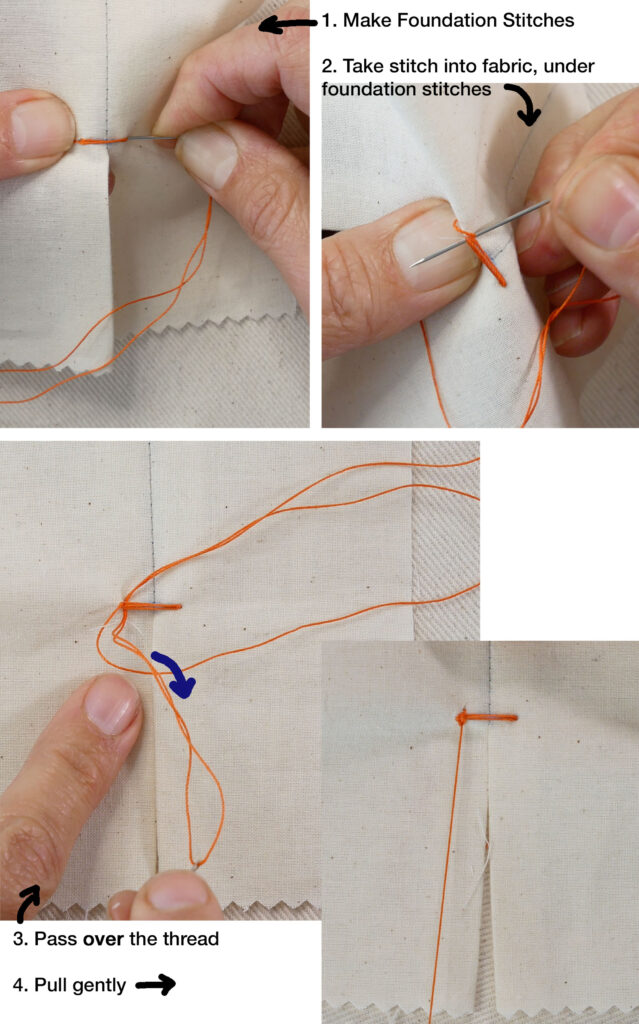
Bartack
The Bar Tack can be found at 05:09 minutes in the video
The bar tack uses a small, tight stitch to reinforce points of strain on a garment. Bar tacks are seen on the opening sides of patch pockets and inseam pockets, and at the end of hem slits. It is a little bar of very close blanket stitches sewn into the fabric and over foundation stitches. It is not sewn over the edge like the decorative blanket stitch. On a sewing machine, it is sewn with a very tight, narrow, zig-zag stitch.
- How you start
- The bar tack is constructed with either a thicker topstitch or button thread or a doubled all-purpose thread.
- To double your thread cut one longer piece. Thread the needle and knot the ends together.
- The bar tack is constructed with either a thicker topstitch or button thread or a doubled all-purpose thread.
- First step
- Make 2 to 4 stitches equal to the length of the bar tack. (1, (A) to (B))These are the foundation stitches and become the base of the bar tack.
- The foundation stitches are sewn on top of each other, not side by side.
- Second step
- Starting at the left end of the stitches, form a blanket stitch, catching the fabric under the foundation stitches you made.
- The needle goes into the fabric above the foundation stitches (B) and exits just below the foundation stitches. (C)
- As the needle comes to the surface, it goes over the thread (D) that is coming from the cloth to form the little knot.
- Repeat
- Take the stitches as close together as you can. This forms the bar.
- Knot the thread on the underside and clip the tail.
More Hand Stitches for Your Skills Box
The Essentials: The Back Stitch and the Prick Stitch
Secure Placement: Tailor Basting Stitch and Slip Stitch Basting
Professional Finishes: The Hem Stitch and the Catch Stitch
The Invisible Touch: The Slip Stitch and the Whip Stitch
When You Might Use the Blanket Stitch: How to Sew on Patches