
Little holes appear in my knit tops too frequently and I want to be able to patch the holes without the mend being obvious.
I know how to patch woven garments so the repair is almost invisible but I didn’t know what would work on knit fabrics.
So I did some research, bought three different types of fabric glue for stretch fabrics, and had a test on three different types of knits.
The glues I chose to use were easy to find, not too expensive, and from brands that have a good reputation and that I had success with in the past.
This post contains affiliate links. This means if you use the link to purchase any of the linked products I get a small percentage of the sale back from Amazon. I bought all of these supplies myself and would not give you links If I hadn’t.
What worked best? What didn’t work at all? And which method would I recommend? (An Update has been added to the end of this post. I used one of these methods on a shirt I want to wear, not just a piece of fabric.)
You can watch the video here or read on
The Objective
To invisibly mend a hole in a knit garment
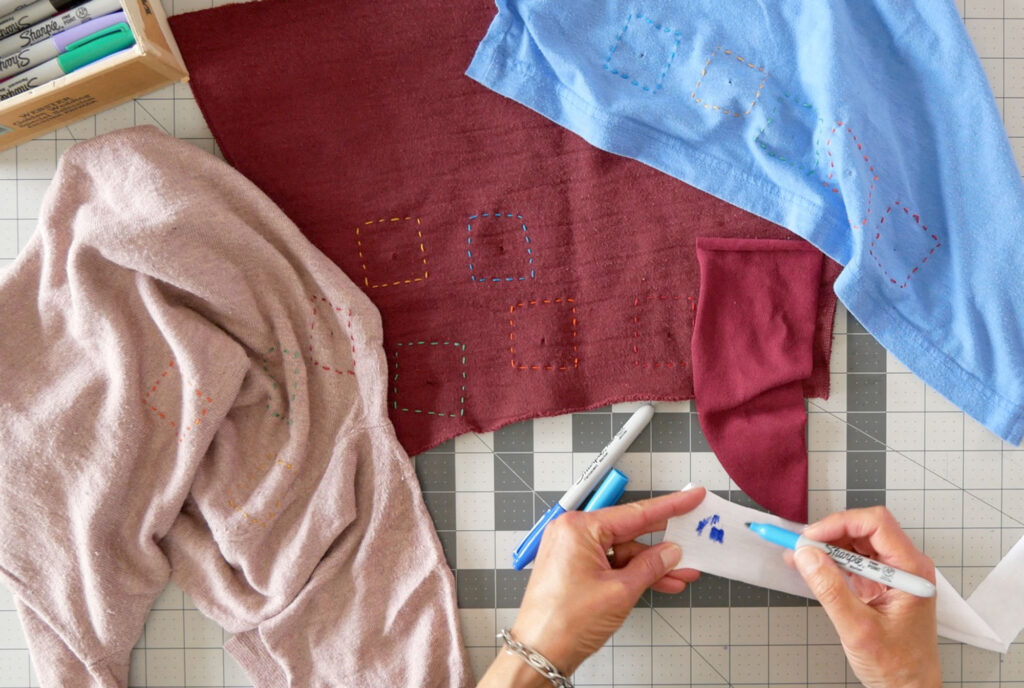
The Set Up
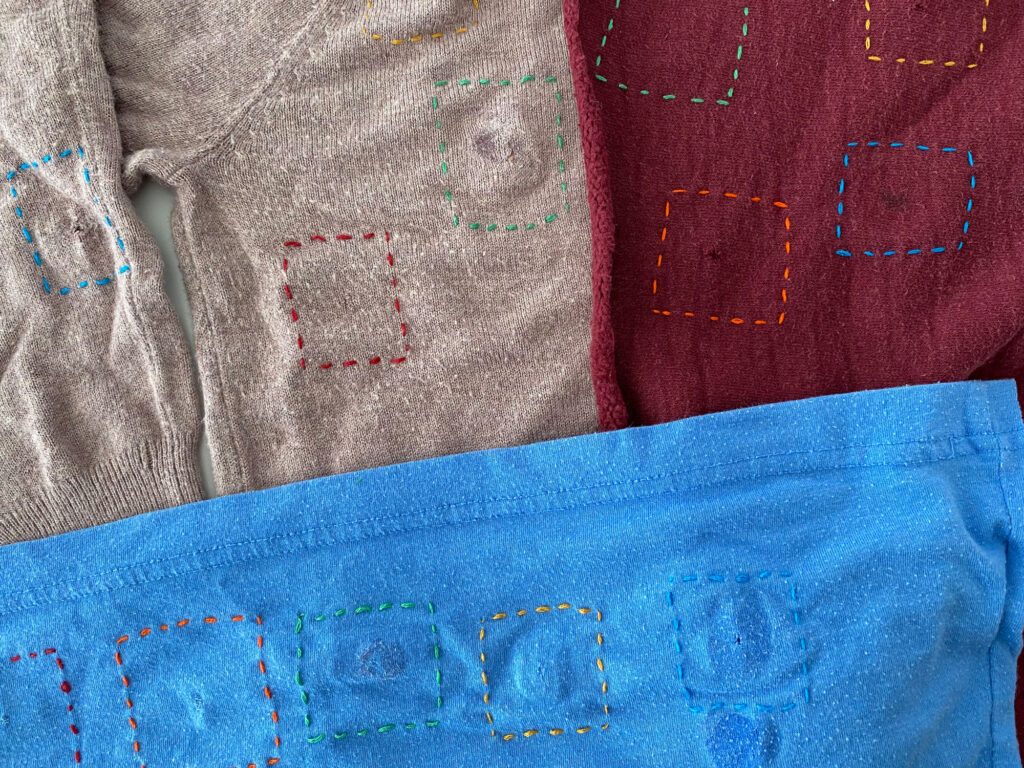
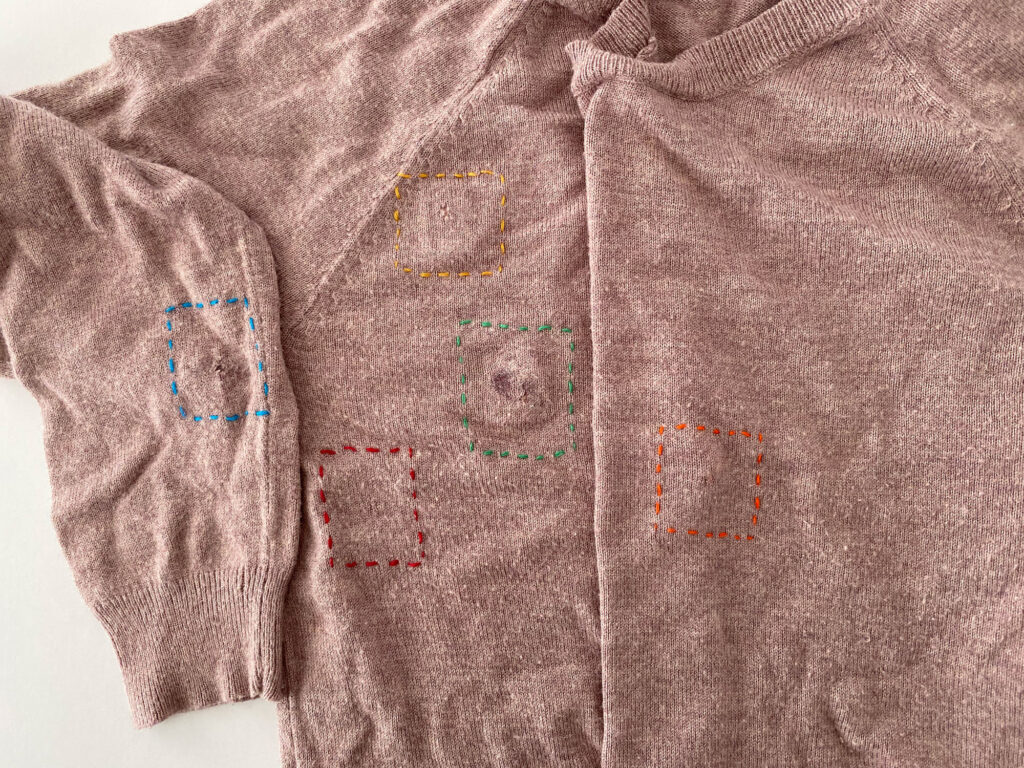
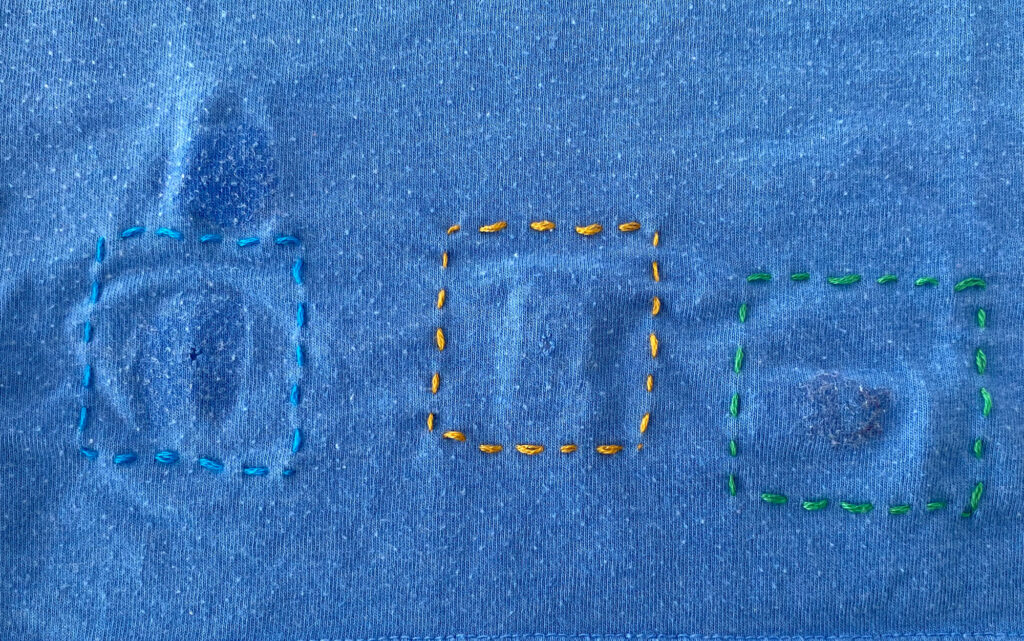
Three types of knit garments
A thin T-shirt
A 100% cotton sweatshirt
A thin, fine-gauge sweater
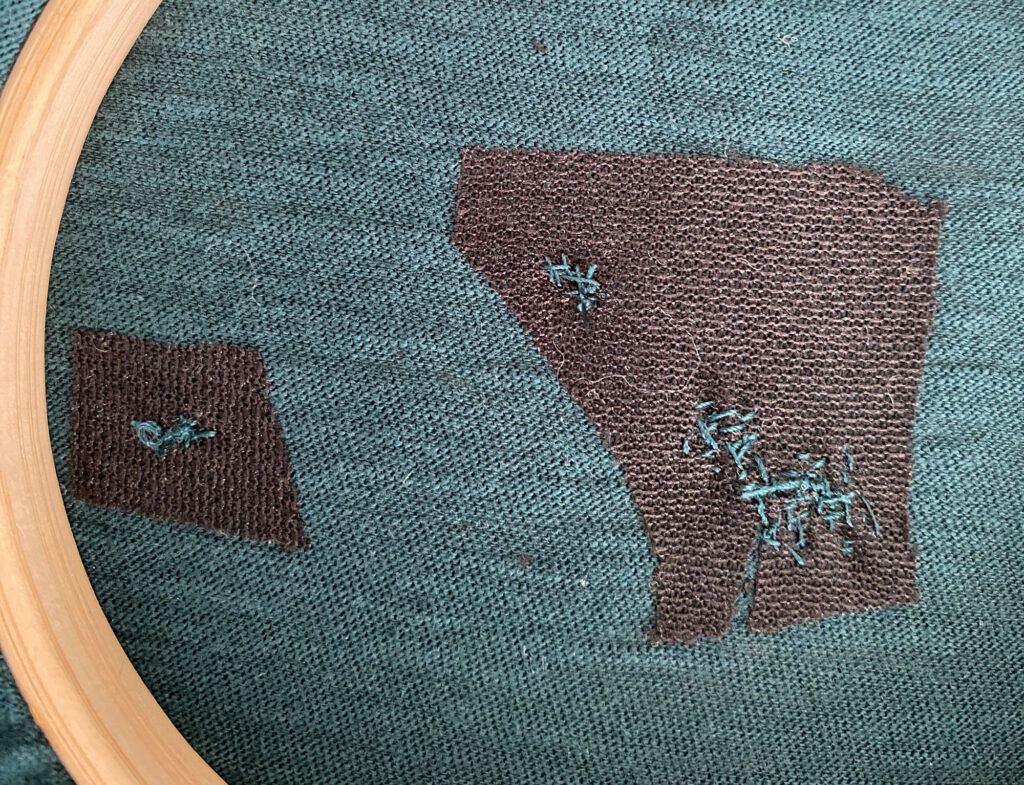
All of the samples had 5 holes of similar, small size. A hole too large would not be able to be invisible, no matter how skilled your stitches.
Around each hole, a box was stitched in a color that represents the method used to mend the hole.
After the methods were done and ample drying time given all the garments were hand washed and lined dry. Then they were machine washed and dried.
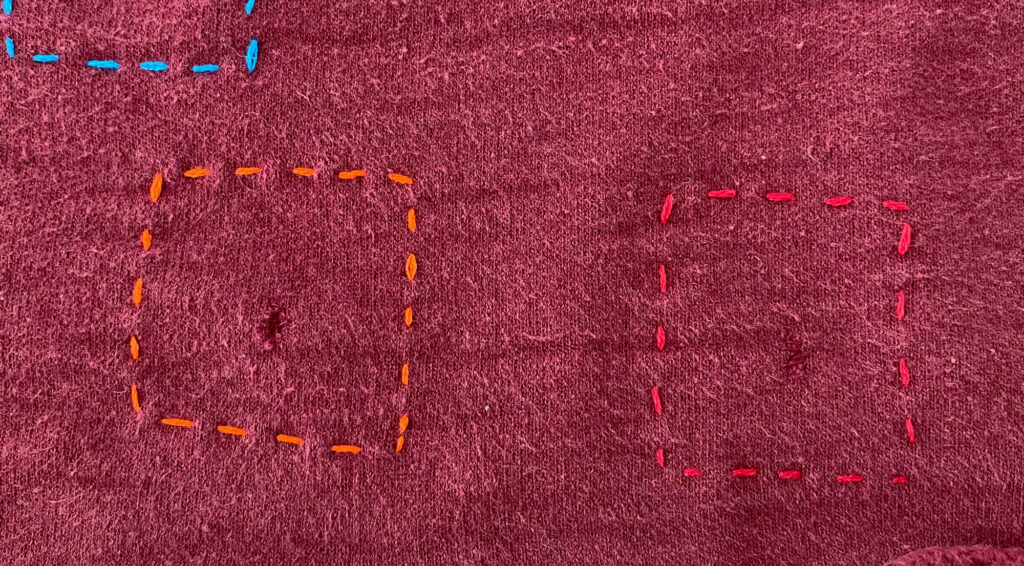
The Players
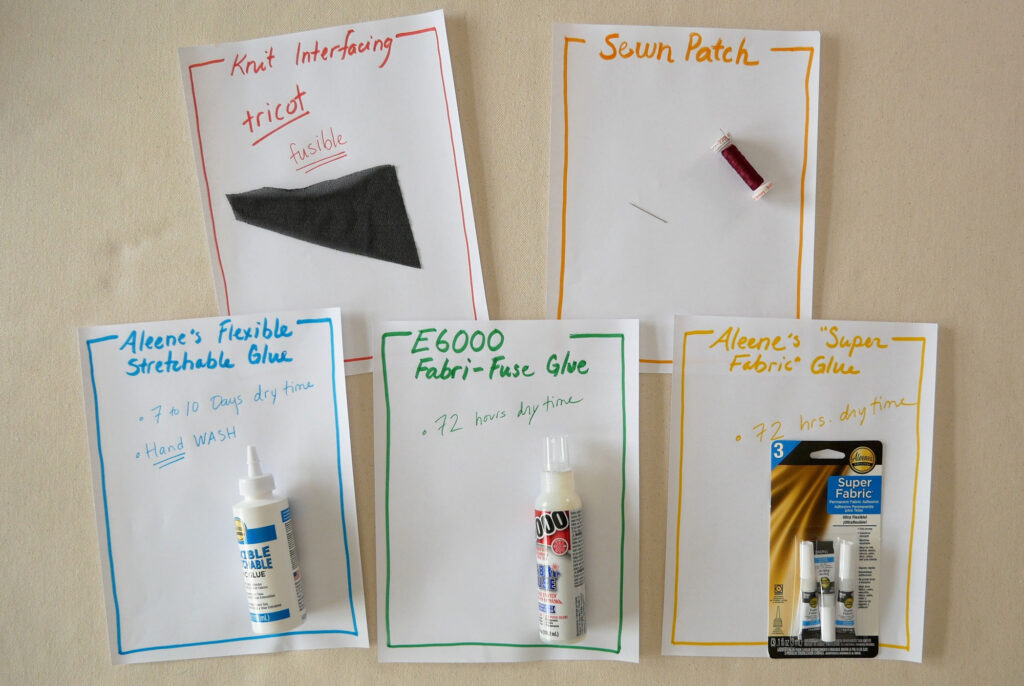
RED: Using lightweight fusible tricot (stretch) interfacing on the back of the hole and a few hand stitches on the top. Tricot interfacing comes in black and white and is about $6 a yard.
ORANGE: Sew a knit patch onto the garment under the hole. A matching spool of thread can cost around $3
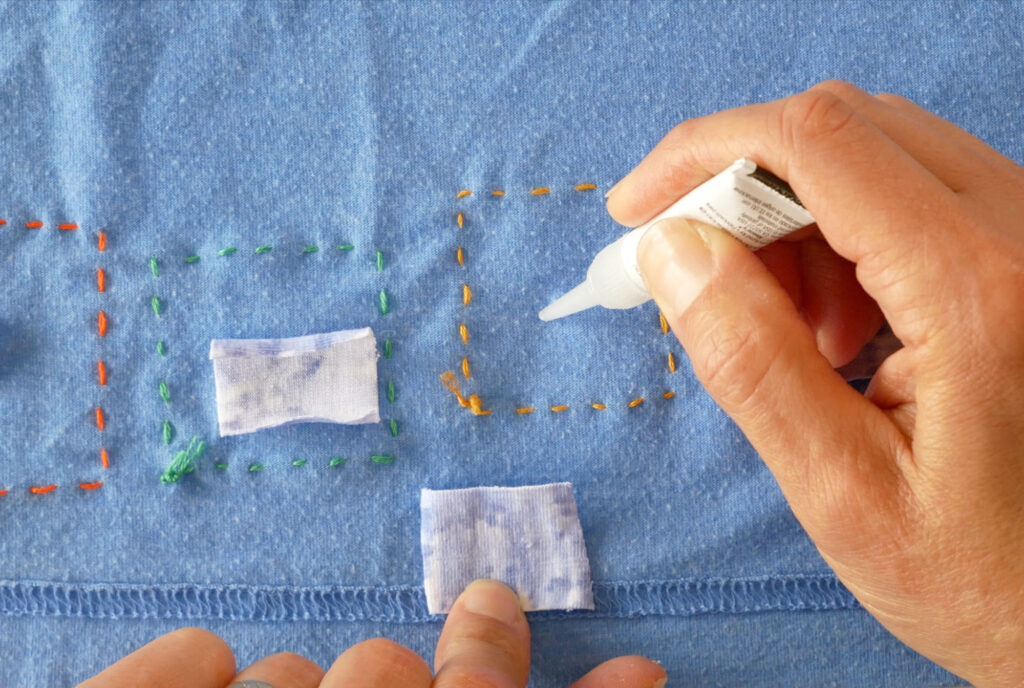
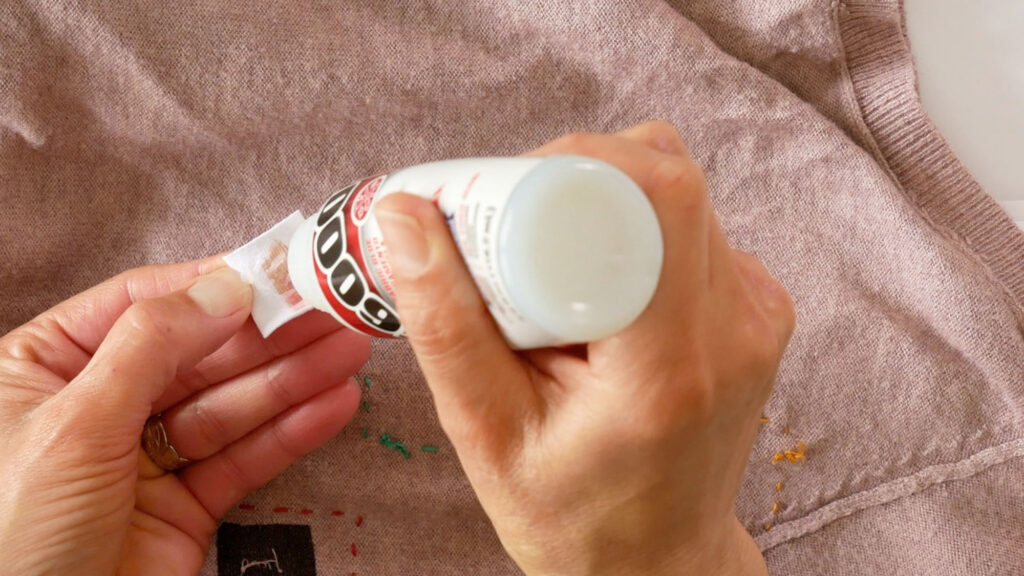
YELLOW: Aleene’s Super Fabric Glue to attach a patch to the back of the hole. Cost: $8.00 for a 3-pack of mini tubes or $5 for a 2oz tube
GREEN: E6000 Fabri-Fuse Glue to attach a patch to the back of the hole. Cost: $9.5 for a 4oz bottle.
BLUE: Aleene’s Flexible Stretchable Glue to attach a patch to the back of the hole. Cost: $5.50 for a 4 oz bottle.
The Test
The Non-Glues
Contender Red: Lightweight Knit Interfacing
Method: Iron a scrape of fusible knit interfacing to the back of the hole. Add a few hand stitches to cover the hole.
Thoughts: Ironing the knit interfacing to the back of all three types of knit fabric was easy. I didn’t feel it was necessary to stitch the hole down to the interfacing but that’s what was suggested in my research so I did. However, I think this could be skipped if the hole is small or the fabric is thicker like the sweatshirt and sweater
(See Update at end of this post about this method)
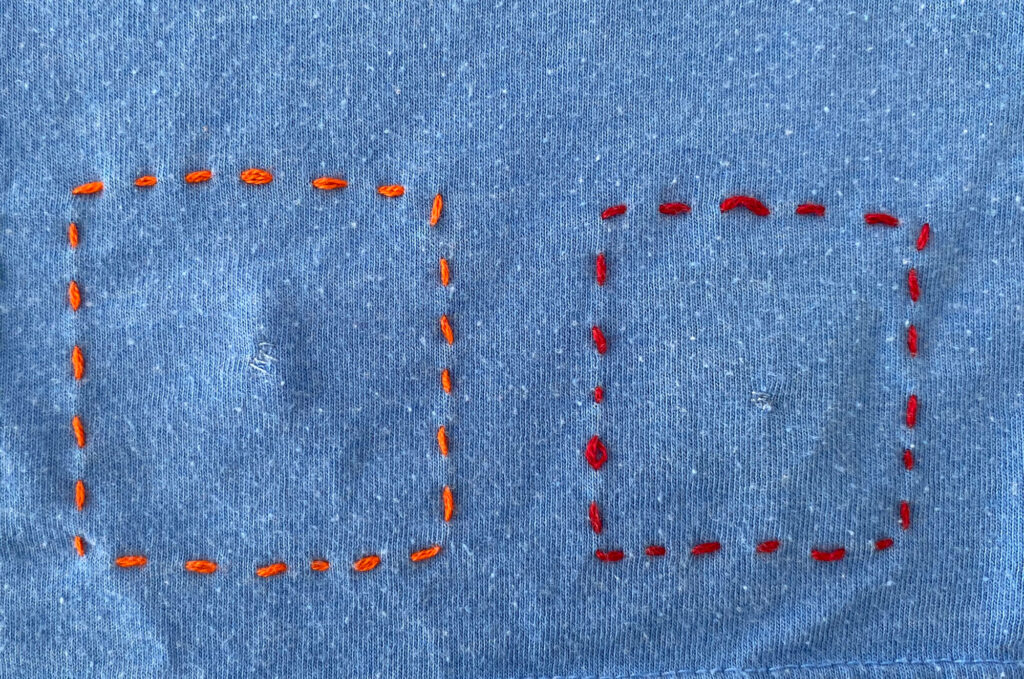
Contender Orange: Sewn Patch
Method: Sew a patch of scrap knit fabric to the back of the hole by hand stitching a few stitches over the hole, catching the patch.
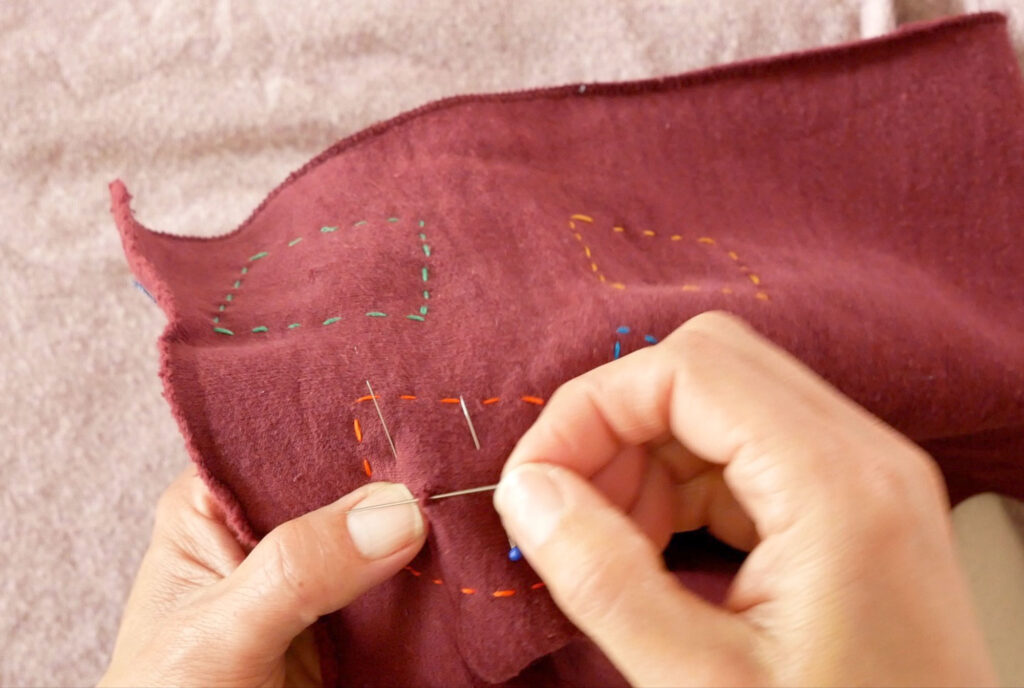
Thought: The sewing was easy enough but not that invisible. Matching thread to the garment is important here for the mending not to show, especially on solid-color garments.
Finding a piece of scrap that matched my T-shirt and sweater was difficult so I used Sharpie markers on white fabric to get something close to matching. The Sharpies fade over time but they don’t bleed in the wash. Maybe a matching patch isn’t that important when the hole is small.
I don’t like how the edge of the patch curls up after it is washed. It creates a bump under the garment but perhaps cutting the patch even smaller to do away with the bulk would eliminate that.
Let’s Compare
The Glues
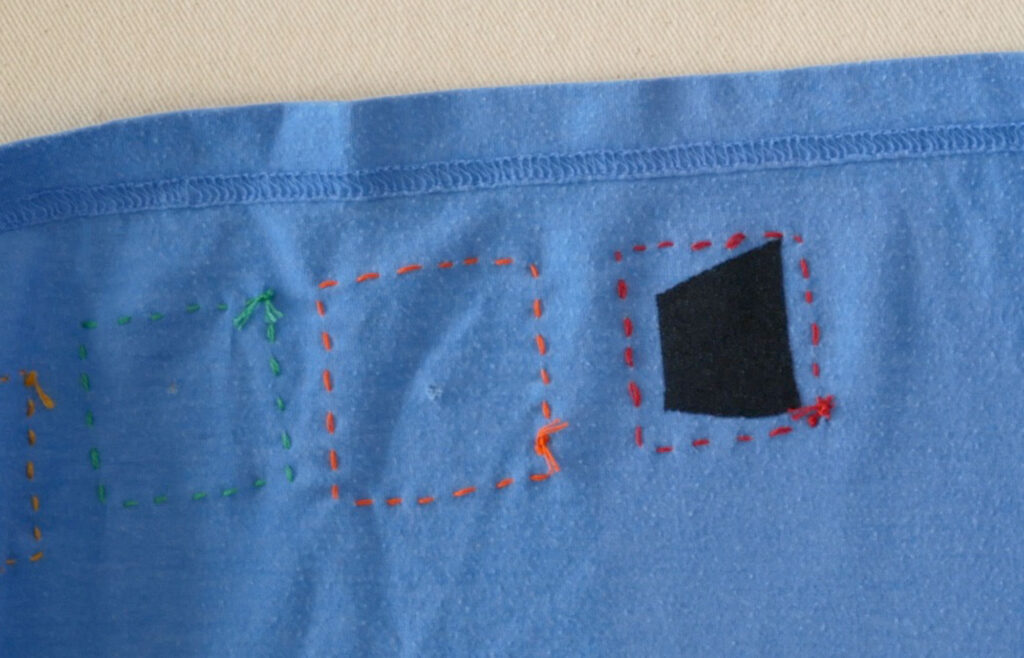
Contender Yellow: Aleene’s Super Fabric Glue
Method: Apply glue around the hole, or the patch. Apply the patch. Wait 72 hours/3 days before machine washing and drying.
Thoughts: The extra fine nozzle on the tube made getting the right amount of glue easy and I appreciate the small tubes as I have had large tubes dry up before I can use it all.
This glue also stretched with the fabric better than any of the other glues and bled through was minimal to none depending on the thickness of the garment.
Contender Green: E6000 Fabri-Fuse Glue
Method: Apply the glue to both the garment and the patch before connecting the two surfaces together. Wait 72 hours/3 days before laundering.
Thoughts: This glue worked well but made the garment fabric stiff when it dried and bled through to the front of the thin t-shirt and a little on the fine-gauge sweater which made it not invisible. Maybe I used too much glue? I tried not to.
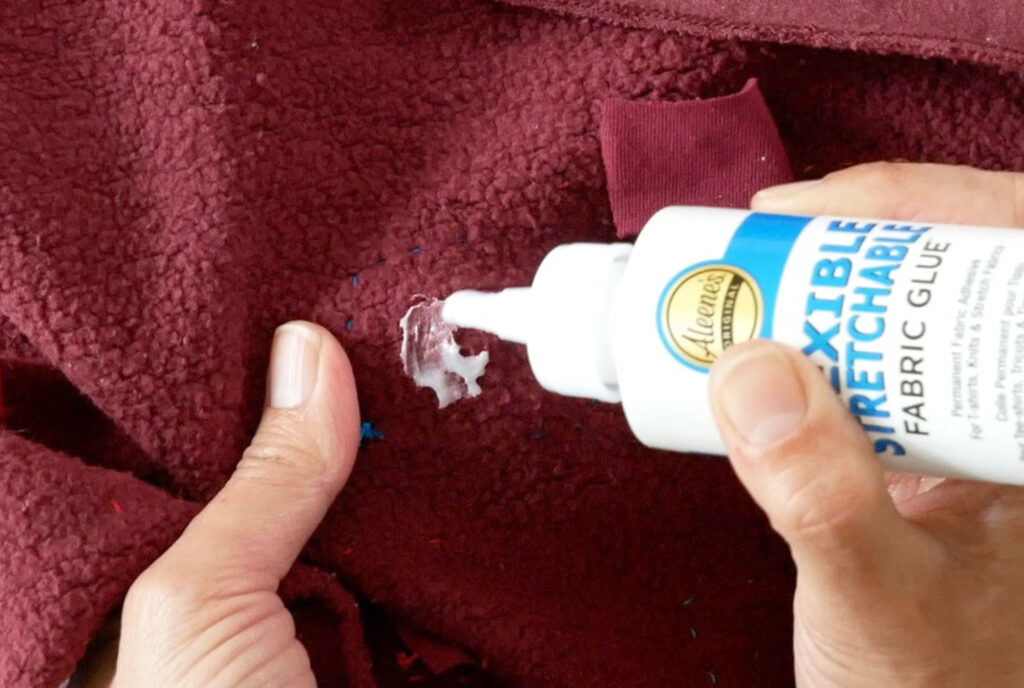
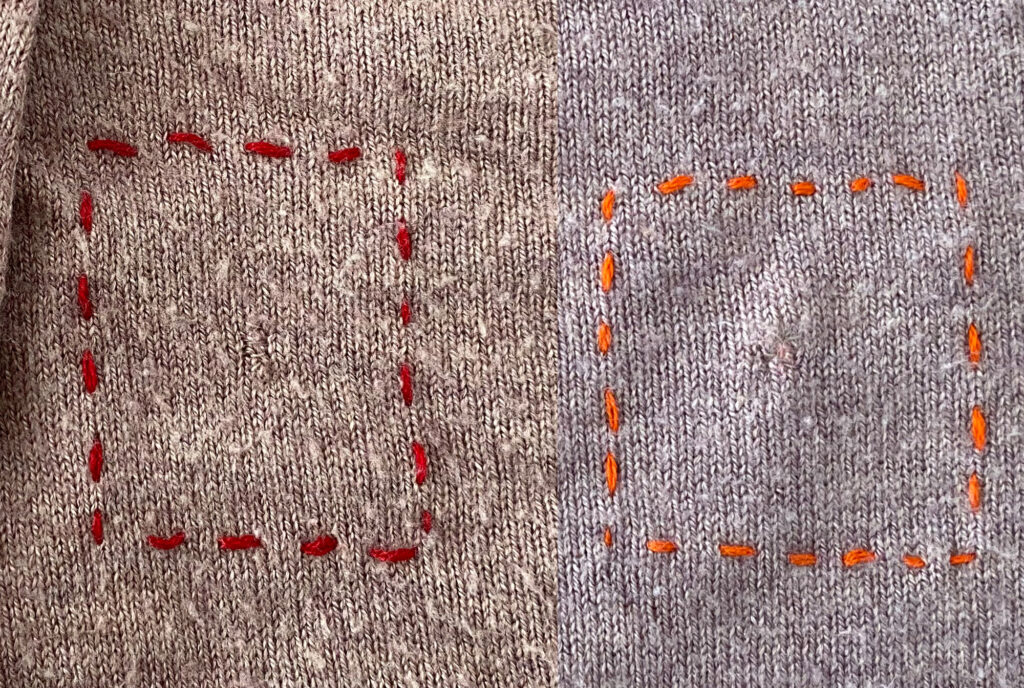
Contender Blue: Aleene’s Flexible Stretchable Glue
Method: Apply glue around the hole, or the patch. Apply the patch. Wait 7 -10 days beforehand washing (do not put in washer or dryer)
Thoughts: This glue went on easy enough but it bleed through the garment in a big, ugly way. The patch came off the sweater and the t-shirt after hand washing and drying with very little pulling on my part. The patch applied to the sweatshirt stayed, even through the washing machine and dryer.
NOTE: I applied the glue to the garments with all of the glues and garments instead of the patch. This could have made the bleed-through of the glue worse than if I had applied it to only the patch. However, I didn’t want glue to come out of the hole and that is why I applied the glue to the underside of the garment, around the hole.
Even though there is no bleed-through with the Yellow glue you can still see the patch underneath. To avoid this I would use the lightweight interfacing method or a very lightweight fabric for the patch as my patch fabric was slightly thicker than this T-shirt fabric.
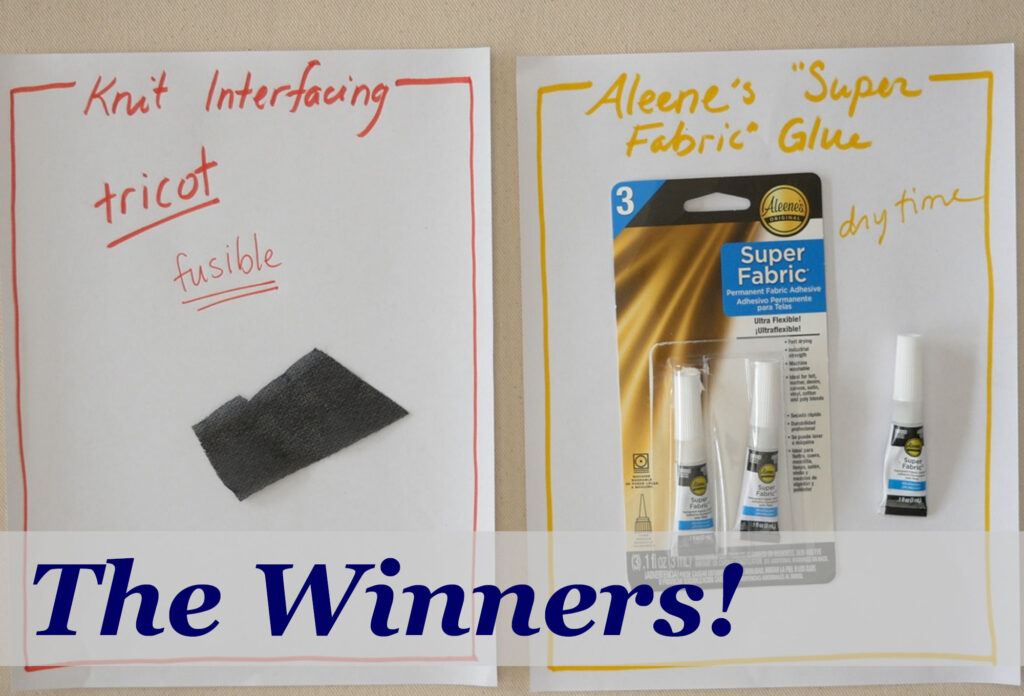
The Winners
In the end, the fusible knit (tricot) method proved to be the best non-glue method (and my personal overall favorite). It showed the least and mends the hole. You can leave off the extra stitching if your hole is small or your garment fabric is thicker. I don’t think that fusible “patch” is going anywhere and if it eventually peels off it’s easy enough to apply another scrap. (see update below)
Aleene’s Super Fabric Glue was the clear winner among the glues. It didn’t bleed through the garment, it was easy to control the amount of glue that came out of the tube and it allowed the fabric to remain stretchable, unlike the other two types of glue in my test.
Update
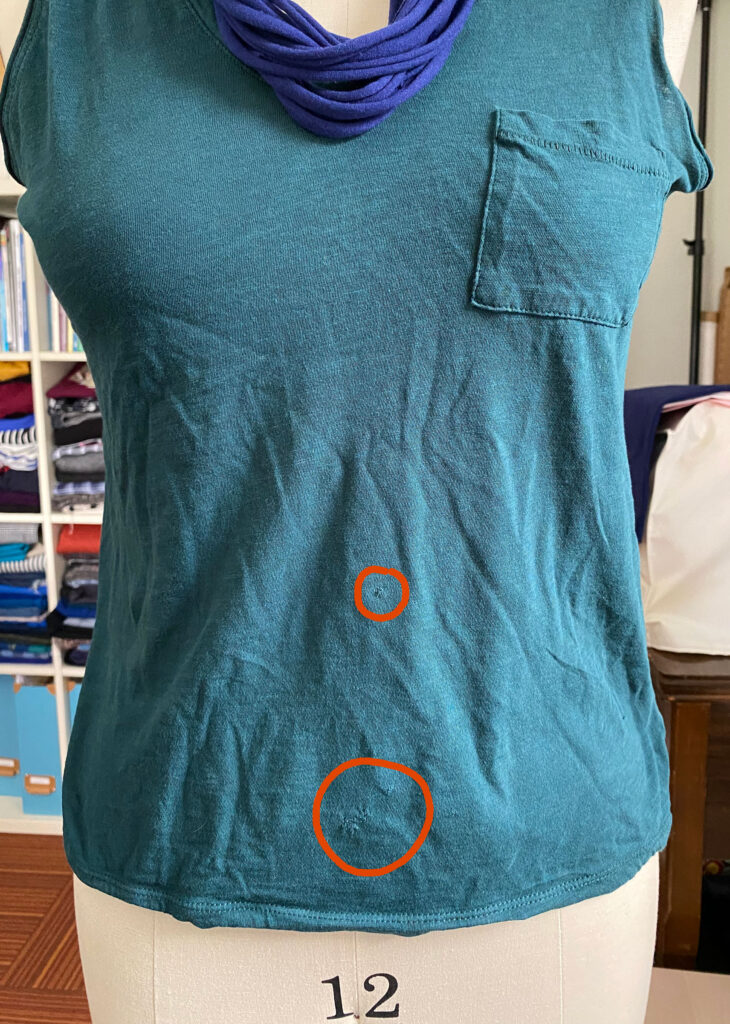
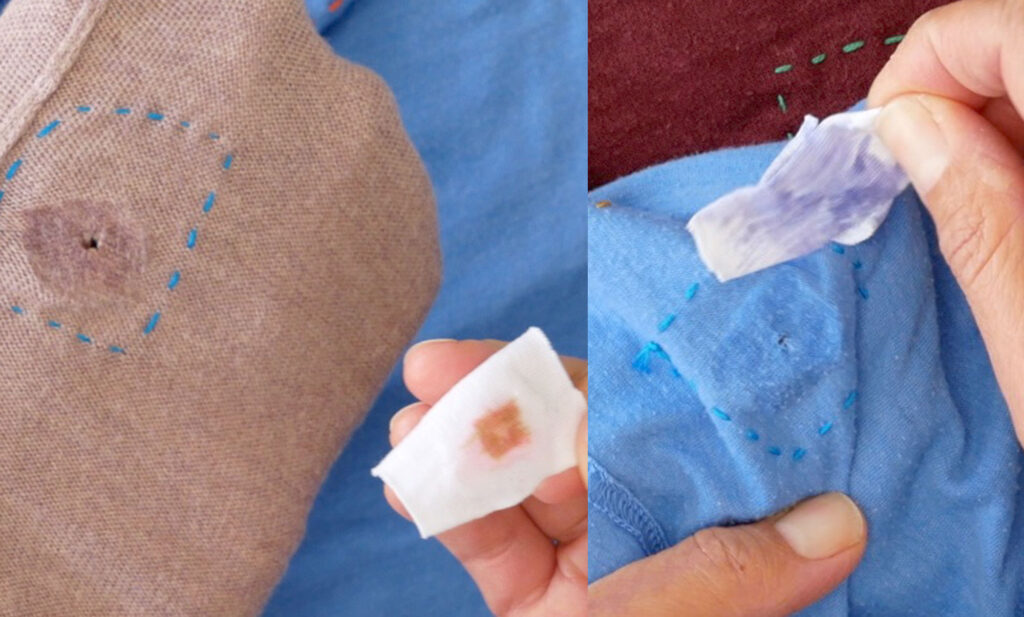
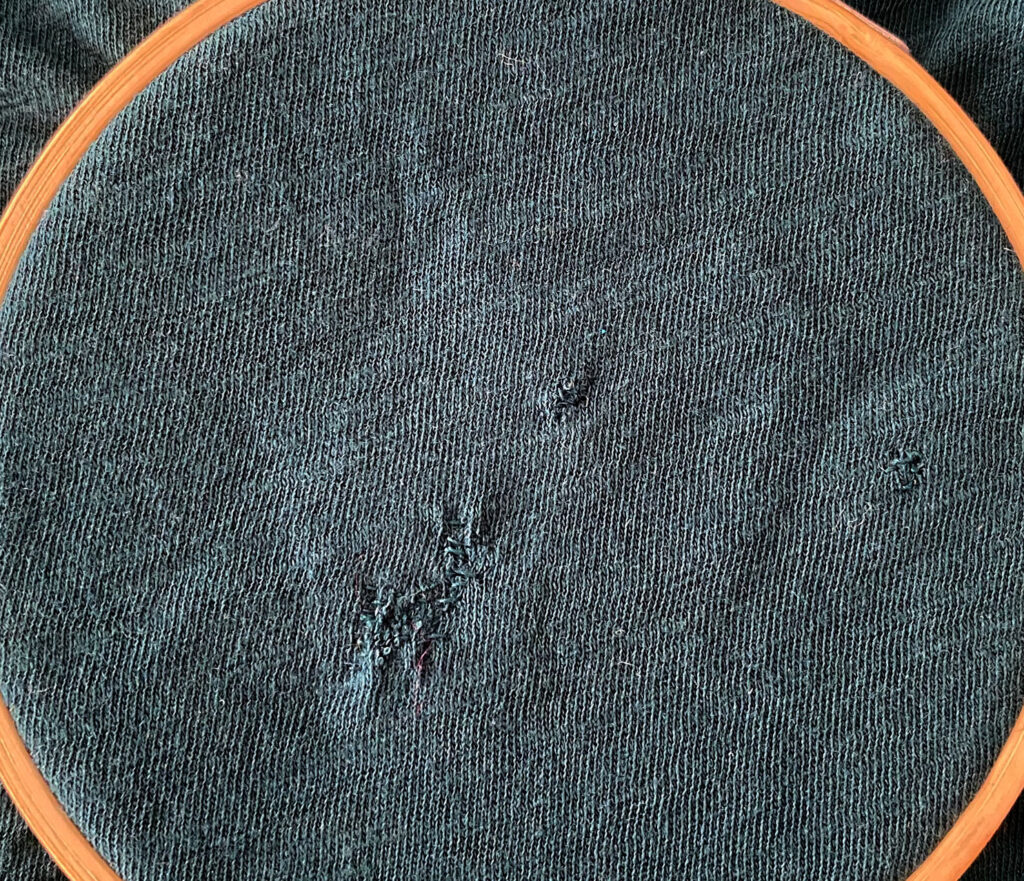
A few days after I published this I repaired a t-shirt of mine that had some small holes but larger than the holes in the test fabric.
I chose the knit interfacing patch on the back since I thought it easier than finding matching fabric for a patch that is glued on. The holes though, being bigger, showed the interfacing after it was applied. Not very invisible. So I added some tiny hand stitches in horizontal and vertical rows going over the hole.
Because I did have matching thread (coincidence) the stitches filled in the hole nicely. I used a small embroidery hoop to hold the shirt fabric taut which helped keep the stitching neat.
Ah, That’s why you add stitches after applying the interfacing patch (Palm-to-Face Moment).
I’ll have to give these a try. I go through SO. MANY. t-shirts every summer. I’ve finally figured out what works. I have my “leaving the house” t’s. They are worn (obviously) only when leaving the house. When I get home, my first stop, even before putting away frozen groceries, is to change my t-shirt to an “at home” t. These are slightly more worn and maybe stretched. They might have a small hole such as you repaired (99% of the time that hole is due to a jeans button rubbing against the kitchen sink). If I repair the hole, it won’t get bigger, which inevitably relegates it to the “outside” stack that I wear when doing yard work. Those t-shirts eventually end up in the rag bag or sometimes even the trash.
I like how you use your shirts through their complete life cycle 😉 Mine go form outside the house to under sweaters in the winter, to PJ top to rags (Since I do very little yard work). I just mended my t-shirt this morning using the interfacing on the back but because to hole(s) were a little large you could still see them. I happen to have matching thread so I add some tiny, hand sewn, running stitches across the holes in horizontal and vertical rows. Adding those extra stitches really made the holes blend into the shirt. I’ll add some photos to the post. But I tell you this because it worked. I was impressed. And my jeans button and kitchen sink are the reason for holes in my t-shirts – all the time.
Thank you for this article, it has given me much to think about.
I stopped using the fusible tricot nearly 40 years ago, due to it either losing adhesiveness or not losing it’s adhesiveness when the garment stretched.
It always seemed like the garment stretched in different ways than the patch, but maybe I didn’t align the patch’s direction of stretch with the garment’s direction of stretch.
Also, I never thought about adding stitching to the fused tricot area, so that could also be a key to success.
Perhaps your method described in a different article, using double patches, inside and outside the garment, both stitched, is probably my best solution.
Do you think this fusible tricot might have improved over the last 40 years? Do you depend on a specific brand?
Talk about something to think about – you are 100% correct about direction of the interfacing being lined up with the direction of the fabric. Same is true on woven garments too. And yet – I don’t remember being too careful about my direction when I applied the patches -oops.
I think interfacing has improved in even the last 10 years (Or I’ve finally found the “good stuff”). I like the tricot interfacing EmmaOneSock.com sells https://www.emmaonesock.com/fabrics/31173 Unfortunately she only has black. I also buy interfacing from Fashion Sewing Supply Their stuff is The Best. (Their website looks very dated but their interfacing is great) Occasionally I buy Pellon from my local JoAnns. I don’t have any right now to share what it’s called but I stand in front of the interfacing bolts and touch everything to pick which one I need 😉
Thanks for the obvious but overlooked reminder about Grainlines matching up.
Those links are greatly appreciated. Seeing Fashion Sewing Supply’s Hair Cloth Interfacing was a reminder of Mom using Hair Cloth to interface her suit jackets in the 1960’s. As a child, I thought it was the same fabric as Hairshirt undergarments worn by medieval monks.
Lol! I thought the same thing!