
Maxi Skirts are the new yoga pants. They’re easy to wear and they’re comfortable. But maxi skirts, well, this maxi skirt, at least is better than yoga pants because it has pockets. Pockets!
If you can use a tape measure you can draft your own pattern in under an hour for this easy to sew maxi skirt with pockets. (I really appreciate pockets, useful pockets, on my clothes)
This post will show you how to draft a pattern for a straight maxi skirt with a 2″ (or 5cm) wide, covered, elastic waistband (featuring a ready-to-wear sewing technique), side slits and two roomy, patch pockets. This pattern was designed to be made from woven fabrics but could be used with light to medium weight knits as well.
Part 2 will show you how to sew the skirt and the ready-to-wear looking waistband. (You can see that here)
PART 1: Drafting the Pattern
[See Part 2: Sewing the Maxi Skirt here]
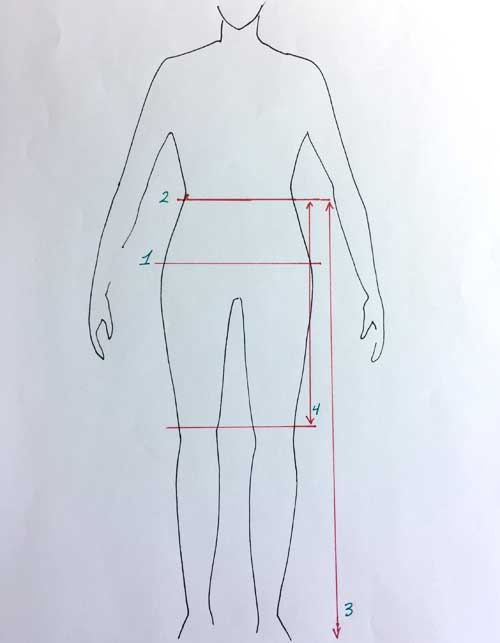
Start by taking your measurements
- Measure around your torso the widest part of your lower torso that the skirt will go over. This is usually the hips and buttocks but this could be the high hips or the thighs. Keep the tape measure horizontally level to the floor when you take this measurement.
- Wrap the tape measure around your torso where you like your skirt to sit on the torso. Ideally, this is your natural waist (the narrowest part of your torso) since an elastic waistband, if stretched too tightly, will find it’s way to a narrower area, whether that’s up or down on your torso.
Make a note of both the measurement around and where on your body you are measuring because this place where the tape measure lies, is the top of your skirt and you’ll need to know where the top of the skirt is for the next two measurements. - Measure from where the top of the skirt will sit (measurement #2) down to your desired length, (the floor, top of your foot, or hovering at your ankle for a tea length skirt)
- Measure down, from the same horizontal line, (measurement #2) to the top of, or slightly above, your knee. (This is the top of the side slit).
Write all these measurements down and keep them close by.
Ready to Draft
You don’t have to make a paper pattern for the skirt front/back or the waistband. You could measure directly on your fabric and mark it out with tailor’s chalk to cut out the pieces.
If you want to make a paper pattern you could make a whole pattern for each piece or a half pattern. A whole pattern is a pattern piece in its entirety. A half pattern is literally half of the pattern. The pattern piece has to be symmetric to draft just half of it. To get a whole piece from the fabric one edge of the half pattern is placed on the fold of the fabric then, when cut, it unfolds to reveal a whole piece in the fabric.
(You will draft a pocket pattern on paper and that step comes right after this one.)
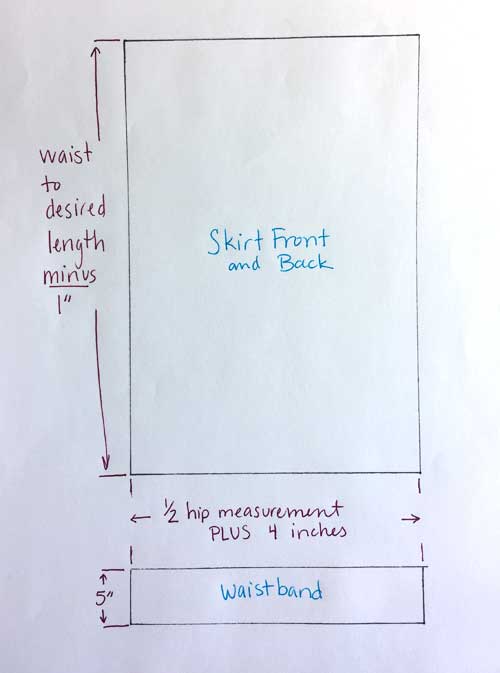
Draft the Skirt Front and Back
The skirt front and back are identical. You need to only draft it once on paper but twice on fabric since you will cut two of the skirt.
Start by dividing measurement #1 in half and add 4″ (or 10 cm). This is the width of the skirt at the top and the bottom. (The sketch says “hip” measurement but use the measurement for the widest part of your lower torso)
Why? The fabric needs to go over the widest part of your lower body, (remember this is woven fabric and it will not stretch like knit fabric), plus give you room to sit. You could add more than 4″ if you feel you want the skirt a little looser in the seat.
If there is a difference of 10″ or more between your widest area and where the skirt will sit on your torso you may want to taper your pattern on the sides to reduce the bulk of excess fabric at the waist.
Here’s how:
- Draft the pattern so the width is 1/2 widest area plus 4″
- Measure on your body down from where the top of the skirt will be to your widest area.
- Draw a line on the side seam of the pattern this distance (top of skirt to the widest area) down from the top edge.
- Draw a line tapering in an inch or two, from the mark (height of widest area) to the top of the pattern.
- Transfer this line to the other side of the skirt pattern
The length of the skirt pattern is measurement #3 (top of skirt to the desired length) minus 1″ (or 2.5 cm) OR, for a deep hem, subtract nothing. (the 2″ wide waistband will give you the inch to hem)
If you’re drafting directly on to the fabric make a chalk mark on both sides where the top of the slit will be. If you are drafting on paper also make a mark at this distance or simply write this measurement down on your pattern piece as a notation and when it comes time to sew the side seam, measure the skirt to see where you’ll stop sewing.
Draft the Waistband
The waistband is a rectangle. Its width is equal to the width of the top of the skirt, (half measurement #1 plus 4″). And it is 5″ high. (for 2″ wide elastic – if you use a different width elastic you’ll want to alter the waistband height)
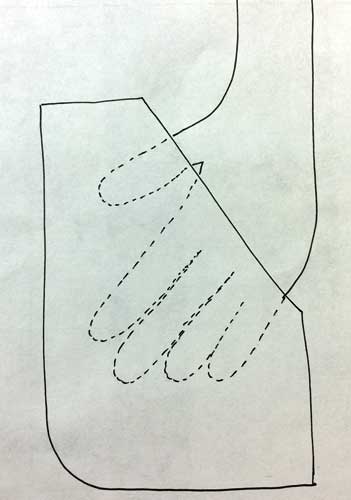
Draft The Pocket
Pockets need to fit hands, and keys, phones, dog treats. This pocket is pretty roomy without looking too big for the skirt. You can alter the size and/or the shape to suit if you want but this is a good size and shape to start with.

Start with a sheet of US letter size copy paper 8 1/2″ by 11″ (a little shorter than A4 paper but of course you can use that and trim it down or have a slightly longer pocket).
- Measure across the top of the sheet over from the right 4 7/8″. Make a mark.
- Measure along the left side, a 1/2″ in from the edge and 5 1/4″ up from the bottom. Draw this line.
- Connect the top of this line to the mark you made on the top edge of the paper (step #1). This is the pocket opening.
- Check that the widest part of your hand can fit into the opening. REMEMBER, the actual opening is 1/2″ in from this edge you just drew (it’s wider already). The drafted line is the cutting line. The finished edge is 1/2″ in (seam allowance, y’all) Lay the widest part of your hand across the opening to see if it will fit. If you need to make the pocket opening wider, angle the line in more at the top. This will make the opening a little longer and the top edge of the pocket a little shorter.
- Round off the bottom right corner of the pocket. My curve comes in from the corner 5/8″ at the widest part. It starts to curve about 1 3/8″ above the bottom right corner and blends back into the bottom edge about 1 1/4″ in from the right corner.
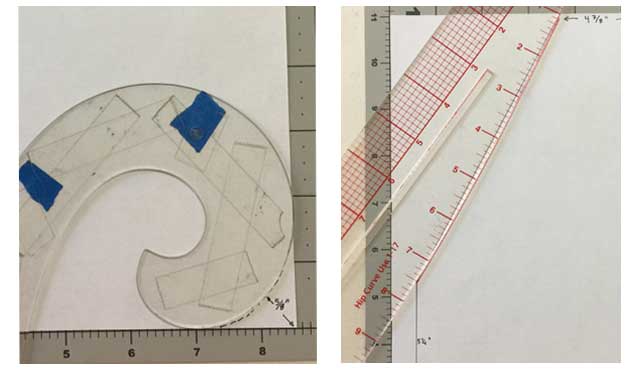
You could use a french curve to get the bottom corner shape or eyeball it.
Soften the pocket opening with a very slight curve. A hip curve ruler was used here.
Trace this drafted pocket onto tracing or pattern paper. The grainline will go along the long edge of the pocket. Lable your pattern with the name of the project, the piece it is, the grainline and “cut 1 – cut 1 in reverse” because you’ll cut two but you want them to be mirrored.
All of the pattern pieces you just drafted include a 1/2″ seam allowance.
Prep Your Fabric and go to Part 2 to Sew This Baby Up.