

There is nothing wrong with Liesl + Co’s Cappucino Tunic pattern. It’s cute. It’s easy to sew. The instructions are clear.
However, there is something wrong with my Cappuccino Tunic. It’s probably the wrong style (or size) for me but the stiff fabric is making it worse. (and the first thing I thought when I saw this top on was “scrubs”. It’s the print in this shape, right?)
After asking on Instagram for some suggestions a friend commented that maybe making it sleeveless would be the trick to making it wearable.
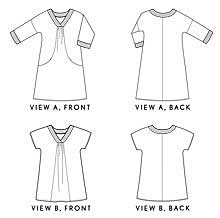 Changing a top with set-in sleeves to sleeveless could be as easy as taking the sleeves off and binding the armhole. But the Cappuccino Tunic has a kimono-style sleeve.
A kimono-style garment has the sleeve and the bodice drafted as one piece. There is no separate sleeve pattern that is sewn onto the bodice.
There is a shoulder seam going all the way from the neck to the hem of the sleeve and an underarm seam that becomes a side seam.
With a kimono-style top, you cannot just leave the sleeve off, you need to figure out where to dissect the sleeve from the bodice. You need a style line.
The Style Line
A princess seam, where a waistline is placed, a sweetheart neck, the shape of a collar or pocket, these are all style lines. A designer chooses, not always for functionality but for the desired look, the style, where to place a style line.
The style line in this alteration is the new armhole. And it’s all up to you, the designer of your sleeveless version. You will decide how the armhole is shaped.
Do you want to scoop it way in? Do you want to leave the shoulder seam wide? Do you want to hug the shoulder in the front but cut away in the back?
And how do you know if it’s going to look ok?
Marking And Deciding On The New Style Line
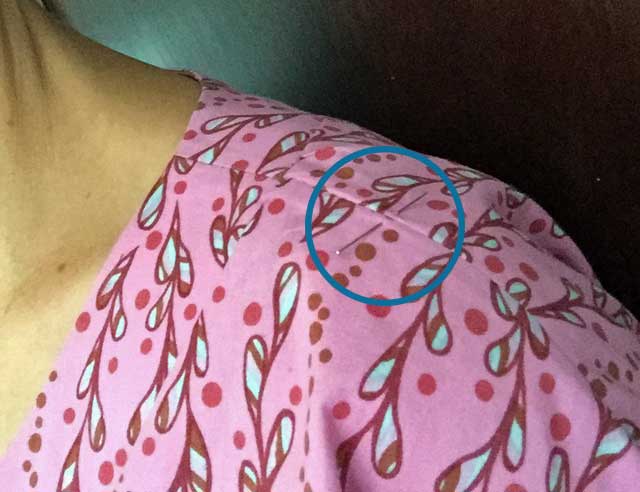 With the garment on, start with the shoulder seam of your non-dominant hand.
- How far should this seam go? Place a pin at the point.
- Look at the upper chest area, how far in or over do you want the armhole to come? Mark with a pin.
- Look at the underarm. On a kimono-style, the underarm is low. Do want to raise it up? Mark this also.
- Take a look at your back with mirrors. If you can mark some points, do. On some prints you can find a reference mark in the print, For example; bring it over to the third stripe, or to the blue triangle. You may have to guess at the back and adjust it after it’s marked out.
You will only need to mark one side of the garment to start with. Later in the process, you will transfer your style line to the other side.
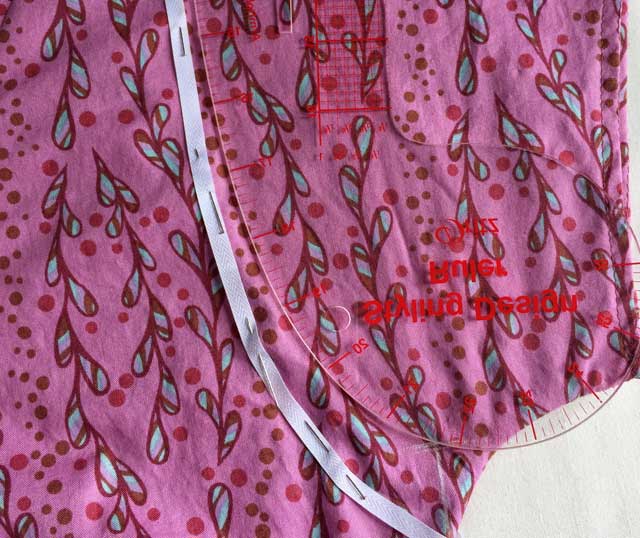
Take the garment off and lay it on your work surface front side up. There are two ways you could draw your new style line; your new armhole shape.
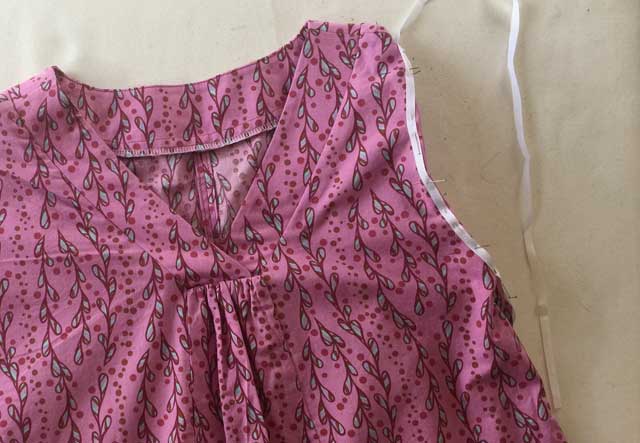
- You could start with drawing a line with chalk and an armscye curve following your pin marks. Then pin contrasting 1/4″ twill tape or ribbon on the style line you just drew.
- OR: Skip the chalk and “draw” with the twill tape or ribbon, hitting those pin marks you made when the garment was on. Place the twill tape so one side of it (the left or right side of the flat twill tape) represents your line. Guide, adjust and smooth the line with an armscye curve.

Now flip the garment over and do the same to the back.
Take a step back to check that you like the new style line. Adjust the tape if you need or want to. (Taking a step back from any visual work helps you see what is going on in the work. I guess it’s looking at the big picture 😉
With the twill tape still pinned onto the garment, put the garment on.
Now you can “see” the new shape on you.
Do you like it? Change it if you don’t and repeat until you do.
(I saw that the armhole will need to be raised and brought closer in toward the body. I’ll show how that’s done in the next post)
Another great visual to help you decide on the final cutting line is to fold the sleeve into itself up to the style line. This really gives you a clear vision of how your alteration is going to look. And it allows you to make changes before you cut anything.
Next post will show you how to raise the armhole and how to transfer your new style line to other side of the garment accurately. Also how to save the style line on paper for future sleeveless hacks to the pattern.
I am trying to do exactly this but on the pattern piece instead of a already made garment ( I love my sleeves but want a sleeveless version) I would love to see theeline you drew for the armcyse to compare to mine before I cut. It is technically a Muslin but I would prefer it to be wearable!
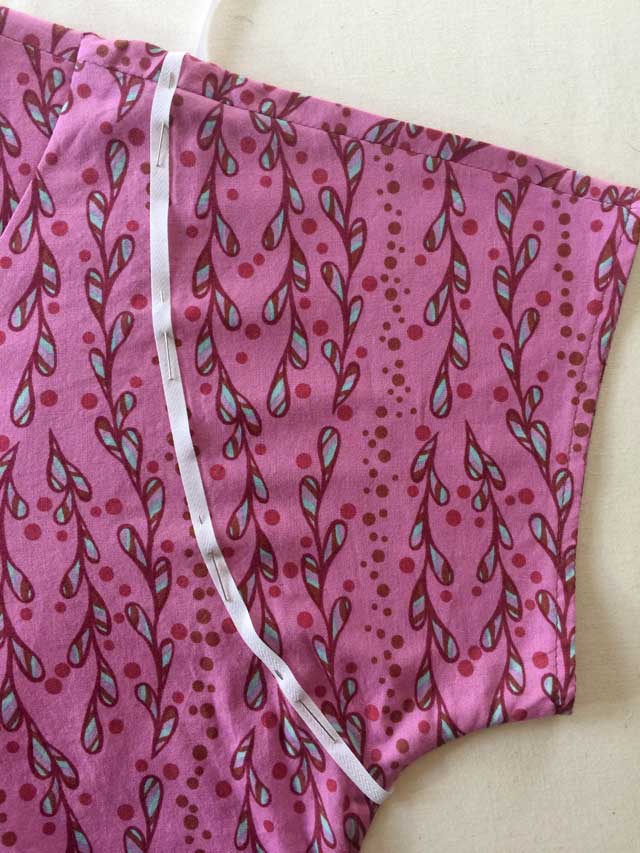
My line is the white twill tape. I drew a chalk line against the twill tape, added 1/2″ seam allowance from the sleeve side of the tunic and then cut.
Copy the pattern front and back on tracing paper and work on your tracing (in case all doesn’t go well). Start by drawing your new armscye. Do you have a sleeveless top, or a pattern for one, that you like the armscye on? You could use it as a guide. Lay it on the pattern and copy the shape for your new armscye. Before you add seam allowance, walk the shoulder seam to be certain the back and front pieces are the same length at the shoulder seam. Then walk the side seam from side notch up to the underarm.(A post on trueing patterns here:http://www.thedailysew.com/2018/02/how-to-true-a-pattern/)
You could draft a facing or finish the arm with bias binding. Hope this helps.
When will you publish the second part of this article? And I especially want to thank you for this blog site so full of useful information–and free! What a gift!
Thank you and that’s a very good question 😉 I’ve already got the pictures, I just need to write it up. Since you’ve asked I’ll move it up on the list. Check back in August.