
Topstitching by its very nature is suppose to be seen. Whether for construction or decoration, wobbly or straight it’s on display.
And you would think it’s easy to sew a straight line of stitches, I mean, there’s a guide on the machine right there, but it simply isn’t that simple.
However, there are quite a few things you can do to make your topstitches top-notch.
Oh, and what I forgot to say in the video so I want to say right now so you are sure not to miss it is:
Do Not use thick topstitching thread in your bobbin. Most machines cannot handle thick thread in the bobbin. It may damage your machine. Use all-purpose thread in your bobbin.
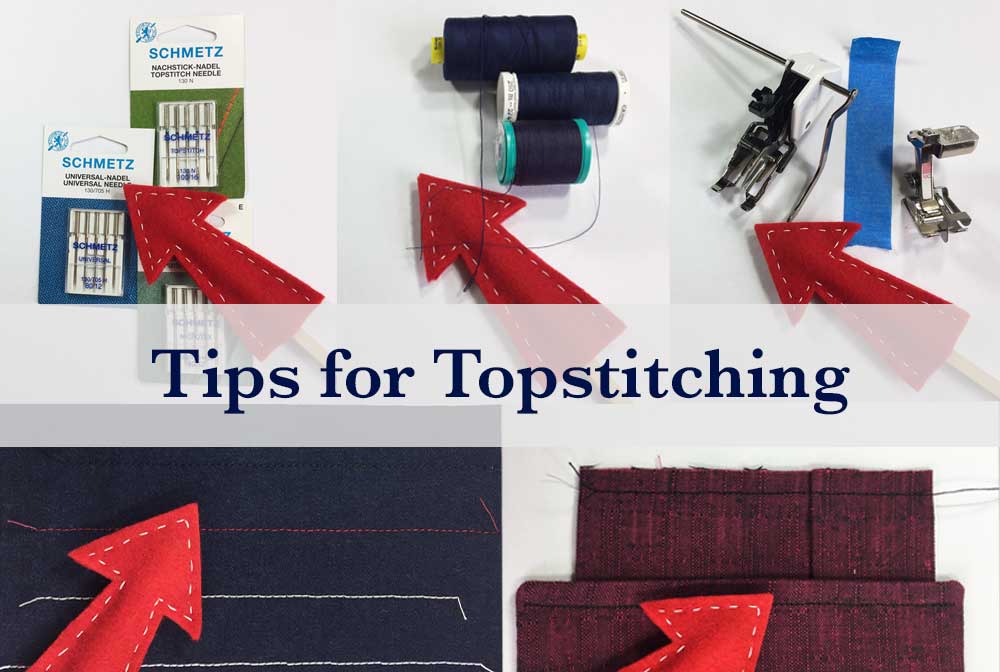
This video will show, close up, a few tricks and some tips you can use to achieve your best topstitching. Take a look.
Or, read about them here:
First consider the color of your stitches.
Even If the topstitching is for decorative purposes you ALWAYS have the option to do your topstitches in a thread that matches your fabric. No one but you gets to decide this personal choice.
Using a matching thread, Your stitches will still be on display but the look is more subtle, and less obvious if it’s wobbly at all. This could be a good option if you feel your topstitching isn’t ready for primetime.
Another choice would be to use a thread in a monochromatic color scheme as the fabric. This is nice for dressier sportswear. It’s subtle, yet there
Contrasting topstitching is very sporty looking. The more the thread contrast with the fabric the more impact the stitches make (and the more precise your stitches should be).
Second consider what type of thread to use
You could use an all-purpose thread (the same thread you used to construct the garment). This is the most subtle and will even disappear into fabrics with any loft to them, like tweed.
Or double your all-purpose thread. That’s right, a second spool or a bobbin wound with your spool thread is placed on top of your machine (you need a second spool pin or a hack for one) and threaded through the machine and needle with the primary spool of thread. This will give more impact to your stitches almost as much as topstitching thread. So this is a good option when you can not find topstitching thread in a color you want.
Use topstitching thread. It’s thicker and therefore pops off the garment giving your stitches
Craft thread is thick like topstitch thread but it’s glazed for hand stitching. This thread is used for decorative hand top stitches like the luggage stitch and when doing
Third you may need to change the needle.
Using topstitching thread? Change to a topstitch needle. The eye in a topstitch needle is larger to accommodate the thicker thread.
When sewing on a woven fabric without topstitch thread consider using a needle made for wovens, like
However, always use the right size needle for your fabric weight. A microtex needle that is too large for a woven will not make straight stitches. So first, the correct size, and then the type of needle. (Another lesson learned through trial and error.)
Fourth definitely use another guide
There are all kinds of extra guides available. Some take more practice than others but you absolutely want to use a guide other than the etched guide on the throat plate of your machine.
Here are some guides besides all the different things you can buy:
- Tape a long piece of painter’s tape onto your machine to extend and raise the visibility of the machine’s etched guide. Painter’s tape, unlike masking
tape will not leave behind sticky residue when you easily remove it. (watch the video above to see how to place the tape straight and accurately OR visit this older post How to Make an Accurate Seam Guide http://www.thedailysew.com/2016/10/rule-your-sewing-machine-how-to-make-an-accurate-seam-guide/ - Your machine may have a foot with an adjustable guide attached to it. Like an edge stitching foot. If so, use it.
- A walking foot or other foot which can hold the quilter’s guide bar. This is nice for topstitching not near the edge of
fabric . - The edge of a presser foot that you can line the edge of your fabric to. Different feet come in different widths so you may have one that’s the same width you want. U
ltimately you want a foot that can hold the fabric stable under it. So look for a foot that is broad and more closed toe rather than slim or opened.
Fifth up your focus and construction techniques
How you approach your topstitching job will be just as helpful as all the guides, needles, and thread you so carefully considered.
Sew slowly and keep the fabric smooth and even.
Keep the presser foot level. At the beginning of a seam, when your needle is on the edge of the garment, fold a scrap of your fabric to the same thickness as the garment (usually two layers plus two layers of
At bulky intersections as the presser foot starts to tilt upward in the front stop sewing with the needle down into the fabric. Raise the presser foot and either place that folded scrap behind the needle, under the foot like at the beginning or
Do not backstitch. It leaves a noticeable cluster of stitches especially if you are using thick topstitching thread. Instead, either bury the thread tails or knot them.
- Bury the thread tails in between the fabric layers. Leave a 6” thread tail and thread one tail at a time with a hand needle. Then insert the needle
in to the garment but just through the layer facing you, then exit out an inch away. Snip the tail close to the fabric surface. The tail is now buried in between the layers. Repeat on the other side for the other tail.
- To knot your thread tails bring the upper thread tail to the back side by pulling on the bobbin thread tail. A loop of the top thread will pop up. Pull on that loop to bring the top thread tail to the back side of the garment. (I place a pin or needle in the loop and pull up making the loop bigger, and the thread to come to the back side.) Tie the two tails into a square knot close to the fabric surface. Trim the excess tail.
Always press your stitches when you’re done.
And remember,
Anytime you try something new, or really want to learn something, practice. As the saying goes…practice makes perfect.
If you have any questions about topstitching please put them in the comments and I’ll be sure to reply.
Well I really messed up my machine using topstitching thread in the bobbin! Wish I’d read your blog first!
Sorry about that. I think patterns that suggest topstitching thread need to point that out in their instructions.
Great tutorial I would have liked some suggestions on stitch length
You want your stitch to be a little longer than a construction stitch. On my New Home machine the stitch length dial went from 0 to 4 so for construction I set it on 2.5 to 3 depending on the fabric. For topstitching, I usually had it on or a little past 3 to 3.5. Again, depends on the thickness of your fabric. My Bernina has a stitch length that goes from 0 to 5 and sets a default construction stitch at 2.5. On that machine, I set my topstitch length to 3.25 – 3.5.
The short answer is to set it at a slightly longer length then make a sample on a scrap of the fabric you’re going to topstitch onto. Then see if you like the look of it. You are the designer so you get the final say 😉
Many thanks for your prompt reply.
Awesome, thank you, your instructions are very clear and at the level of detail I need: The comments about using folded fabric to keep the presser foot level helped me greatly with this common problem. The solution I have been using is not near as good, I have wooden shim stock I put behind foot to level it at the beginning of a seam. When I come to a seam, to hop over, I used a chopstick as a lever to raise up the front of the foot, ha. This is what happens when an engineer starts learning to sew with no instructions.
Ok, a chopstick is funny but actually it was also very clever 🙂 I’m glad the folded fabric works for you and thanks for reading.
Hi
How do I prevent slight ruffling of material [cotton poly.] at last couple of inches when reducing my trouser length. I folded over about 1 1/2 inches and managed OK until the last inch or so.
Thanks
Hello – that “extra” fabric happens in the last inch or so because the presser foot is pushing the top layer of fabric at a different rate than the bottom layer. You’ll notice this more on slippery fabrics – so more on cotton/poly bend than on 100% cotton. You could use a walking foot so both layers are feed evenly or, what I do, use a lot of pins and have them placed perpendicular (opposite) to the stitch line. I will often put a pin in every 1 1/2″ or 2″ and if it’s slippery fabric I will then baste it in place with the pins left in, remove pins, sew it down, then remove basting stitches. If I don’t baste then I sew right up to the pin before I remove it.
Pins placed perpendicular to your stitch line keep the fabric from getting “pushed” any further than that pin.
This is also why I prefer thin pins because I can get away with sewing over them (sometimes – if I’m slow. It’s not a good practice – but sometimes I’m desperate to keep the fabric where I need it)
All that said, Turning up the hem, you may have a different circumference at the bottom of your pant leg and the point where you are sewing the new hem to the pant leg. If the pant leg is larger than the bottom edge you’ll have to stretch it a bit to fit flat. If the bottom edge is a bit larger you’ll have to ease in the extra width or even make a few small pleats/folds on the inside of the hem.
I hope this helps and let me know if you have any questions.
That sounds a good solution, using pins perpendicular and removing each during completion. I thought another solution would be to unstitch one of the seams of the pants and start from that point with the hem and
complete the circuit at the open seam, then finally resew the seam which would only be the depth of the hem or about 3/4 inch. Hopefully that would just about take up the puckering effect.
Thanks for reply above, I’ll see if the perpendicular pins does the trick before I start unstitching the seam.
That’s also a good idea. Take out the inside seam – or if the inside seam is sewn with a flat fell seam and the outer isn’t unstitch the regular seam as it’s a pain to take out and redo a flat fell seam. The reason for taking out the inside is just in case the two ends, once hemmed, don’t line up exactly. On the inside it will be less noticeable (that’s the only reason).