
There are a few patterns we will sew more than once. There are patterns we will never sew again, and there are patterns we might sew again, if we could make them a little different. Maybe we would add pockets, leave the sleeves off, or change the neckline.
Welcome to pattern hacking. It’s easier than you might think. It saves you money. You don’t buy a new pattern; you reuse a pattern you already purchased. It saves you time because you’ve already determined the size to sew, made the necessary fit adjustments, and are familiar with the construction. Less time head scratching.
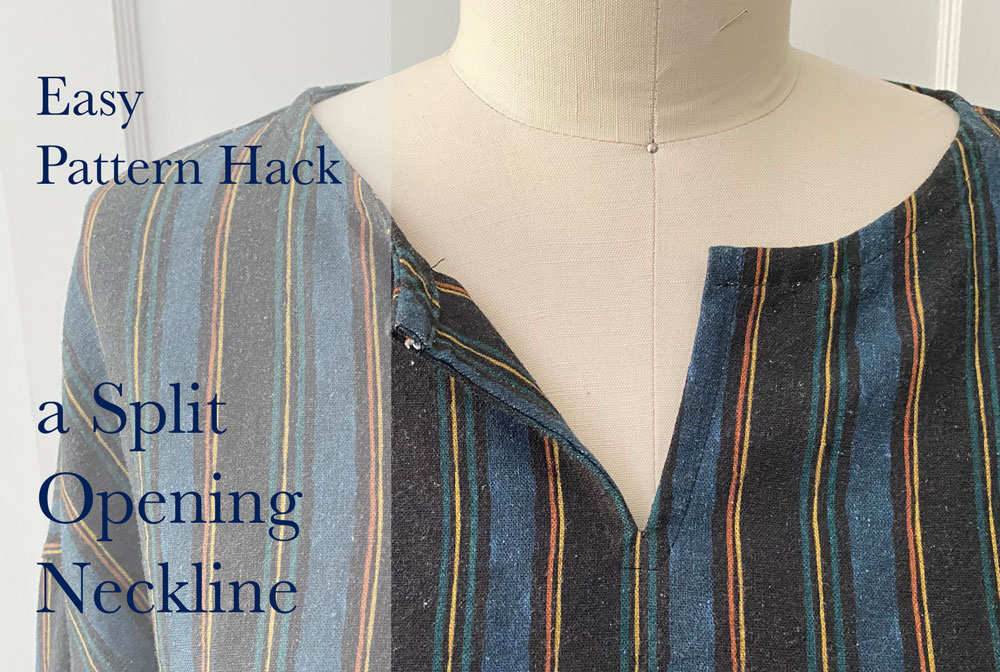
Adding a slit or notch to a neckline at the center front or center back is one simple design hack with many variations. This post will cover four different ways, and each of these could be altered in shape or with the addition of buttons and loops, trim, or things I haven’t thought of.
This tutorial was written for a bodice (or center bodice piece if it has a princess seam) that is cut on the fold. If your bodice has a center seam, you can follow option 4 below to add a slit at the top of the seam, or you can make a copy of your bodice piece and take off the center front seam allowance. The old center seam is now Center Front (or back) and is placed and cut on the fold.
It’s important to read the instructions for the option you’re interested in before starting any hacking, sewing, or cutting, as there are many variations of patterns, and my instructions cannot include every variation. Reading through will give you the concept, and may be all the steps that fit your situation. However, you might have a different starting pattern and will need to work out small details I have not included. Please ask any questions in the comments below.

Consider
- What shape will the neckline be
- How do you want to finish the slit and neckline
If you want to change the shape of the neckline, do that first. When you add a slit, you are giving the top more room to go over the head. This means you can make the neckline smaller. For example, if your top is designed with a scoop neck, you can redraw it to be more shallow with a center slit. Or, if it’s a wide neckline, you could make it a crew neckline with a keyhole neck opening in the back or front.
There are also different construction and finishing methods for a slit at the neckline
- Bias binding
- A Facing
- A Yoke
- Having or adding a center seam to the garment that starts as an open slit and becomes a seam.
Note: All pattern changes should be done on a copy of your original pattern, should you ever want to go back to that design, or use it as a starting point to go in yet another direction.
You only need to copy the pieces that need to be changed. In this tutorial, that’s the bodice pattern piece and possibly the neck facing if you have one.
Option 1: A Slit Opening Finished with a Bias Binding
The construction for this neck slit is done the same as a sleeve vent. This is great for tops being sewn in lightweight fabrics such as Swiss dot, eyelet, or handkerchief linen because it doesn’t add a lot of weight or bulk, preserving the flowiness of the fabric. It’s minimal and lends minimal structure.
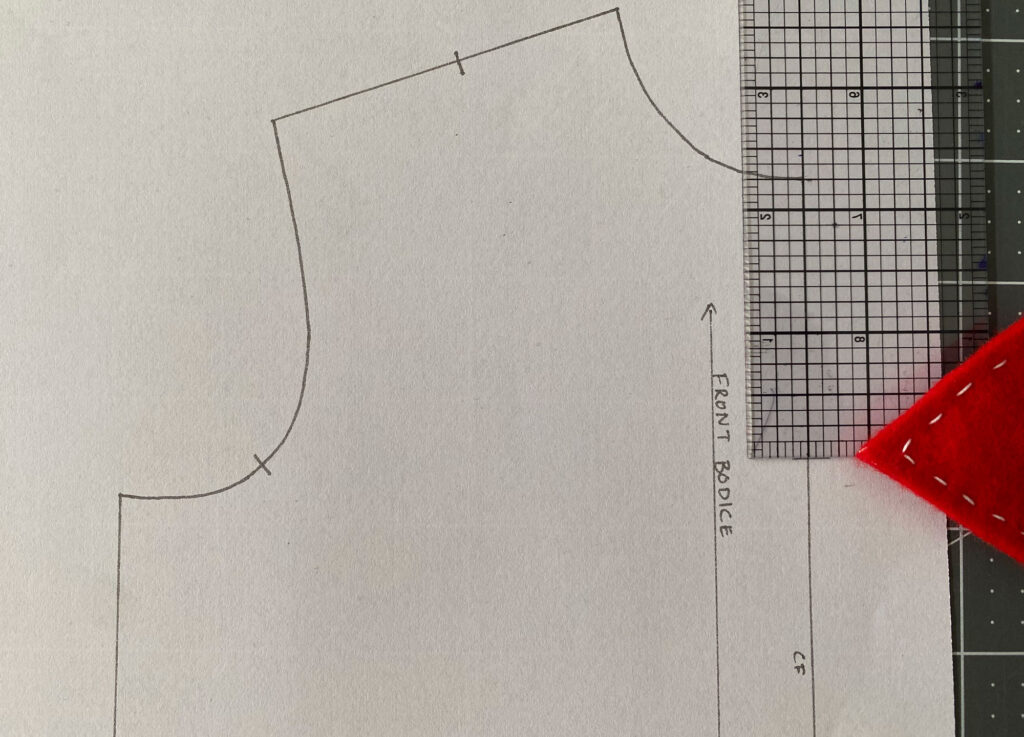
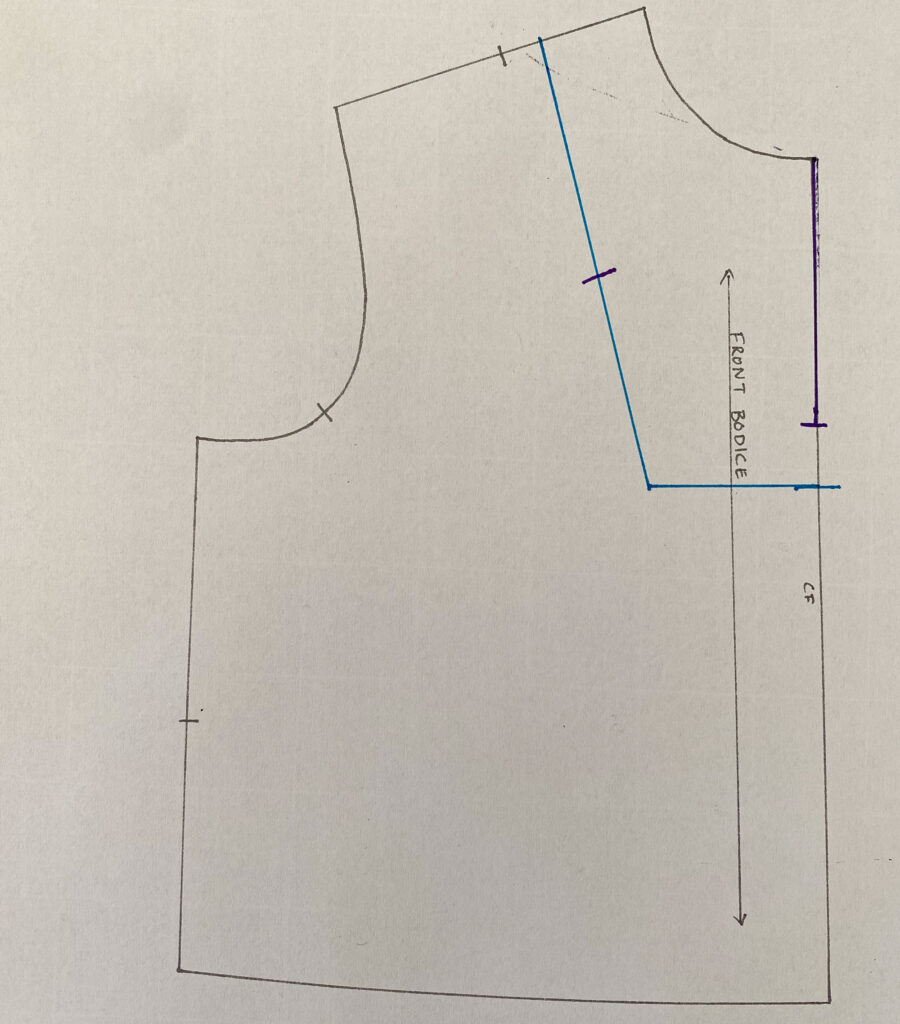
On the copy of your pattern, draw a short horizontal line where your slit will end along the center front or back.
If you want a wider opening at the top of the slit, draw a line from the bottom of the slit to the neckline as far from the center as you wish***. Sometimes this line is curved or shaped slightly, especially when the slit is short.
***NOTE: This is the cutting line. You will be stitching a bias strip to this cut with a ¼” seam allowance. Adjust your line needed.
Make note of how long the slit is, and double this. Add an inch to this length for safety. When you cut the pattern out, cut a 1 ½” wide bias strip this length. Example: a 5” deep slit doubled is 10” plus a safety inch, meaning I will cut a strip to be 11” by 1 ½”
If your slit doesn’t come off the center line, make a small clip into the neckline at the center fold when you cut the pattern out to mark the top of the slit.
If your slit line comes off the center line at the neck, cut on the new cutting line, carefully.
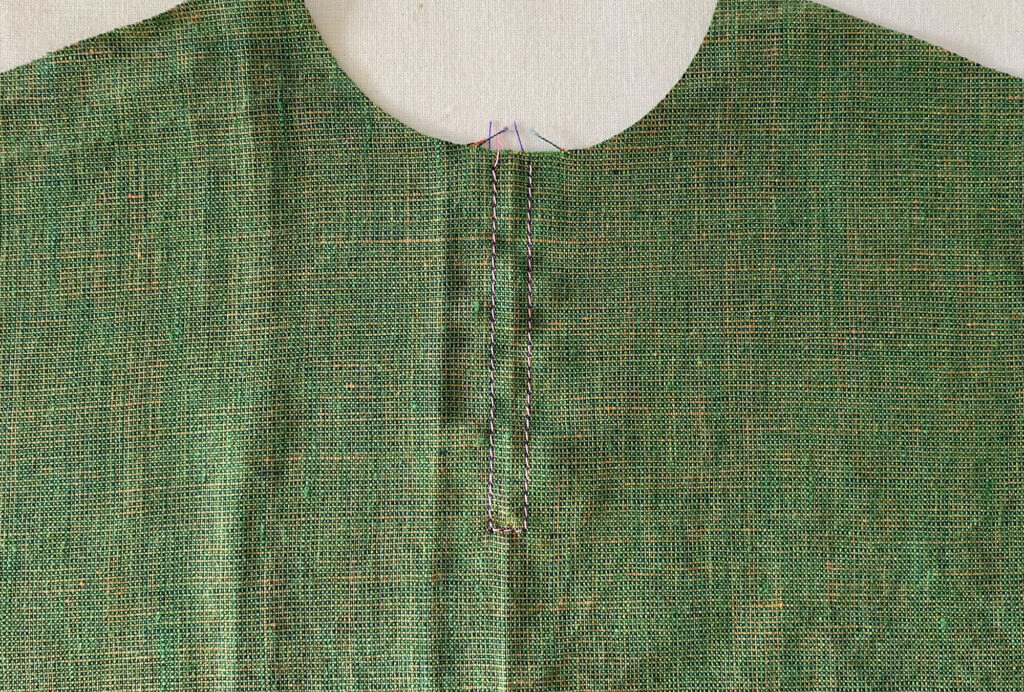
Stay stitch around the slit between ⅛” and ¼” away from the slit/cut line. Stay stitching prevents the slit from stretching out of shape. I have seen this step done in different ways:
- Before cutting, the slit is drawn on in chalk and then stitched around the chalk line
- The slit is cut first, then stay stitching is added
- A narrow (1″) strip of fusible interfacing is applied to the bodice under the slit. The slit is drawn onto the interfacing and cut open without any stitching (the fusible strip acts in place of the stay stitching).
- And, sometimes I’ve seen no mention of any reinforcement of the area around the slit. But I think it’s the little details in the dressmaking process that elevate the final result from homemade to handmade.
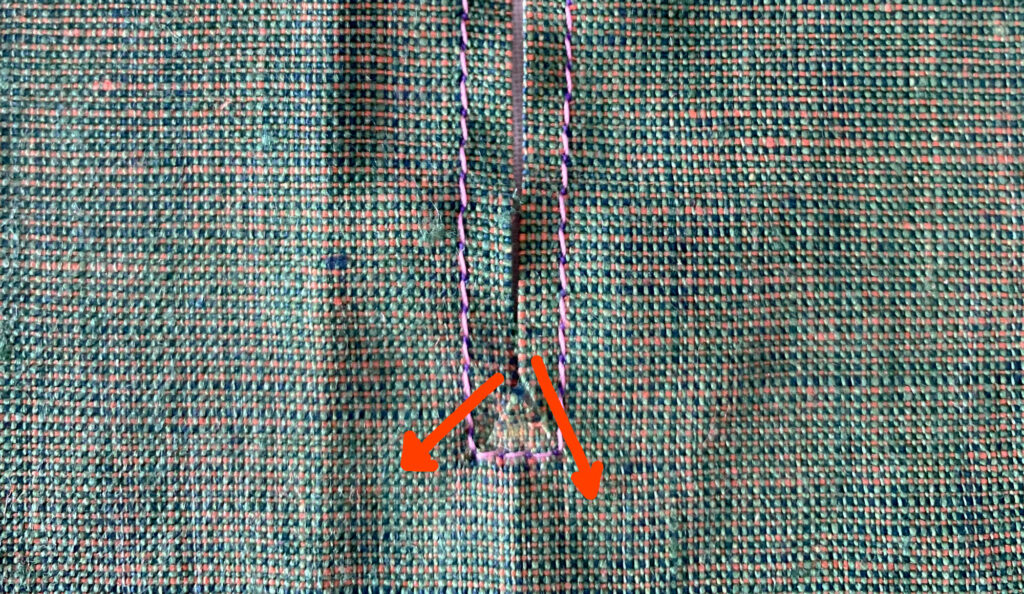
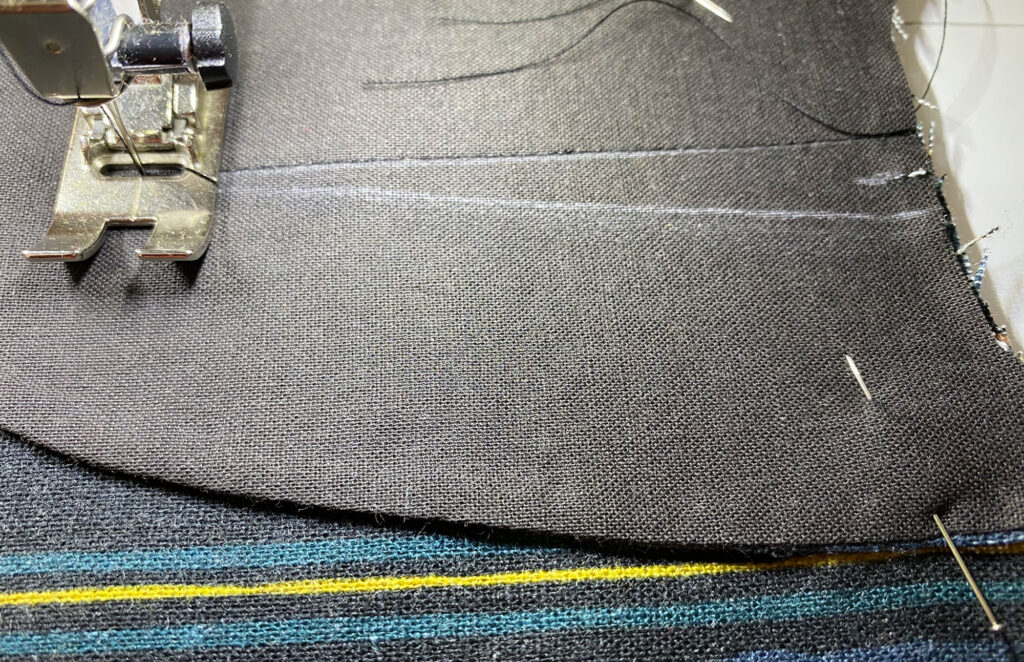
If you stitch a box around your slit, as in the photo above, snip to the right and to the left on an angle into the corners of the box like an upside-down Y. These clips are SMALL. No more than ¼”
You could also stay stitch a V shape, where you taper close to the slit at the bottom and pivot the needle to sew up the second side. If you do this, no need to snip into the corners. Simply stop cutting before you cut the stay stitching threads.
Fold the bias strip in half lengthwise and press. Be careful not to stretch the strip as you press. It will stretch very easily; you may not be aware you’re stretching it, so be mindful you aren’t.
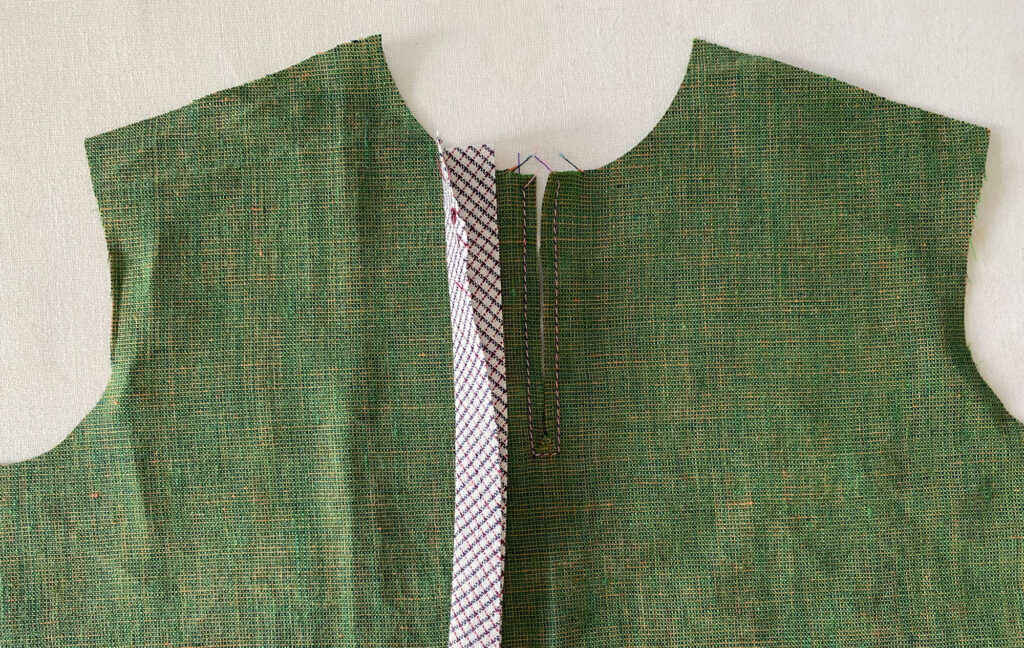
Lay the bias strip down on the right side of the bodice, so the long raw edges of the strip are going to be lined up with one side of the slit. Pin.

Open up the slit so it forms a straight line. Continue to line the bias strip up with the slit and pin.
Sew the strip to the bodice with ¼” seam allowance.
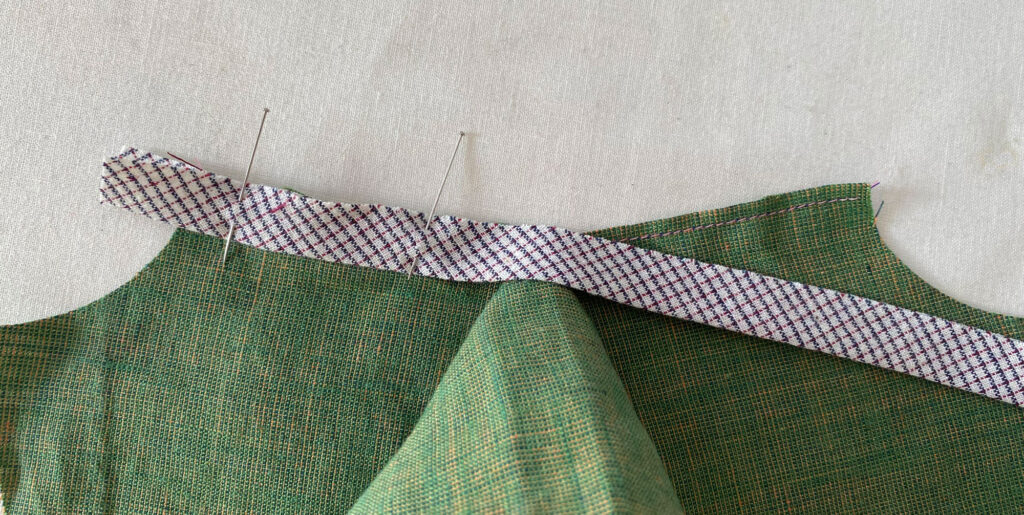
Press the strip away from the bodice.
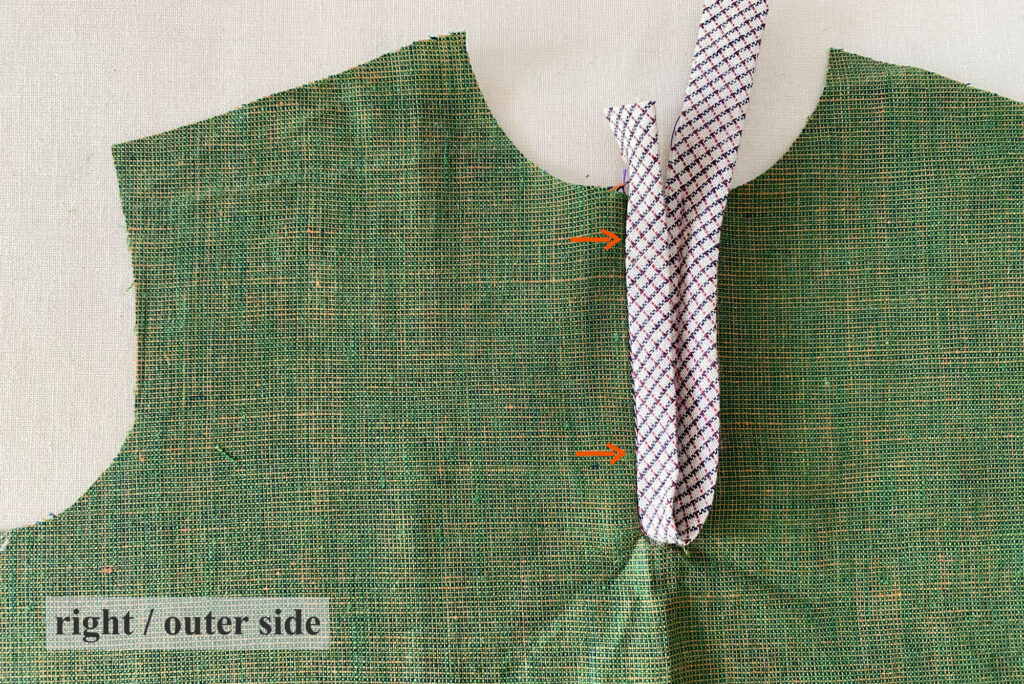
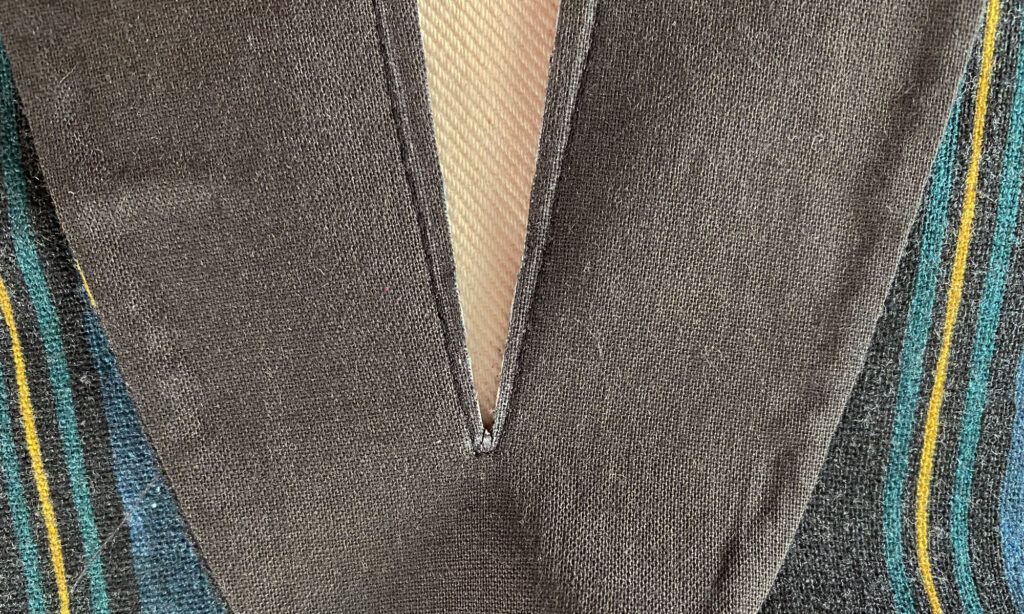
Fold the strip to the inside of the bodice so the seam is either right on the fold or turns inside slightly. Press. Pin and sew down close to the folded edge of the bias strip.
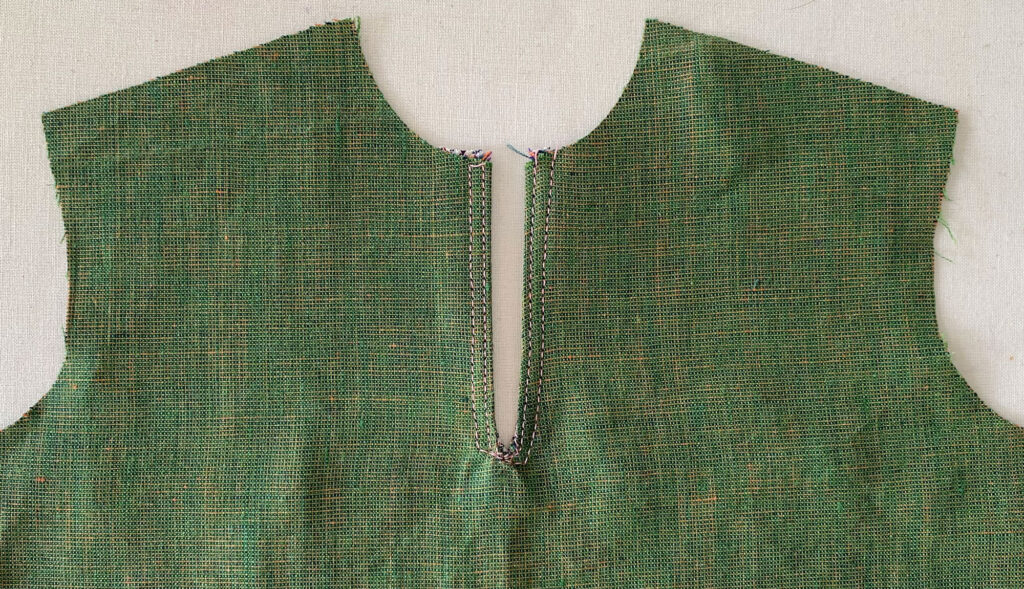
Clip any excess off the strip so it lines up with the neckline.
After the back is joined to the front across the shoulders, the neckline can be finished with a bias strip. The strip is applied to the neckline in the same manner as it was to the slit opening. Only make the slit a little longer than the neckline by 1 ½” to 2”. You need the overhang on both edges of the neck to tuck in for a clean finish.
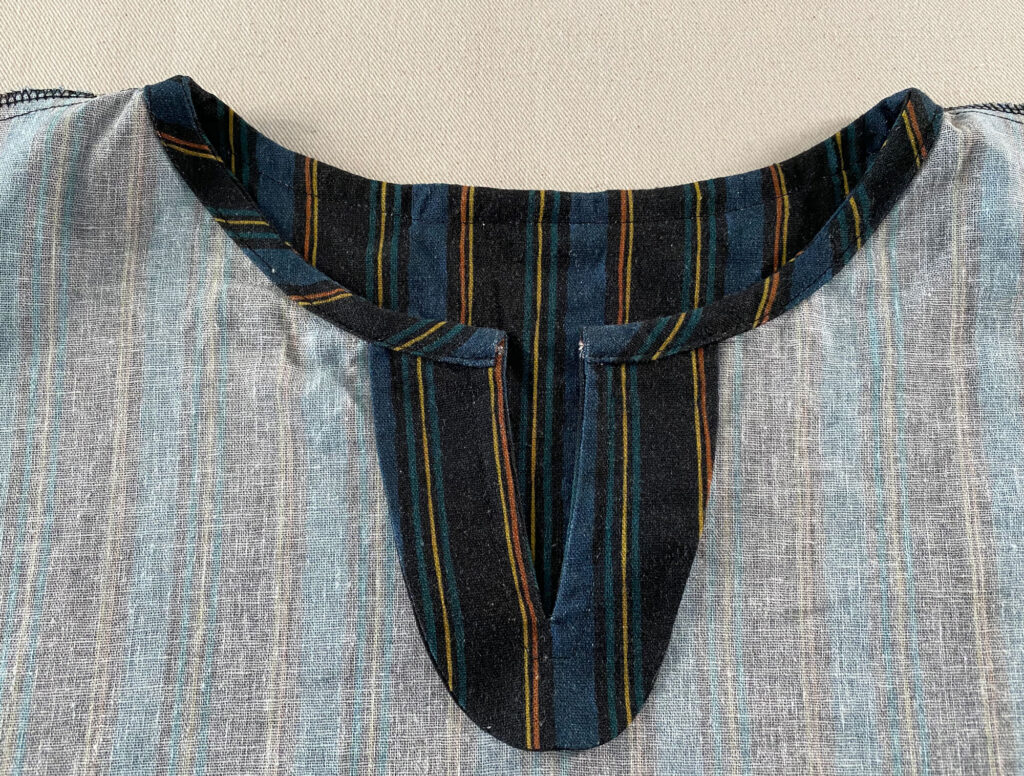
Option 2: A Slit Opening Finished with a Facing
A facing is a pattern piece that is a full or partial copy of another pattern piece. It’s used to finish off a raw edge. Facings are used on opening edges, like a neckline, jacket, coat, or shirt front, a sleeveless armhole, and a waistband.
They are sewn to the garment at the opening they face, right sides together, then flipped to the inside of the garment. They are often understitched to keep from rolling out.
Drafting a partial facing to finish a center slit is a good option for top patterns that already have a neck facing, fabrics that are prone to fraying, and for designs that need a bit more structure, like when buttons will be sewn to one or both sides of the slit.
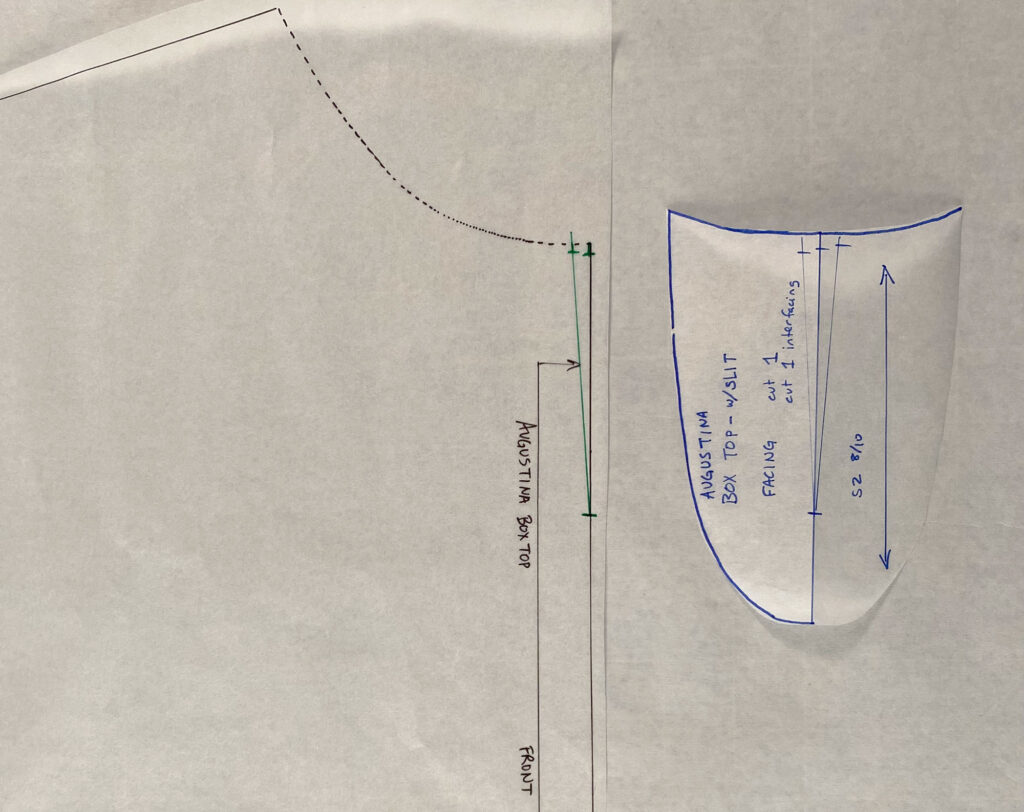
On the copy of your bodice pattern, draw a short horizontal line where your slit will end along the center front or back.
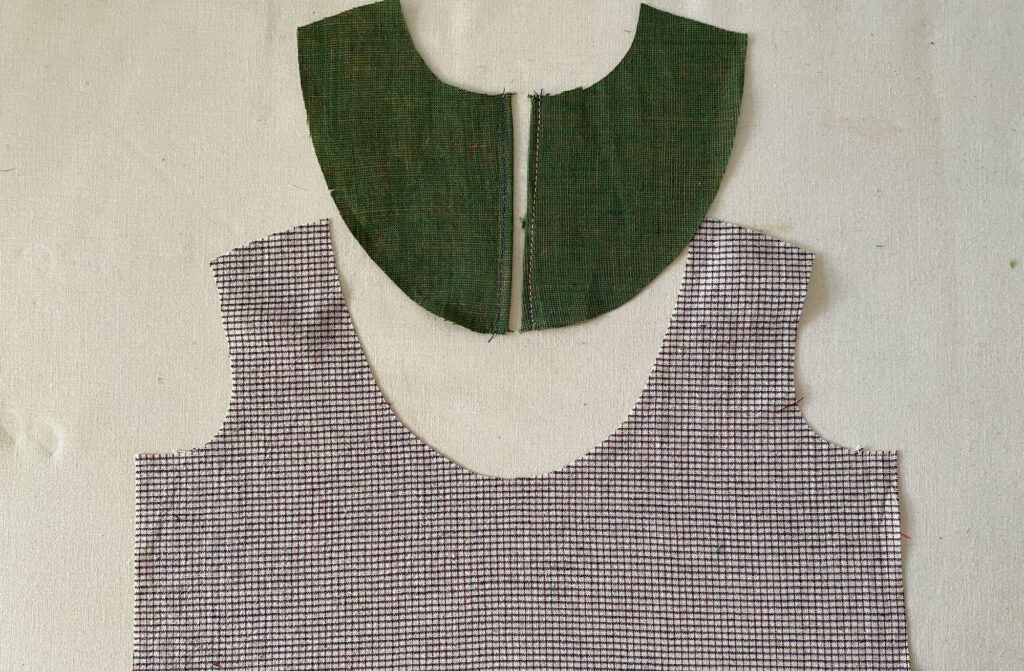
Lay a second piece of pattern paper (something you can see through) on top of your draft with the slit. Make a tracing of the area around the slit. Include the neckline and a couple of inches or more of the bodice on the sides of the slit, plus the area below the slit.
Shape the facing to your preference. If there are nearby seams, maybe the facing extends to the seams, in order to be tacked down in them. The facing could extend to include the entire neckline, to the armhole, or, if it’s a sleeveless top, it could blend into an armhole facing.
If the top pattern you’re hacking uses a neck facing for the neckline construction, blend the slit facing with the neck facing so the two are combined into one pattern piece
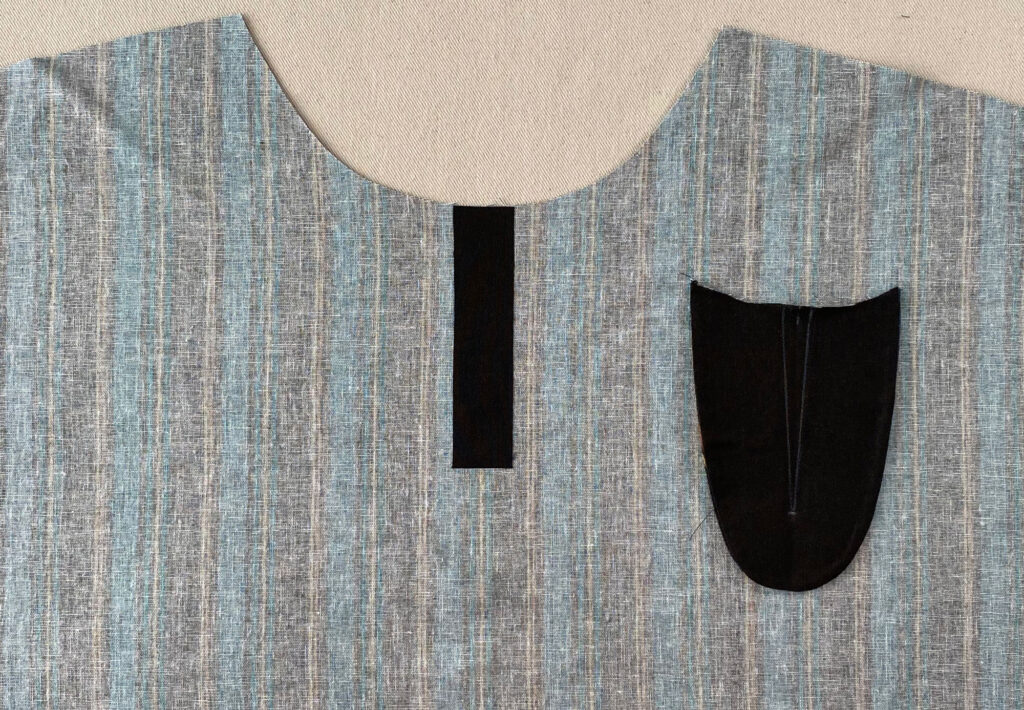
Cut out your facing pattern and apply interfacing to the wrong side of it.
Mark the slit on the interfacing side of the facing in fabric chalk or fabric marker.
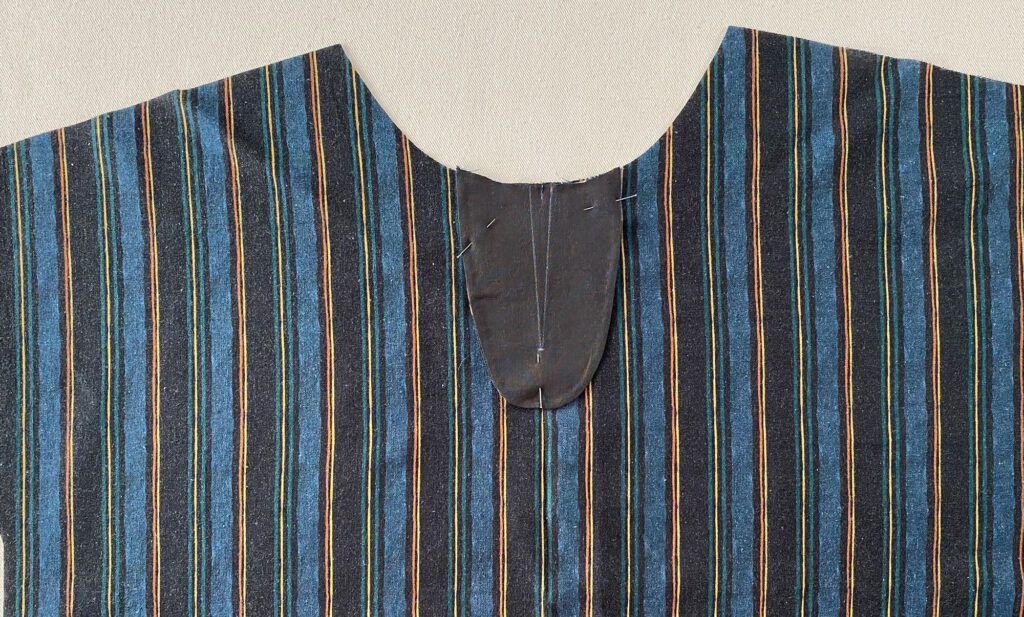
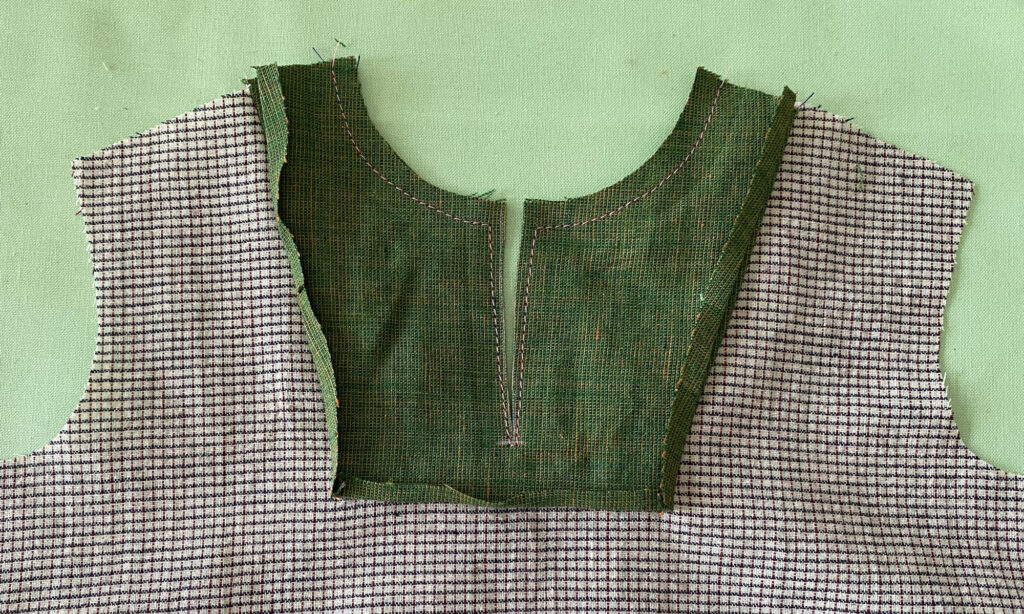
Lay the facing onto the bodice right sides together, lining up at the neckline and placed so the slit placement on the bodice and the slit placement on the facing are stacked on top of each other. Pin the facing down to the bodice.
Stitch ⅛” to ¼” away from the marked slit around it through all the layers: the facing and the bodice.
You could make a squared-off line of stitches at the bottom of the slit or taper close to the end and gently, symmetrically, go around the end. (see above in Option 1 for more details)
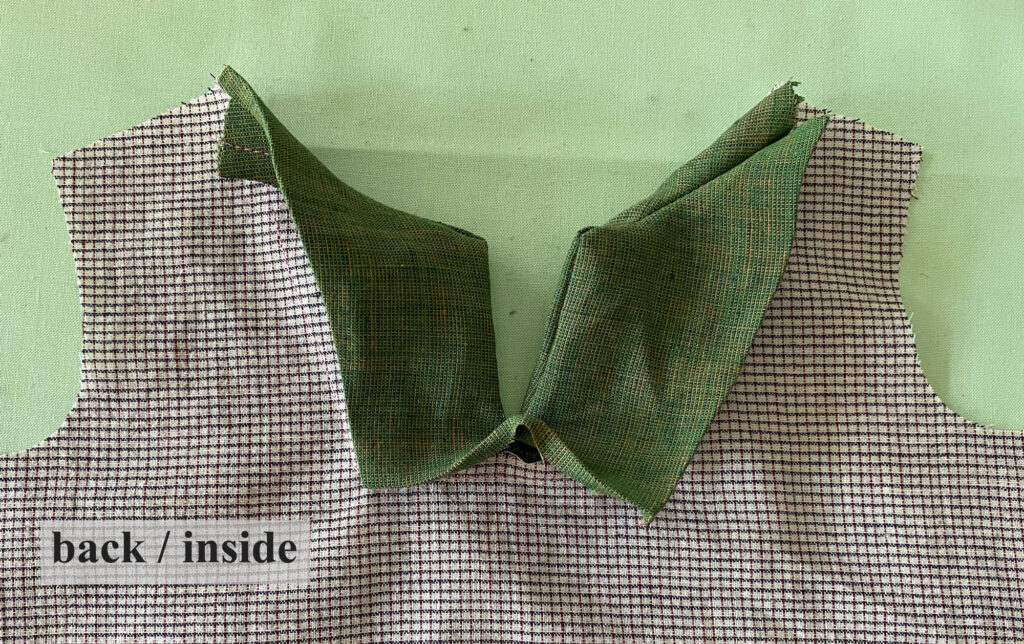
Cut the slit open through all the layers. Cut close to the stitch line at the bottom, but not through the stitches. If you squared this off, cut only to the end of the marked line. From that end point, cut diagonally into the stitched corners. Get close, but don’t cut the stitches.
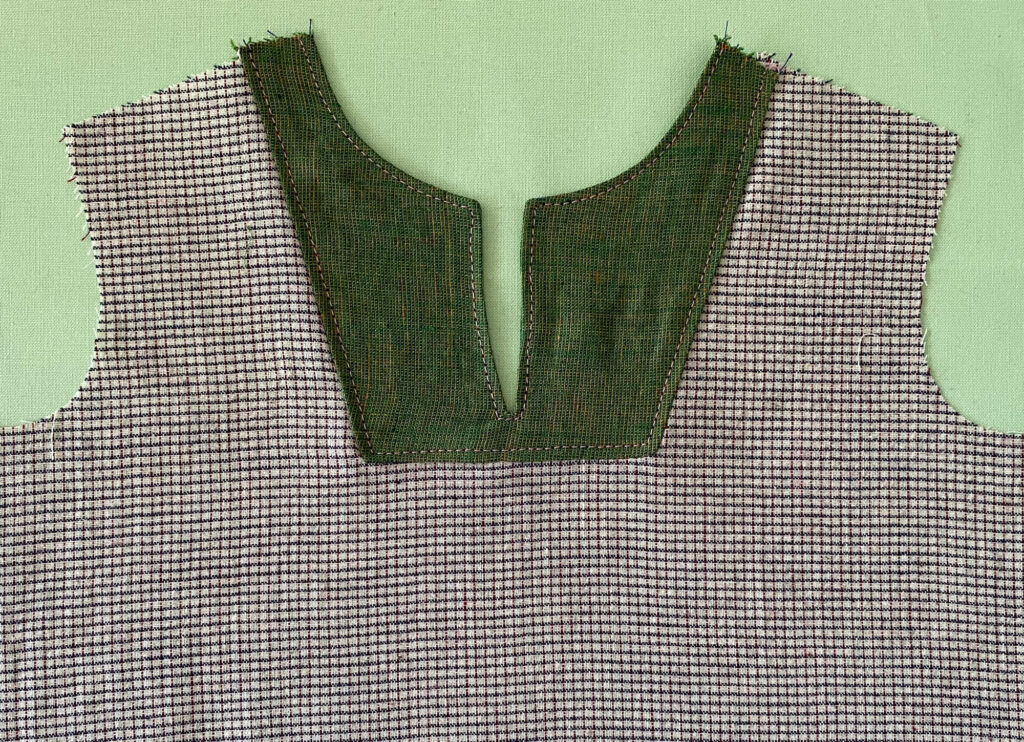
Pull the facing up off the bodice and press it away from the slit. Flip the facing to the inside of the bodice.
Understitch the facing around the slit or topstitch around the slit on the outer side of the garment, close to the opening. Another option is to understitch the facing around the slit and topstitch on the outside around the slit further away from the opening edge. This would look more decorative/purposeful. The stitching would be part of the design. To make it more obvious, a fancy stitch could be used instead of the straight stitch.
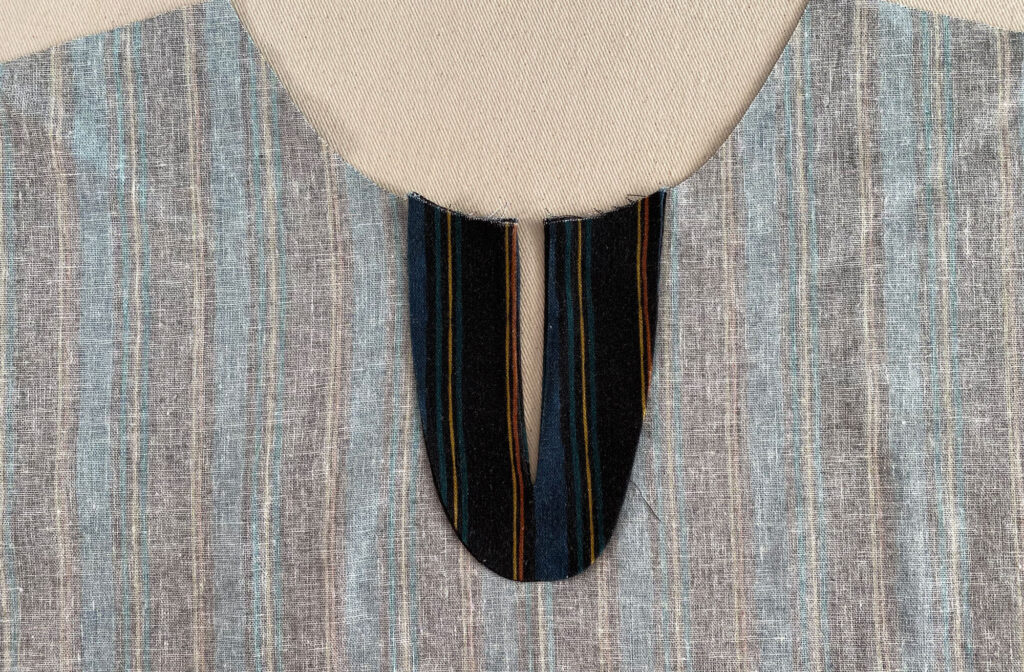
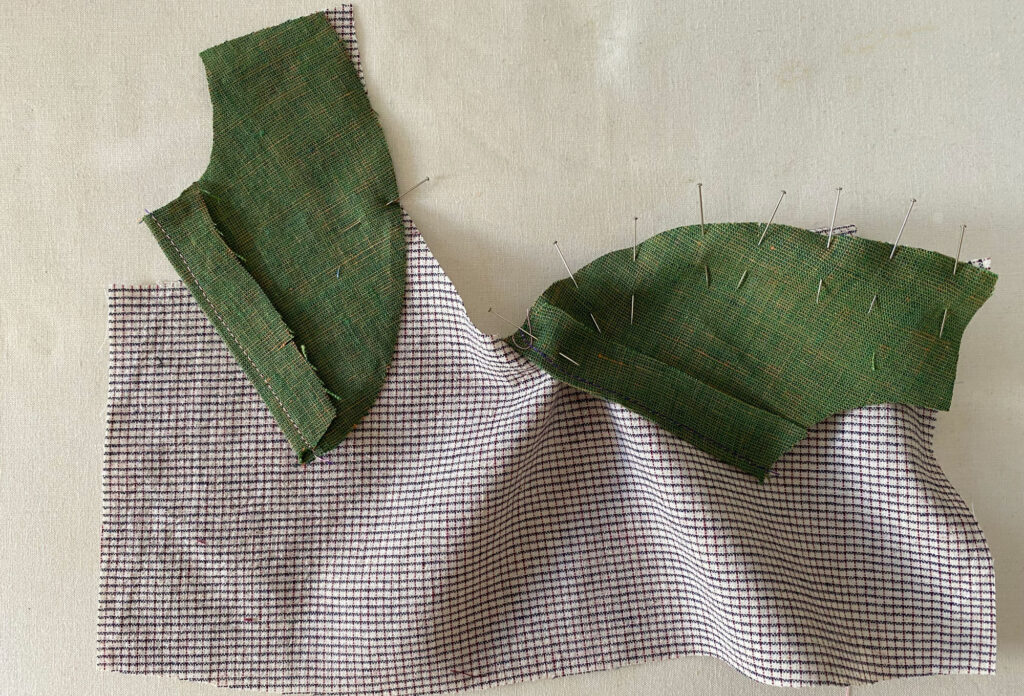
Option 3: A Slit Opening Finished with a Yoke
Center front yokes on tops often have an opening. Sometimes it’s just a slit, sometimes it has a single button and loop closure at the top, or it has a few buttons placed only within the yoke on the bodice.
A center yoke is an easy hack to both draft and construct.
On a copy of your original pattern, draw in the design of your yoke. Along the center, from the neckline to however long you want, draw a short line where the center front slit will stop. The slit should be inside the yoke for these instructions.
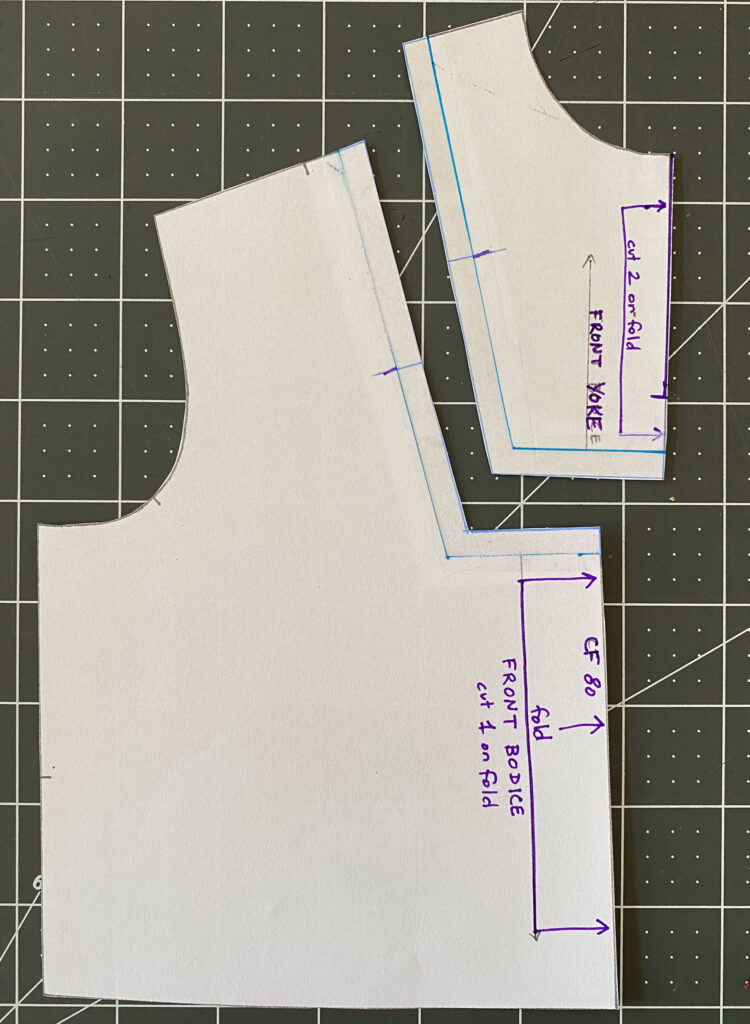
Cut the pattern along the design line to separate the yoke from the rest of the bodice. Tape paper to the cut edges and add seam allowance.
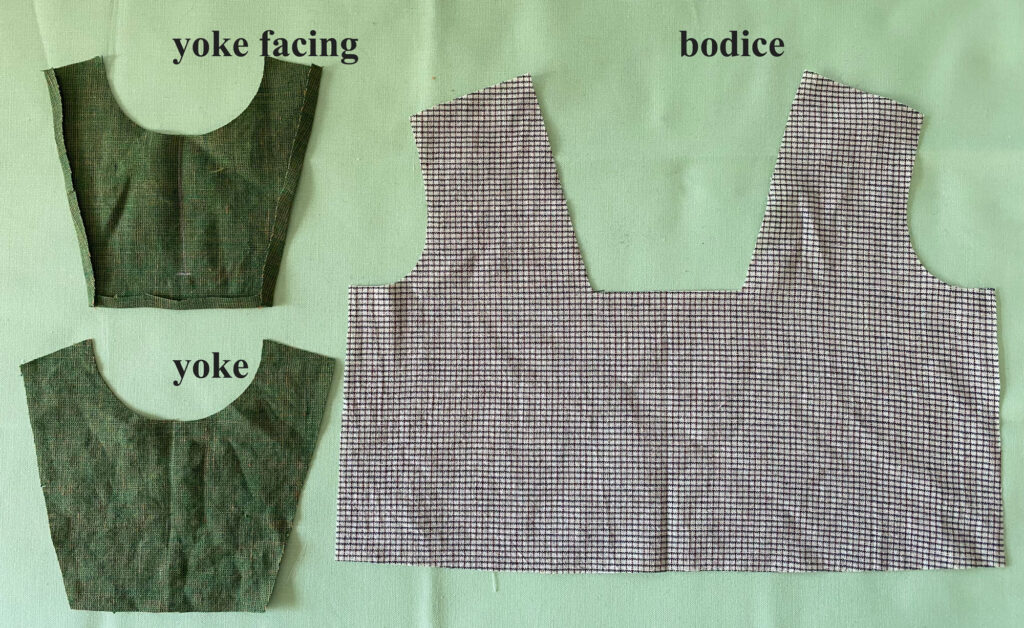
The yoke pattern piece is cut out twice in fabric; one is the yoke, and one is the yoke facing. The facing can be a different fabric since it is on the inside of the garment. This is especially helpful if your fabric is thick or bulky.
Fold over the seam allowance of the yoke facing on all the edges except the shoulder seam edges. Press.
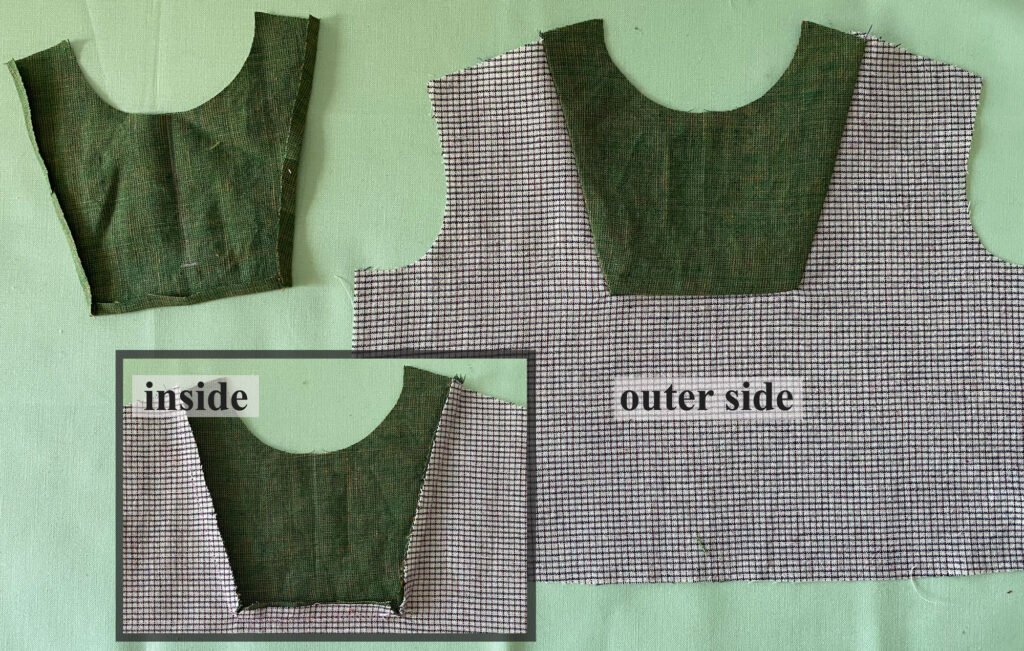
Stitch the yoke to the bodice. (First, you separated it, added seam allowance, and now you’re sewing it back together). Press the seam allowances up toward the yoke and away from the bodice.
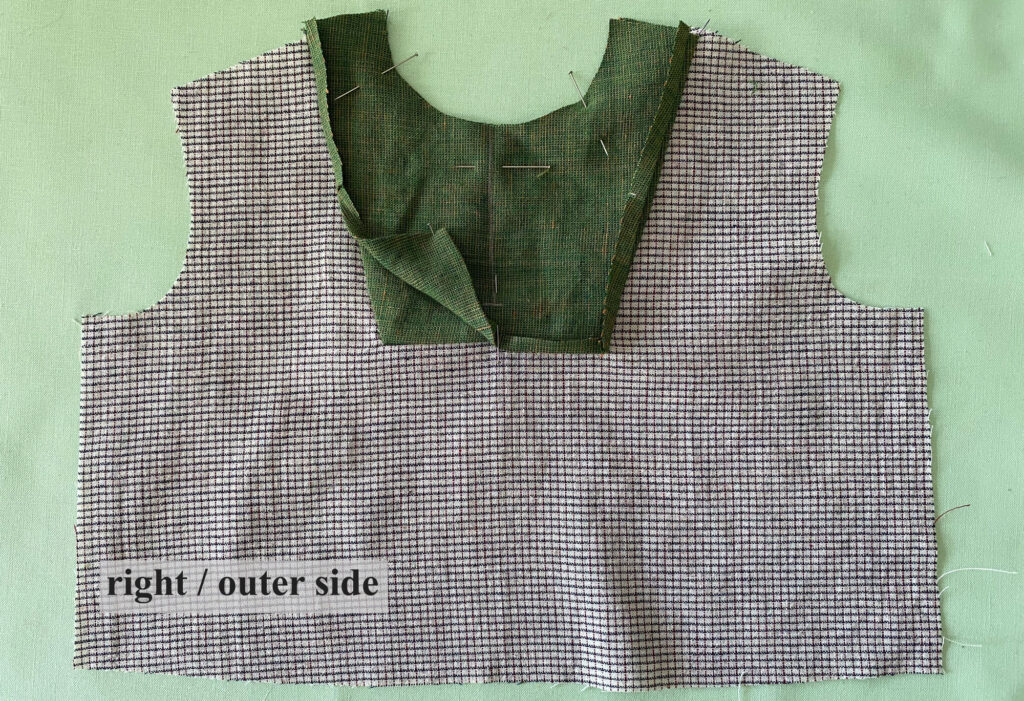
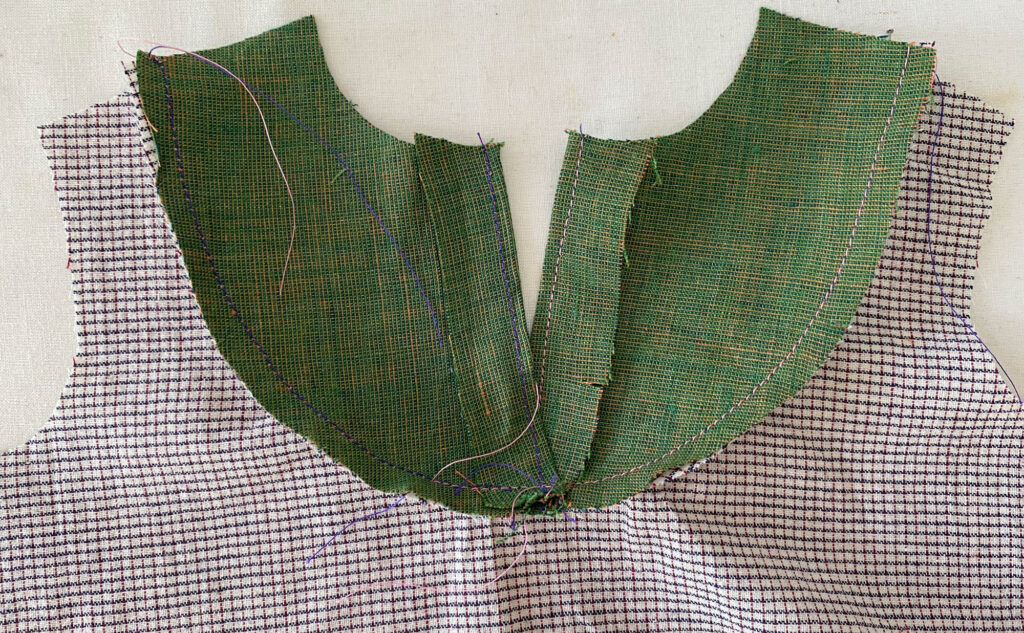
Mark the slit on the back of the yoke facing with chalk or pins. Lay the yoke facing on top of the bodice, right sides together, so it is lined up with the yoke.
Stitch around the slit and then cut it open (see both options 1 & 2 above for more details on stitching and cutting the slit open)
Bring the yoke facing up and away from the yoke and flip the yoke facing to the wrong side of the bodice. It will help to press the seam at the slit open. Press the opening so the seam either turns toward the inside of the top or is right on the edge of the opening.
Stitch around the opening or understitch the seam allowance to the facing only.
Baste the shoulders of the yoke and yolk facing together. The yoke facing will cover the seam allowances of the yoke and bodice. You can either hand-stitch or machine-stitch the yoke facing to the bodice along the folded edges.
Finish the neckline as directed in your pattern. If your pattern uses a neck facing, the facing piece will now be shortened to meet the edges of the yoke instead of being sewn to the entire front neckline.
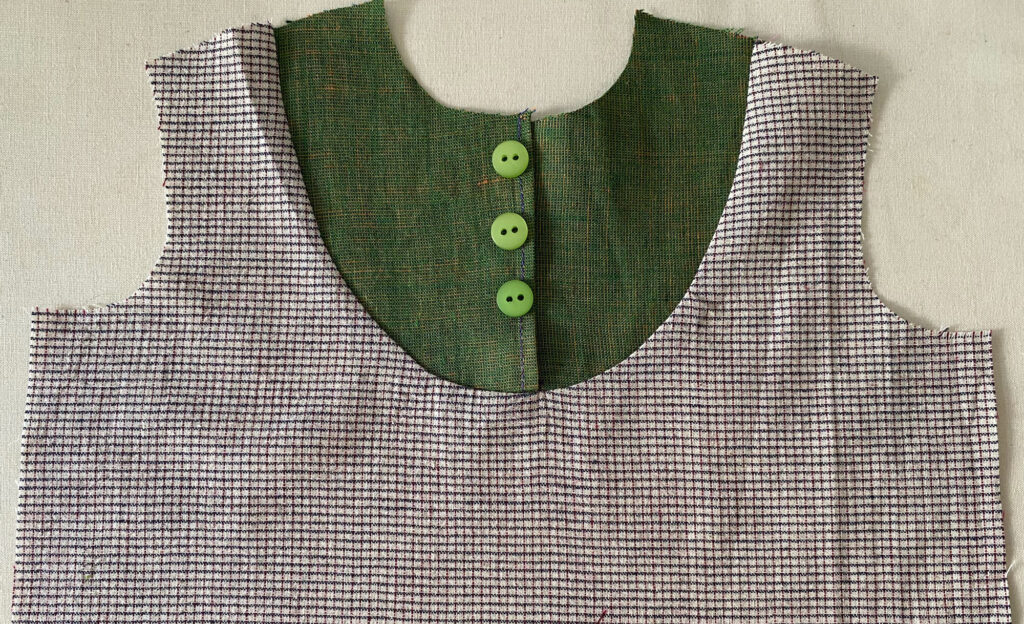
You could also make a yoke that has a button opening. Draft an extension to the center front of the yoke. You need enough extension for an overlap for the button and buttonholes, and a fold-over facing.
Construct the yoke pieces.
Stitch the yokes to the bodice.
Add buttons and buttonholes.
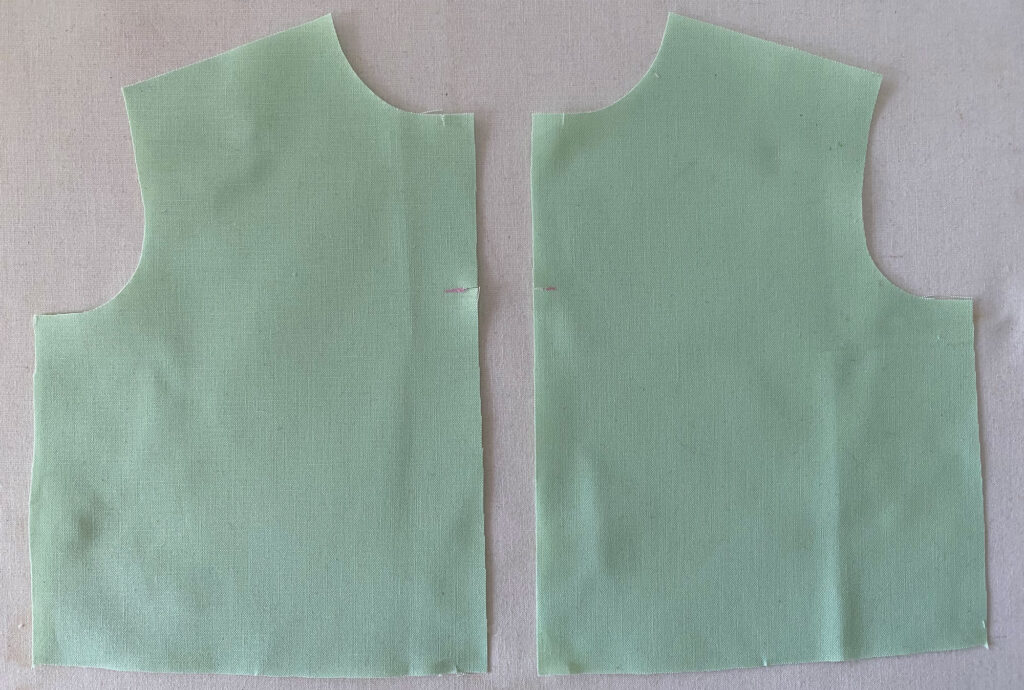
Option 4: A Slit Opening Made with a Center Seam
This might be the easiest way to add a slit, especially if your pattern already has a seam down the center front or center back. However, you can redraft a center bodice piece that was meant to be cut on the fold so it has a center seam.
Add seam allowance to the “on fold” edge. Mark your slit.
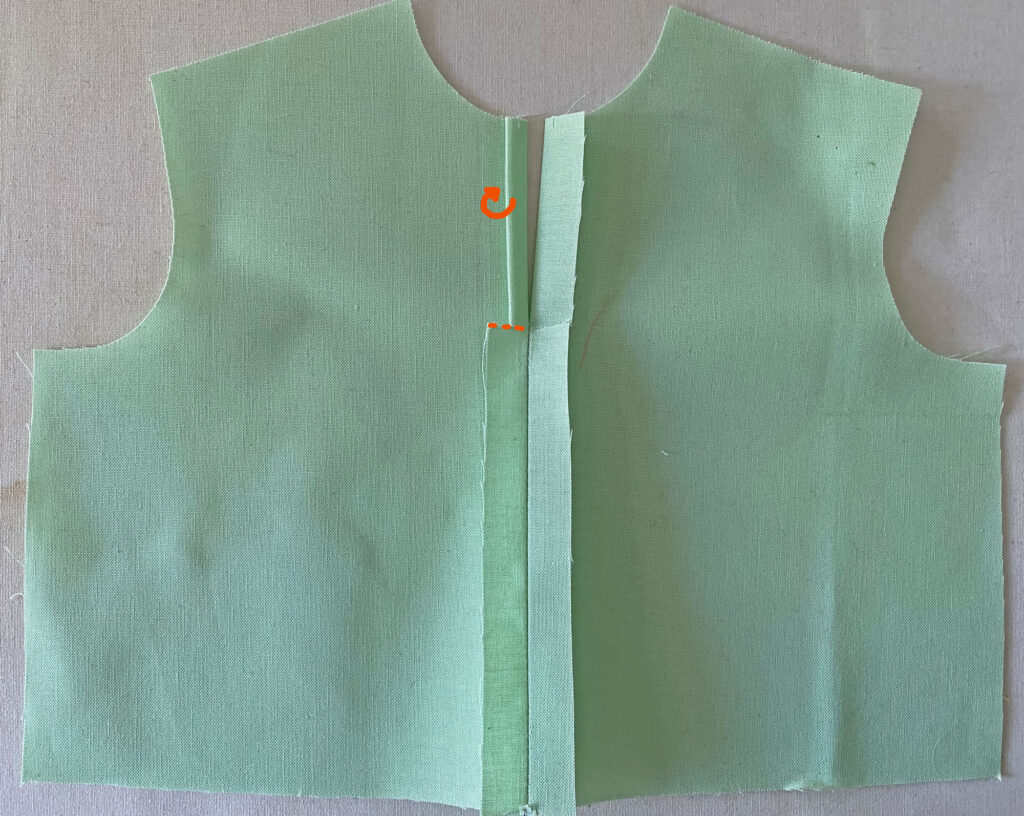
Before sewing, clip into the center seam allowance where the slit will end.
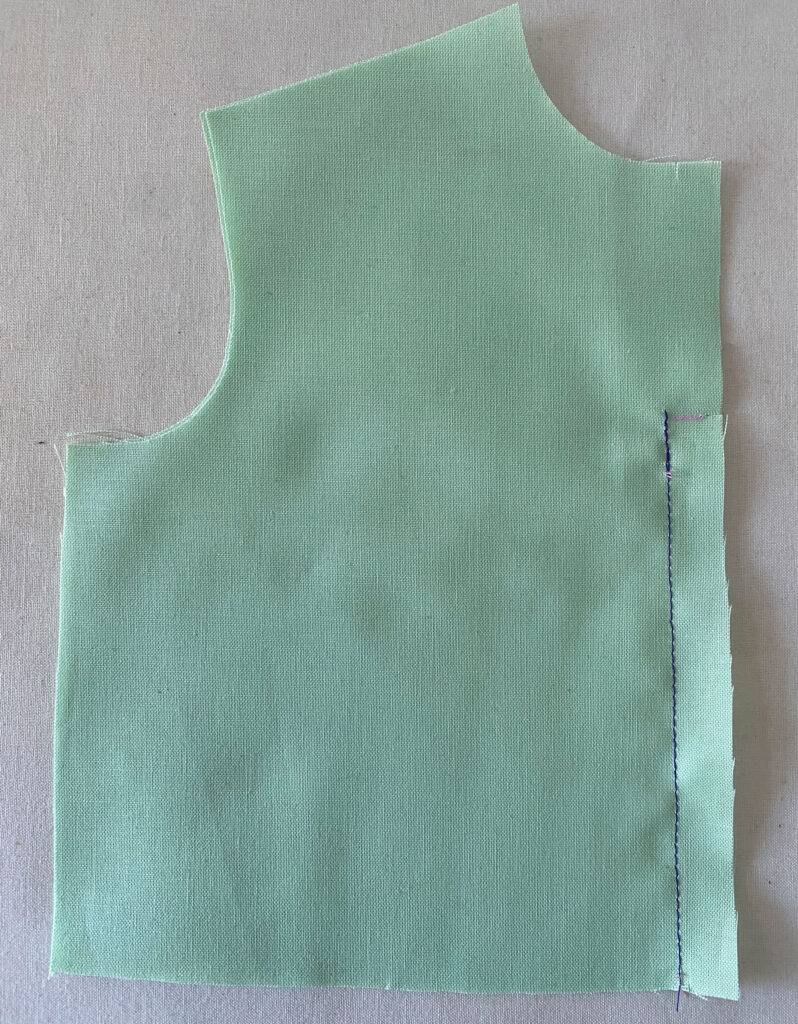
Sew the seam together, starting at the clips and ending at the hem. Add some reinforcement stitches at the start by reverse stitching.
Press the seam open.
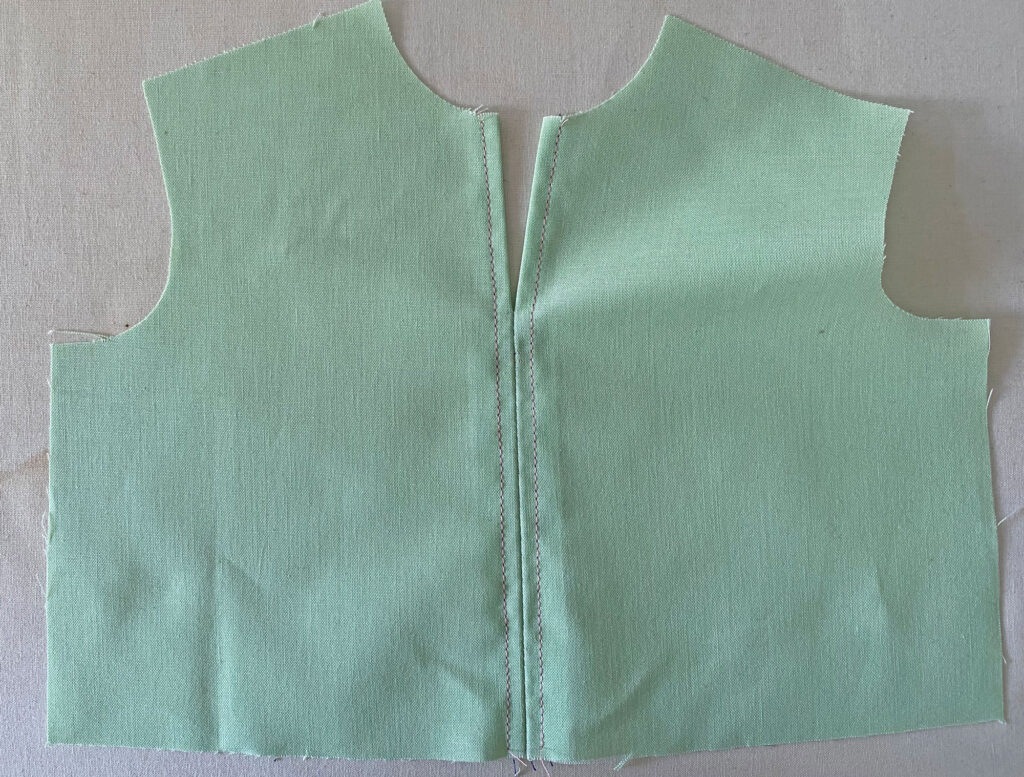
Clean finish the raw edges of the opening:
- Fold the seam allowance twice, on itself, and stitch the folded allowance down around the opening.
- Bind the entire length and both sides of the seam allowance.
- Overcast the seam allowance before sewing the seam.
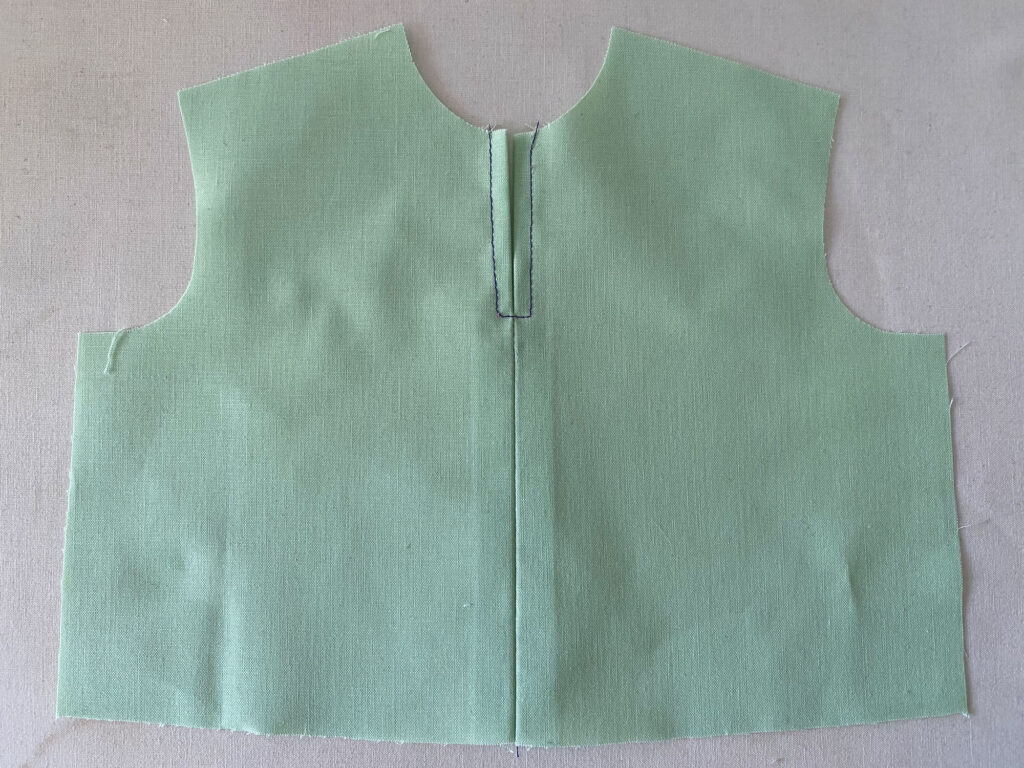
Sew the seam allowance down around the slit. Or down both sides of the seam.
If the pattern’s original neckline is finished with a neck facing, the facing piece will need to be split at the center as well. Add seam allowance to the new cut edge so it can be clean finished and folded to the inside.