
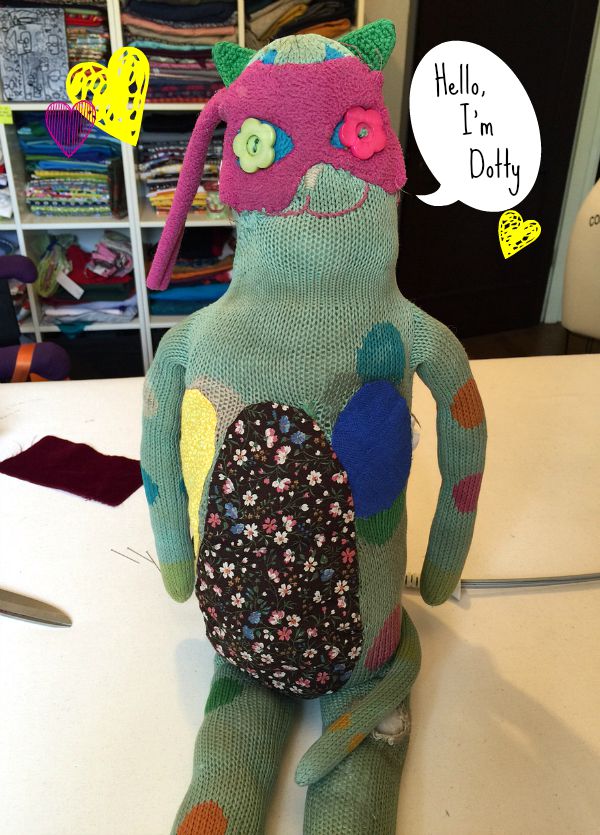
Love can tear us apart and wear us thin and leak out our stuffing. This is what happened to my son’s girlfriend and Dotty, her knitted, stuffed cat from her childhood. However, love can fix us too and with the desire to make Dotty’s owner happy, my son suggested to her to let me fix Dotty’s six holes.
I don’t consider fixing a special friend as mending or a chore but as a privilege. Just six holes? Sure, my afternoon just opened up. I’m honored someone trust me to fix their loved one. To those who are deeply attached to a special toy, fixing that toy, in any way, makes them feel better. After all they know they were the one who loved their special friend to, literally, pieces.
I’ve patched before. I’ve seen the appreciation. My daughter’s pink dog, Sniffy, who followed her to college, has patches on his patches. He still keeps the honored position on her bed. I’m glad I could help make that happen.
Fixing a stuffed toy is pretty easy. Patches can be of matching or contrasting fabric. Dotty is knitted, and I don’t knit but her owner didn’t mind if I sewed patches on. I let Dotty’s owner choose which fabric to use from my scrap pile and she choose five different fabrics.
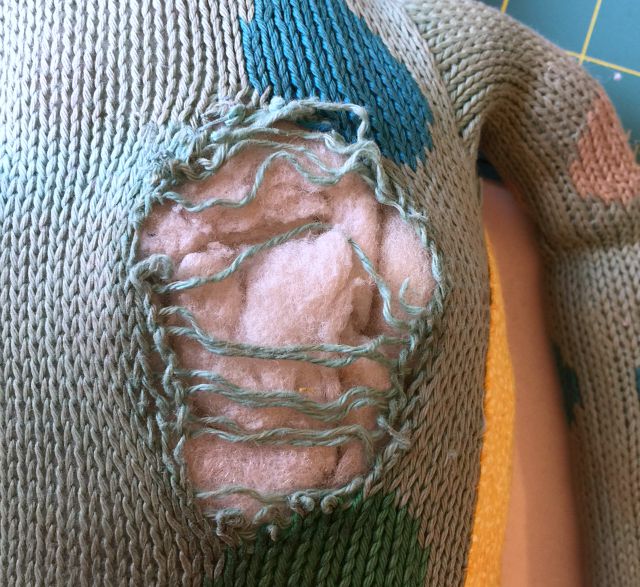
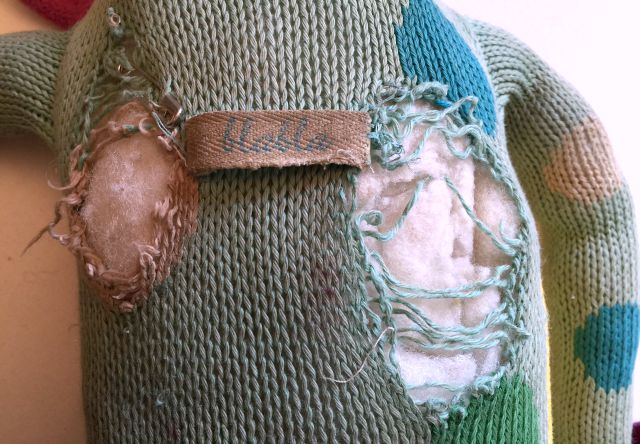
Dotty had six holes like this. My son had used Fray Check on the edges of the holes before I ever saw Dotty.
Dotty had become a little flattened over the years so I was asked if we could plump her up a little. The holes allow you to add more stuffing if needed. However, do be careful about how you add it. You want a smooth look, not a lumpy look.
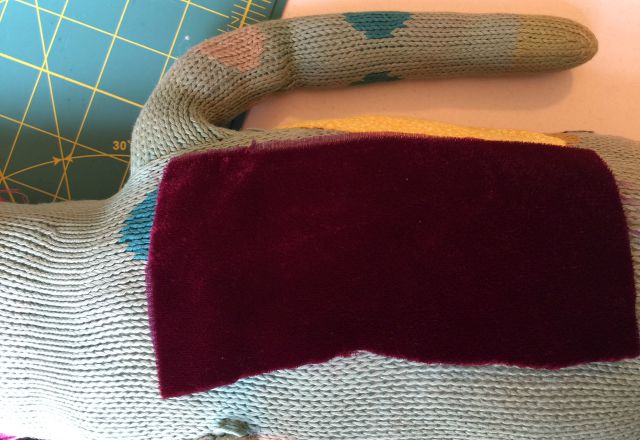
To patch, cut out a piece of fabric larger than the hole. Lay the fabric over the hole so it extends beyond the hole on all sides.
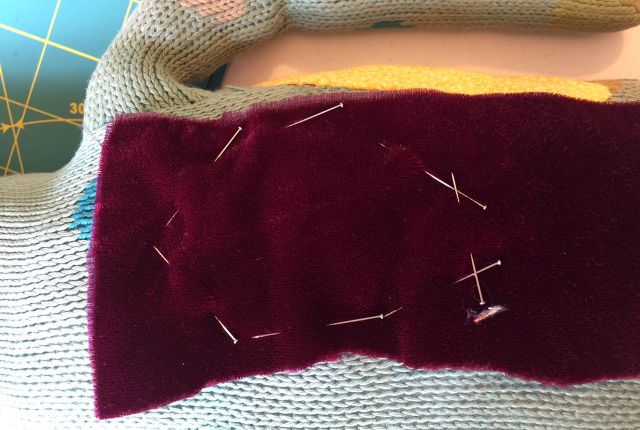
Feeling where the hole is underneath I pin the patch to the stuffed toy around the edges of the hole. My pins go through the toy’s “skin” around the edge of the hole and not just into the stuffing. The outline in pins is just larger than the hole.
Trim the patch with it still pinned to the toy. The pins are a guide for shape and size. Leave enough fabric to turn under, about 1/4 inch is good. You could run a tight zig zag stitch around the patch (after unpinning it from the toy) and not turn under your fabric.
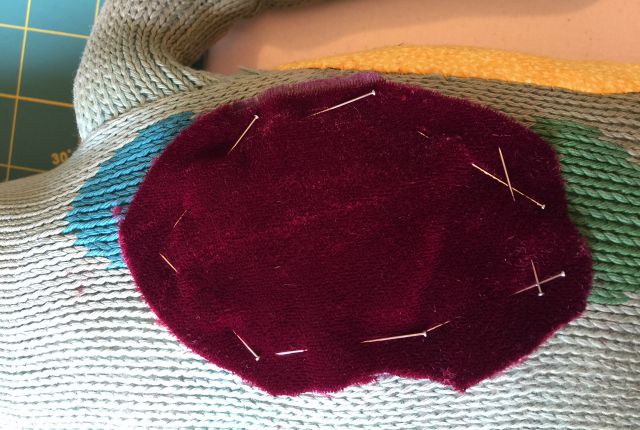
Turn under the edges of the patch. Pin down as you go.
Around tight curves I notched the fabric slightly. On the front of Dotty, where I used lighter weight fabric on the larger holes, notching wasn’t necessary. On a small circular patch, made of light weight cotton, I had to notch because the curve was so tight.
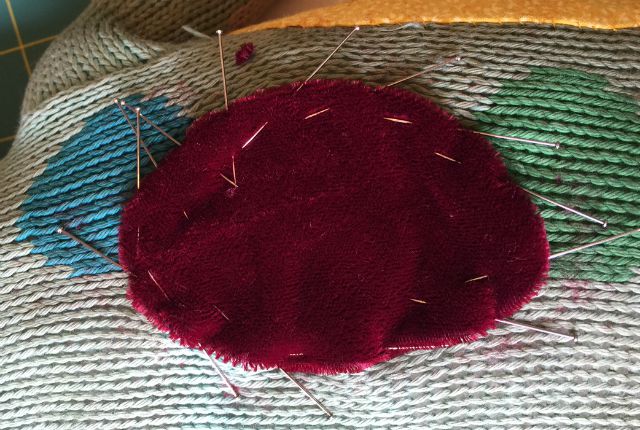
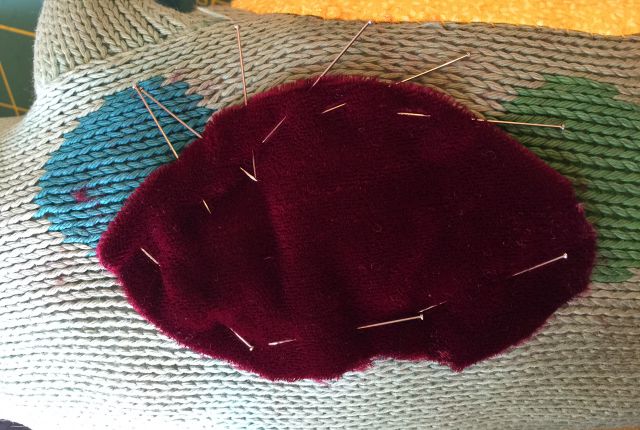
When it’s pinned down all around just check that the entire hole is covered.

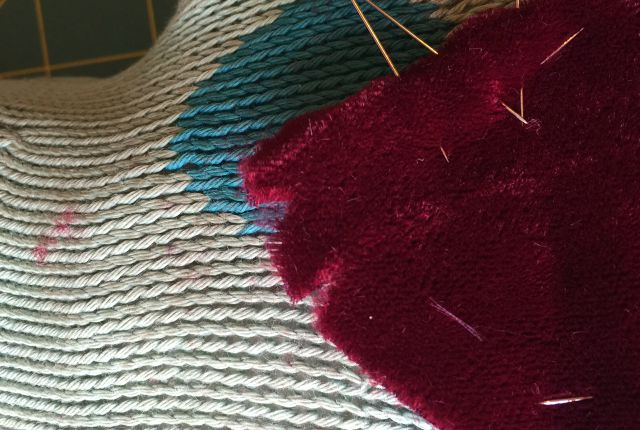
Sew the patch in place.
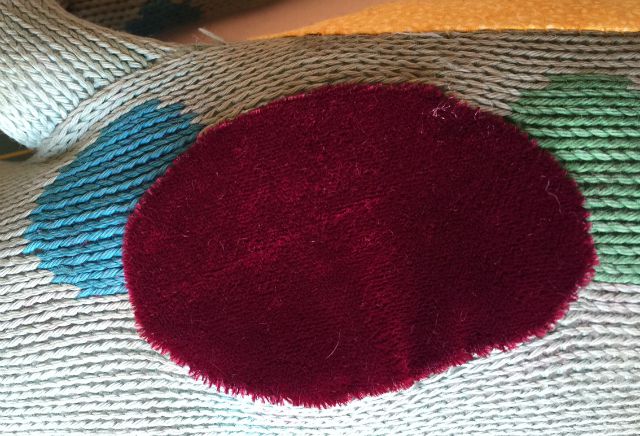
Finished. (with this patch)
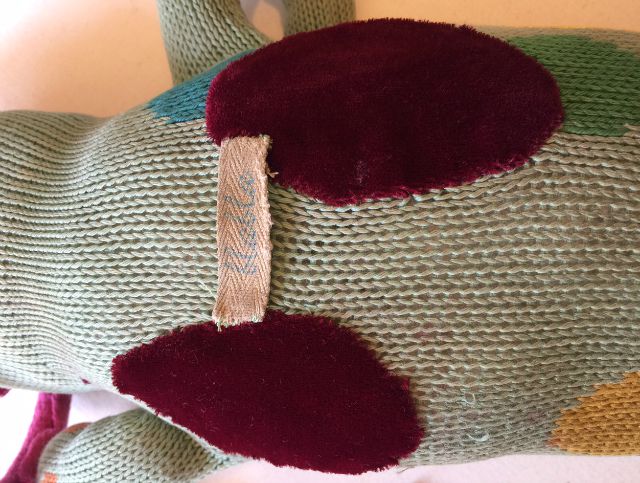
I had to take off the twill tape tag to patch but I reattached it when I was done because I noticed this tag is Dotty’s handle. A finger easily and lovingly slipped though this tag to carry Dotty around. Keep in mind that ittle details like these are special to the owners. My daughter’s dog had a large, loose, loop of thread that once was part of his factory made, sewn down smile. I left the loop loose because it had become part of his special smile.
Here she is; patched and plumped and ready for more love.
Now Dotty can be called a “rescue Cat”. Great tutorial.
Thanks. My favorite companion was a plastic doll that I gave a crew cut to. I wish I knew how to fix that.
Oh my goodness, I just about cried reading this. My almost 8 year old has “mr kitty” from before she was born, also a blabla kitty, just with stripes instead. He is relegated to be stuffed in a little bag because he is falling apart so badly and my daughter loves him so so much! I can not see to save my life (or poor mr kitties). I tried to see a patch but it pulled he thread and made a new hole. And then I ironed on a few patches but they haven’t held up. You don’t by chance take in any strays? Lol! I would love to somehow repair her very best friend!!
Oh, poor Mr Kitty. Is Mr. Kitty knitted? You’ll have to send me a picture (mary@thedailysew.com) so I can help with a solution.
I just purchased a vintage Blue Ribbon monkey (1958), who is very furry except for face hands and feet. He has a hole in his lower chest. Being so furry I hesitate to use a patch. Suggestions? The hole is not huge but not tiny. An inch square? I think if I cinched it close with needle and thread it might pull surrounding material too much. Also the head is loose. It appears someone tried to repair using long threads but it’s wobbly and may be trouble later. Any tips would be very appreciated.
What about darning the hole, like a sweater. You could even use a thin yarn to give the repair a fuzzy quality. Darn by anchoring stitches across the hole in one direction, then weave your thread or yarn across those first stitches. Or have the first stitches cross the hole and each other diagonally like a web or like slicing pizza. Then weave filler thread around the spokes. I haven’t darned much so you may want to look that up 😉 I think you’re right though, about pulling the material too tight if you were to cinch the hole shut. The fabric is already old so you don’t want to put much strain on it.
You could also place a piece of fabric over the hole but with the edges of the patch under the edges of the hole. A sort of reverse applique patch.
The head is tricky. Do you have a long doll making needle? I would use one and attach the head, close to the base as possible, through the body stuffing and out the other side. If you can work through the fur, maybe take small stitches all around the base of the head (regular needle and thread) to attach it to the body. That’s how I remember attaching the head when I made a cloth doll.
Repairs or not, I’m glad you’re new monkey has found a loving home.
Good advice. I don’t have the needle you mentioned but I do have longish needles used for yarn (Have some crochet experience. Sewing not so much). Your advice of patching sounds good. It will mess with his fur ( it’s long!) but better than falling apart. He is fairly “moth eaten” on his left side of torso. And all around his neck which might make stabilizing head difficult. Didn’t realize it when I purchased him. I would guess he needs his entire torso replaced which would make him not as original but better than wasting away! But that would need a professional, not me. I can try patching him up in the meantime. Thank you so much for your advice! I really appreciate your time and advice. It’s encouraging.
🙂
I have a pink stuffed cat. His name is Cat. And he’s 46 years old. He has a huge hole on the back of his neck (it’s pretty much just a pile of stuffing and no fabric) that I have repaired several times over the years. The material over his whole body is quite worn and thin. I’m not sure how to fix him with such thin material. Any ideas would be soooo appreciated. Cat is the best cat ever and a great listener!! I need to fix him up.
I’m going to research repairing older textiles, see what I can find and write soon. Hang in there, Cat.
Ok, Not as easy as I thought it was going to be.
Unfortunately, fabric breaks down over time and light exposure, humidity levels and dirt and pollutants can speed up its deterioration. Repairing old fabric is a delicate job. You could send Cat to a professional animal repair company. I also found this book on repairing vintage bears. It’s out of print but maybe you can find it used on other sites cheaper: https://www.amazon.com/Restoring-Teddy-Bears-Stuffed-Animals/dp/0942620348
If you really want to fix Cat yourself keep these things in mind:
You’ll want to clean Cat before you start mending because you don’t want to work any dirt into Cat or Cat’s stuffing as you work. I found this good post on washing old fabrics: https://lenoir.ces.ncsu.edu/2015/01/restore-vintage-fabrics-to-life/
Use fabric for any patches that is similar in weight to what Cat is now. You don’t want to put strain on the original fabric.
Use the smallest needle you can for the fabric. (Heavier fabric requires a larger needle)
Take delicate and not too many stitches to sew on a patch. Do not pull the thread too taught (strain)
Threads has some best practices in this post (scan down just past all the “is it worth fixing” questions) (Of course it is!) https://www.threadsmagazine.com/2012/04/27/simple-fixes-and-mending-techniques
Good luck.
Would this work for teddies with no holes, as I want to buy teddies and sew hearts onto them? I found this very helpful and it made my think of my toy Kookaburra, Kooka who has lost the yellow on the bottom of his beak.
Yes. This will work for any patch, hole under it or not. Great idea about sewing the hearts on to them.
I wish I had seen your post earlier before I threw out my son’s Blabla doll, which I replaced with the same one, but it just wasn’t the same emotionally for him. But my daughter’s blabla doll is also needing a fix. She’s happy that she can save her doll.
Thank you!!!
I think fixing a beloved is the best reason to know how to sew 😉 My eldest’s (26 years old!) favorite is still around. It has a few patches. I bought the smallest amount of pink velour I could to match Sniffy’s body for the first fix and so glad I held onto what was left because he needed more patches as the years went on 😉
Could I use pinking sheers instead of turning under patch on a teddy with holes?
Yes, I think you could especially if Teddy isn’t going through the washer every week and the fabric your patching with isn’t super prone to unraveling. A denim, twill, flannel, plain cotton, woven wool or a thick canvas would all work with just pinking shears. A knit isn’t prone to raveling and you would cut that with plain scissors. Pinking shears is a good idea. I wish I had thought about them when I wrote the post
Thank you. Repairing a dear teddy for a friend
I am so glad i found this post! Even if it’s somewhat old, recently i have noticed that my stuffed elephant of 13 years has recently started losing his fur, and one solution i saw was giving him patches! It breaks my heart seeing him like this and getting worn down, he means loads to me and it would be amazing to get some advice! He a bit older then 13 from what i know, we got him at a garage sell so who knows how much older he could be! I just need some advice on how to cover up his bald spots, it would mean the world to me and him!
I think patches are a good solution – or clothes if his bald spots can be covered with a pair of pants – custom made for him – or a waistcoat or even an aviator type cap if he is bald on top 😉 Making the clothes would be a project but you could figure it out by putting fabric up against him to see what shape you need to cut the pieces. I would start with scrap fabric.
If your elephant will not go in the wash, and he is not too furry, you might be able to get away with gluing fabric patches on him instead of sewing them down. Use fabric glue. When I patched a beloved animal here at my house, I searched fuchsia velour to match his skin. If you can find fabric to match your elephant the patches will really blend in. But you could have fun with the patches too and make them all different.
It’s wonderful you are patching your friend.
I found a vintage stuffed monkey online and he was just like one I had as a toddler in 1962. Unfortunately as he was nearly 60 years old he had some worn spots and the material was so threadbare it was hard to sew patches on or mend. My mother in law, a great seamstress, purchased a black stuffed bear and repurposed his fur and replaced my monkeys whole chest area. He looks really good for an “old man”.
I hope this gives an idea to try if appropriate.
This is a Great idea!!! I’m glad you got your monkey, and could repair him and I’m glad you shared that. Thank you!
I’m glad I found this post and hope you can help. I’m attempting to patch several worn out areas on a beloved stuffed doll. What would be the best stitch to use if placing a patch under the hole (reverse appliqué as you described above)? I’ll be using felt for the patches. Thank you in advance.
Reverse applique IF you have enough fabric to do so. It’s clean and practically invisible if you want it to be. You could also use a blanket stitch but that is showy and may not suit the look you’re after. The blanket stitch is good though if you don’t have a lot of fabric to turn under for reverse applique.
Hi:) I have a bunny from my childhood (Blue Bunny), and he is in college with me right now and desperately needs some TLC! Some of his stuffing has gotten less fluffy over the years, and his neck is getting particularly frayed, almost to the point of a hole. Could you recommend a stuffing to make him plumper? I also want to put a patch over the hole that is forming but I don’t want to mess up the way his neck looks!! Any suggestions? Thank you so much!
This is what happen to Sniffy the dog. His stuffing became packed, less fluffy. But Sniffy did have a hole so I could remove some of the old stuffing and replace it with new polyester stuffing. So, first, restuff Mr BB and then, repair any worn areas.
Does Blue have a hole somewhere that you could, if not remove any old stuffing, at least add some new stuffing? If he doesn’t, don’t make one in his neck – but maybe somewhere where the fabric is still in relative good condition (it wears down at the neck from being held there over the years) and somewhere on his body that is or was plump (where the shape doesn’t change his personality – a head or neck, if you can’t reshape it like it was originally, can really alter how the animal looks but a round tummy, is a round tummy. Easy to recreate if needed). I know the thought of surgery is big – but, to get some stuffing in Blue Bunny you need to open him up. Not a lot, an inch should do it.
Make a small slit with some sharp scissors. Don’t worry about removing any old stuffing unless it is really misshaped. If you do use a tweezers to pull it out so the slit doesn’t become stretched.
Get some ploy-fil, sold in a bag at any craft or big fabric store, and a pencil or chopstick. Carefully add some stuffing and with the pencil, get it where he needs it. You can massage Blue Bunny to shape the new stuffing. You will probably be able to pack a lot of stuffing in so keep adding until you like the look.
Close up the slit with a few hand stitches that go across the slit – side to side. Be careful not to pull the stitches/thread too tight especially if the fabric is well worn. Then you could add a patch over the slit if you wanted, or like Madeline in the children’s book, he can wear his scar with pride ;-).
As for the neck…I think I would apply Fray Check first (a clear glue-like product from Dritz. Sold in fabric stores and on Amazon). This would halt the damage. Of course, I would test it first because it may leave a sheen or wet-look to the cloth. This is okay if you’re going to add a patch over the worn area. A patch made from lightweight or knit fabric will mold to a shaped area best so try something light for a patch fabric.
OR, if Blue is/was furry, I might buy some thin yarn to match his fur, and darn the worn area. (use basket darning method explained in this post: https://thedailysew.com/blog/2022/05/8-ways-to-darn-mend-a-sweater/)
I hope you can fix Blue Bunny to your liking. It’s great you still have him. Let me know if you have any more questions