

Everybody loves a pocket, so why is it that a lot of clothes don’t have them? And tiny, useless pockets don’t count as pockets. Luckily, pockets are easy to construct and add to your store-bought clothes, and they’re easy to draft for your me-mades.
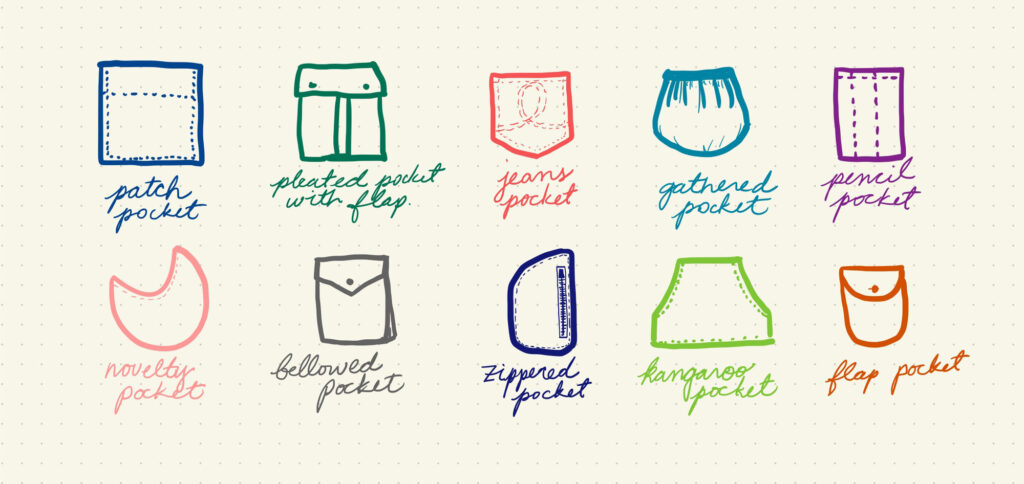
There are so many types of pockets that there are entire books written just about pocket design and construction (and the history of pockets).
The easiest pocket to add to anything (garment, bag, home accessory) is the patch pocket. The patch pocket, aptly named, is like a patch on a garment, but left unsewn across the top, so you can put things in it.
Sometimes the simplest things are the most flexible, for the patch pocket can be made in infinite sizes to accommodate what you need to carry, and it can be placed almost anywhere, inside, outside, near a seam, or in the middle of something. And you can easily upgrade the patch pocket with a closure like a zipper or a snap, make a flap to cover the top, make it round, triangle, or slant the opening. Add a pleat to it, gather it, or decorate it with topstitching.
Its simplicity is both practical and a starting point for creativity.
So let’s add a pocket
What to Consider First When Adding a Pocket
The first steps are the same whether the garment or item is already made or if you are working with a pattern and nothing has even been cut out yet.
Decide on where the pocket will be
- Where will the pocket sit on your body once the garment is on (if it’s a garment)?
- Does the pocket’s location or what you need to carry in it require a secure closure?
- Where could the pocket be anchored if the garment or item is already sewn? How will you anchor it so the stitches are hidden if needed? Example: adding a pocket to the inside of a jacket, I would want to hide the stitches so they don’t show on the outside. If I were adding a pocket to the inside of a tote bag, maybe the stitches could show on the outside, or I could add a larger pocket or decorative element on the outside to cover them.
- Consider the shape and size of the area where the pocket will go. Is there a seam or dart that will be covered by the pocket? Will that matter to you?
- Think about your ability to reach and use the pocket if you plan to use it: is it too high, too low, or do you have to reach too far around your back?
- Do you need to cover something like a stain, tear, or patch?
Decide on the shape, type, and size of the pocket
- Is there a seam that the pocket can be anchored to or incorporated into? Or that you need to use when attaching a pocket so the stitches will be hidden (by sewing in the ditch of the seam that’s already there).
- What shape and size of pocket will best fit in the area of the item where it’s going? Pockets don’t have to be rectangles. They can be just about any shape, but they need to look like they belong. The design of the pocket should relate to the design of the item it is being added to. Maybe that is echoing a shape in the item, or maybe that’s being in complete contrast, so it becomes THE design element on a simple garment.
- What do you need to put in this pocket? If something in particular needs to go in it, measure the item to make the pocket large enough. Does the pocket need depth added to accommodate something bulky?
- Does the pocket need to be secured? How secure? A flap, a zipper, or a snap?
- Does the pocket need to hold anything? Silly? No, sometimes pockets are added for interest, balance, and to break up a large space. They can also be used to hide something.
How to Draft a Patch Pocket Pattern
(Basic Pocket and the Foundation for All Patch Pockets)
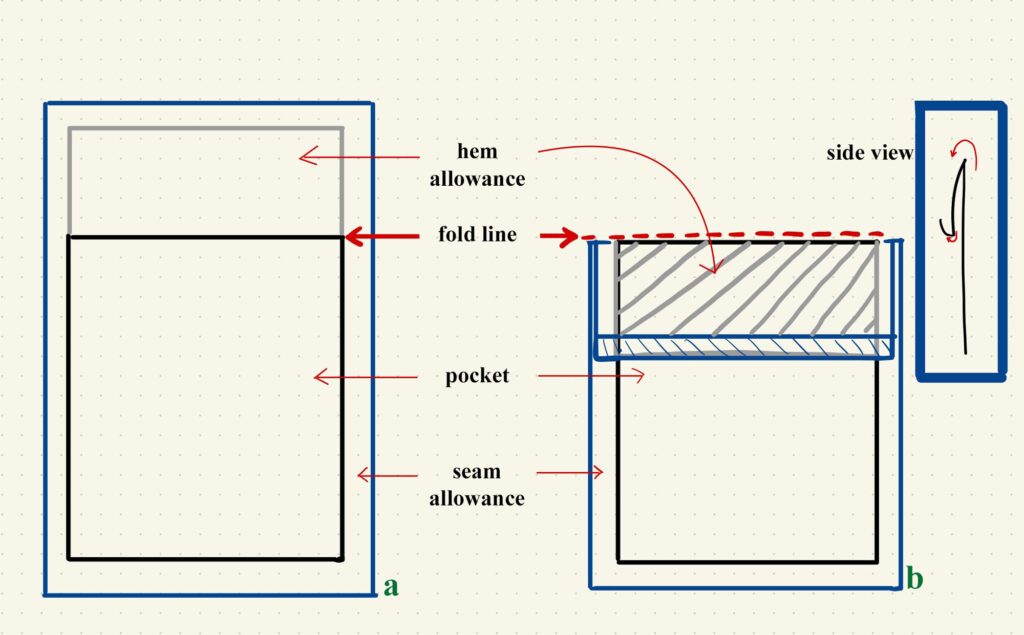
After deciding on the shape and size you want the pocket to be, draw it out to scale on a piece of paper larger than the pocket.
The edges of the pocket that will be sewn down to the base (the garment of the item the pocket is going onto) will be folded once to the underside of the pocket. Add seam allowance of ½” or 1 cm or your preferred seam allowance to those sides. (see a in the illustration above)
The opening side of the pocket usually has a deep fold or hem. (Shaped pockets will have facings, and I’ll explain that next.) This fold is folded twice to capture the raw edge. One deep fold, about 1 to 1 ½”, and a second fold, the amount of the seam allowance is folded under that and sewn down across the pocket before it is attached to the base.
The deep fold and clean finish prevent any fraying threads from sticking out of the pocket and lets the pocket stand away from the base fabric just enough for your hand to easily slip into it.
To the opening edge of your Pocket pattern, add the hem allowance (from ¾” to 1 ½”) and then your seam allowance.
Prep the Patch Pocket for Sewing
Some people serge/overcast the edges of the pocket before folding over the seam allowances. This is not necessary, but it is helpful if your fabric is prone to fraying. Another option is to cut the edges with pinking shears, or to zigzag stitch the edges, but since these two methods distort the shape, they should be done after folding and pressing the seam allowance to the back.
Turn under the seam allowance across the top to the wrong side and press. Alternatively, you could serge/overcast this edge.
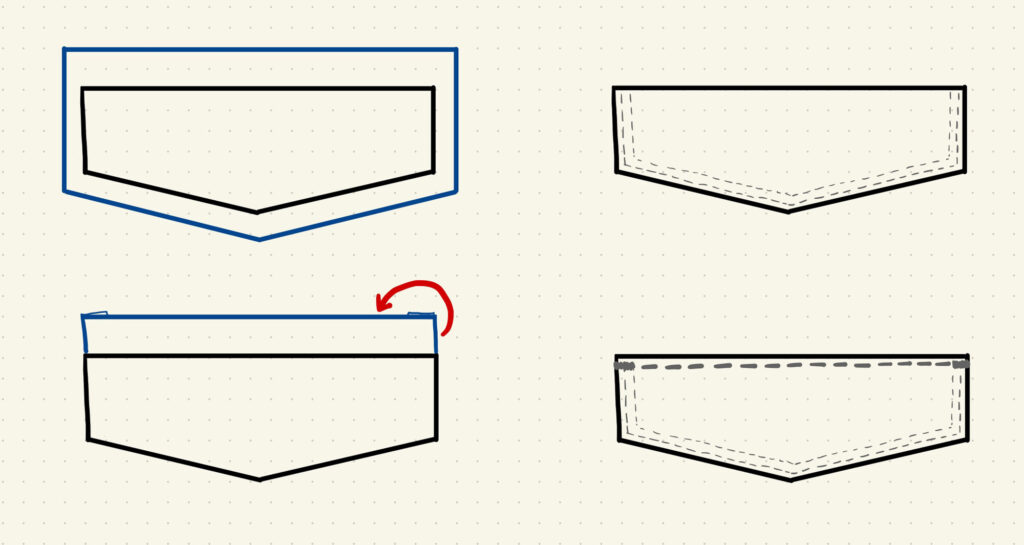
Fold the hem allowance to the front so it lies on the right side of the pocket. (see b in the illustration above)
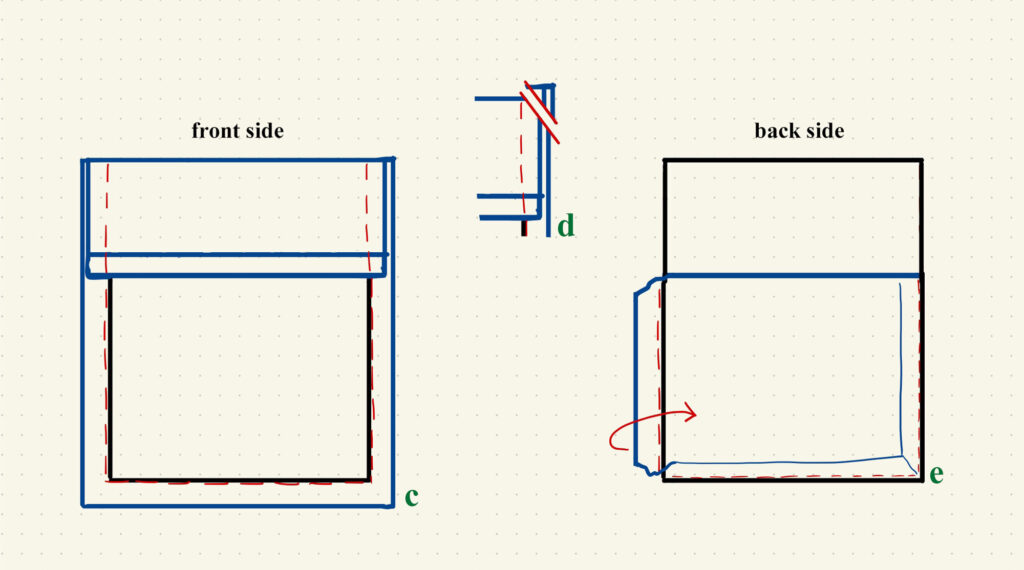
Sew around the pocket on the seam line. (see c in the illustration above) This will sew the hem allowance to the pocket and give you a clear line on which to fold the seam allowance.
Clip the corners. (see d in the illustration above)
Flip the pocket hem allowance to the back side and press. Stitch across the bottom of the pocket hem to enclose the seam allowance and secure the hem down inside the pocket.
Some pockets have two rows of stitching across the opening edge. It’s up to you. Now is the time to add any fancy stitches to the pocket.
Fold the pocket seam allowance of the remaining edges to the back of the pocket and press. (see e in the illustration above) You will find the stitching line makes it easy to fold, but try to make the fold so the stitches are not seen on the right side. If they are, you can remove them, but it’s quicker to hide them ;-).
How to Draft a Shaped Patch Pocket Pattern
A shaped pocket can be as simple as a square with a slanted side or as whimsical as a crescent-shaped moon. Whatever shape, like the simple patch pocket described above, it has to be clean finished.
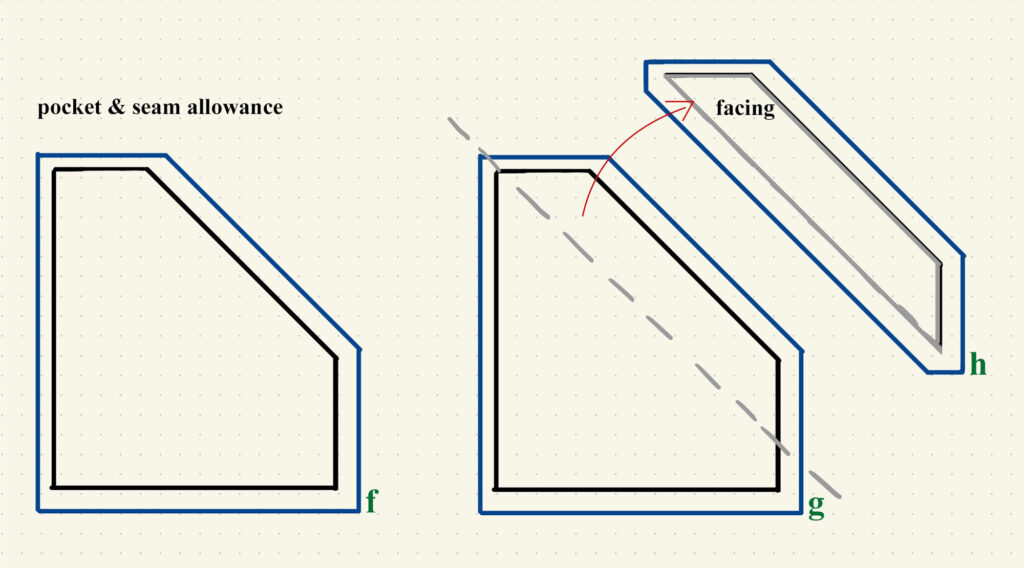
Draw your pocket out to scale on a piece of paper larger than the pocket. Add seam allowance to all the edges. If your pocket is round, a narrow seam allowance of ¼” to ⅜” (1 cm) will be easier to form to the shape. (see f in the illustration above)
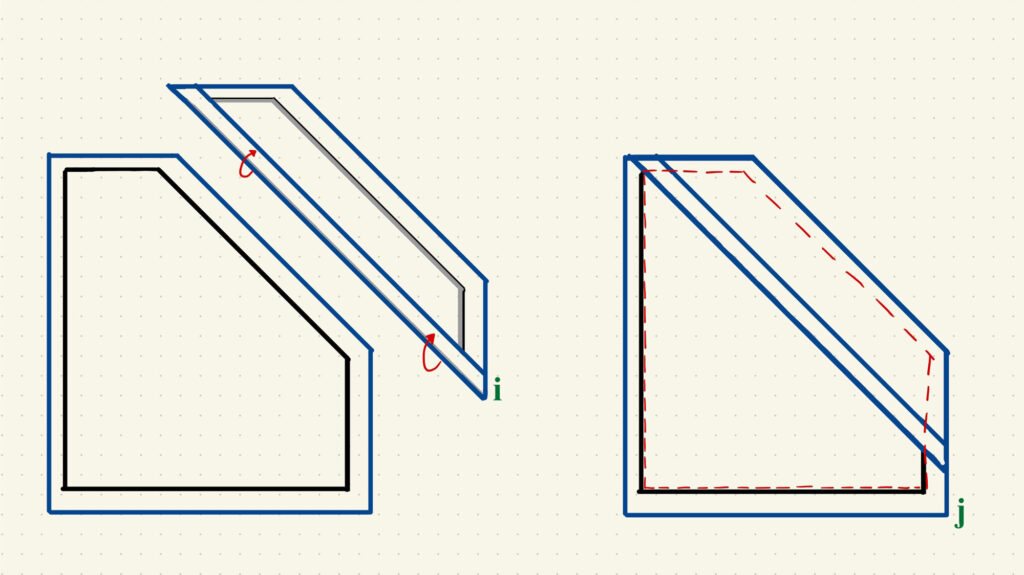
The opening edge of the pocket, instead of folding over a deep hem, will be sewn to a facing. The facing is a separate pattern piece that matches a partial portion of the pocket. If the shaped pocket is extremely shaped, say a star, it’s best to fully line the pocket for a clean finish (see below for a lined pocket)
Draft the facing pattern by tracing the pocket pattern. (see g in the illustration above) You only need to face about an inch or two of the opening edge (just like the deep hem of the simple patch pocket). Trace the opening edge and corresponding corners/sides. Add seam allowance to the bottom edge of the facing. The other sides already have the seam allowance from the pocket pattern. (see h in the illustration above)
Prep the Shaped Patch Pocket for Sewing
Fold up the seam allowance along the bottom edge of the facing. Alternatively, you could serge/overcast this edge and not fold it. (see i in the illustration above)
Place the facing, right side down, on top of the pocket. Right sides will be together, and the facing will line up with the opening edge of the pocket. Sew them together across the opening edge. Continue sewing all the way around the pocket on the seam line. (see j in the illustration above)
Clip the seam allowance of the facing and pocket corners if needed. Flip the facing to the backside of the pocket. Fold the seam allowance on the stitches to the backside of the pocket. Press.
How to Sew on a Patch Pocket
Sewing a patch pocket to an item is the easiest part of the job.
If you are constructing the item, sew the pocket on before sewing the garment together unless there is a dart or seam under the pocket. Those must be sewn before the pocket goes on.
Pin the pocket in place on the item. Take your time. If you have a second pocket that is mirroring this, get out a ruler to line them up.
Sew the pocket down, close to the edge. Go down one side, across the bottom, then up the last side. You can either backtrack at the beginning and end or make a little triangle, or stitch a bar tack at the ending points after that seam is sewn.
If your fabric is shifty, you can hand-baste the pockets in place before you sew them down by machine.
Sometimes a second row of stitches is added to the pocket. This might be done for decorative purposes (topstitching), but it does add strength to the pocket, so consider adding a second row of stitching for workwear or any pocket that needs to carry anything heavy.
Hand Sewing a Patch Pocket
Sometimes you don’t want to see the stitches around a pocket, for example, with textured coating fabric or a vintage-inspired gabardine jacket. Not a problem!
Construct the pocket mech the same way, except without any stitching on the top edge. Instead, you will give the fabric a very good press. The pocket piece could also be lined to finish off the top edge and all the edges. (See below for how to line a pocket)
Pin the pocket in place and then use a Slip Stitch to sew it down.
Simple Design Options for a Patch Pocket
A Pocket Flap
Draft a flap the width of the pocket it will overlap, and as tall or narrow as you wish. Add seam allowance to all the sides. The top side should have a wide enough seam allowance for you to be able to fold. I would add a ½” to the side that will be sewn down and use ¼” for the seam allowance around the flap’s other edges to reduce bulk.
Cut out two flap pieces for each flap. The two pieces are sewn together, right sides together, around the sides and bottom. Clip any corners, trim seam allowance if necessary, and flip the flap pieces right side out.
The seam allowance of the top raw edge is folded into itself. Press the flap, and top stitch or edge stitch along the sewn sides as desired. Sew the top edge of the flap down to the base fabric about ½” to ¾” above the top edge of the pocket. Sewing the flap down also closes the open top edge of the flap.

A Lined Patch Pocket
Typically, lined pockets are drafted like an unlined patch pocket described at the beginning of this post. The lining is sewn to the bottom edge of the pocket hem lining what the hem leaves uncovered. This is a great option for suit pockets. It keeps the inside of the pocket very tidy and clean finished.
When a pocket fabric is bulky, like a boucle or a heavy coating, the pocket is fully lined on the backside. There is no folded hem.
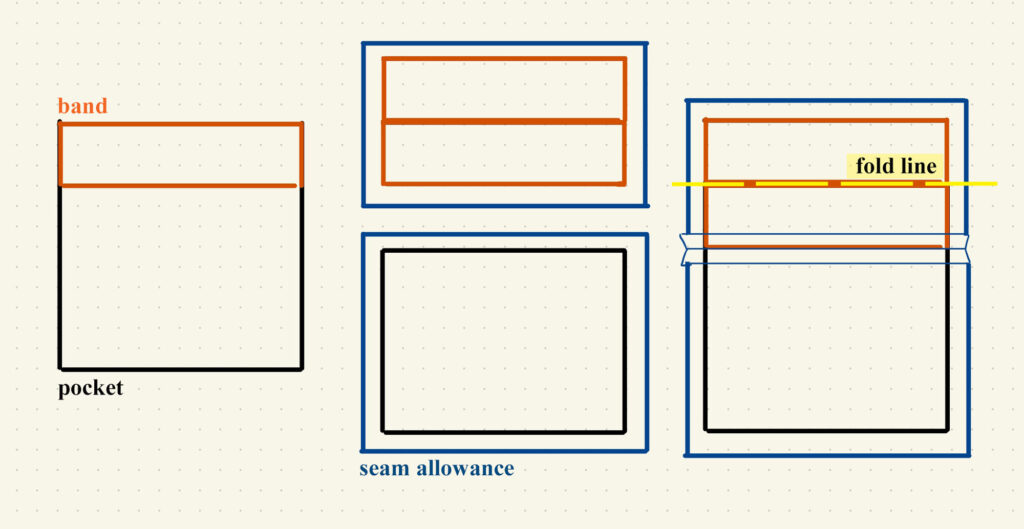
For a partially lined pocket, draft the lining piece to equal the remainder of the pocket; the pocket size minus the hem. (see 2 in the illustration above)
Sew the lining to the hem edge. (see 3 in the illustration above) Fold the pocket hem on the fold line and press. Unfold and fold again so the right side of the pocket is touching the right side of the hem and lining (like sewing the basic patch pocket described above).
Sew down the sides and bottom, but leave an opening wide enough to turn the pocket right side out. Press so the lining is not seen on the outside. Tuck in the seam allowance at the opening. Sew the pocket down to the base fabric.
For a fully lined pocket, draft a pocket to its final shape. Add an equal amount of seam allowance to all four edges. Cut once in the pocket fabric and once in the pocket lining fabric. Sew the two together, right sides touching, leaving an opening to turn it right side out. Tuck in the seam allowance at the opening. Press the pocket and lining so the seam turns toward the underside of the pocket. You don’t want to see the lining peeking out from the pocket. Sew the pocket down.
A Banded Patch Pocket
Instead of a fold to finish the opening edge of a pocket, a strip of bias binding, fold-over elastic, or a wide band of fabric, leather, or suede could be sewn to the top edge. This detail is usually done in a contrasting color, or by turning plaid or striped fabric on the bias or at a ninety-degree angle.
There are a few ways to add binding to a pocket, and therefore, the drafting of the pocket will be different. If you are simply sandwiching the edge in a folded binding, like fold-over elastic, leave the seam allowance off the edge that will be bound.
If you are binding the edge with a double-folded binding, add a narrow seam allowance, about 1/4″.
When the top band of a pocket is wide and a contrasting or turned fabric, draft the patch pocket to be the finished size. Draw a line across the pattern to separate the band from the pocket. Slice the pattern on that line. Add seam allowance to every side of the lower pocket piece. Double the depth of the band and add seam allowance to all the edges. (see the middle drawing in the picture above)
The band is doubled to include the opening edge’s hem allowance. Construct the pocket the same way as a basic patch pocket (described at the beginning of the post) after attaching the band to the pocket.