
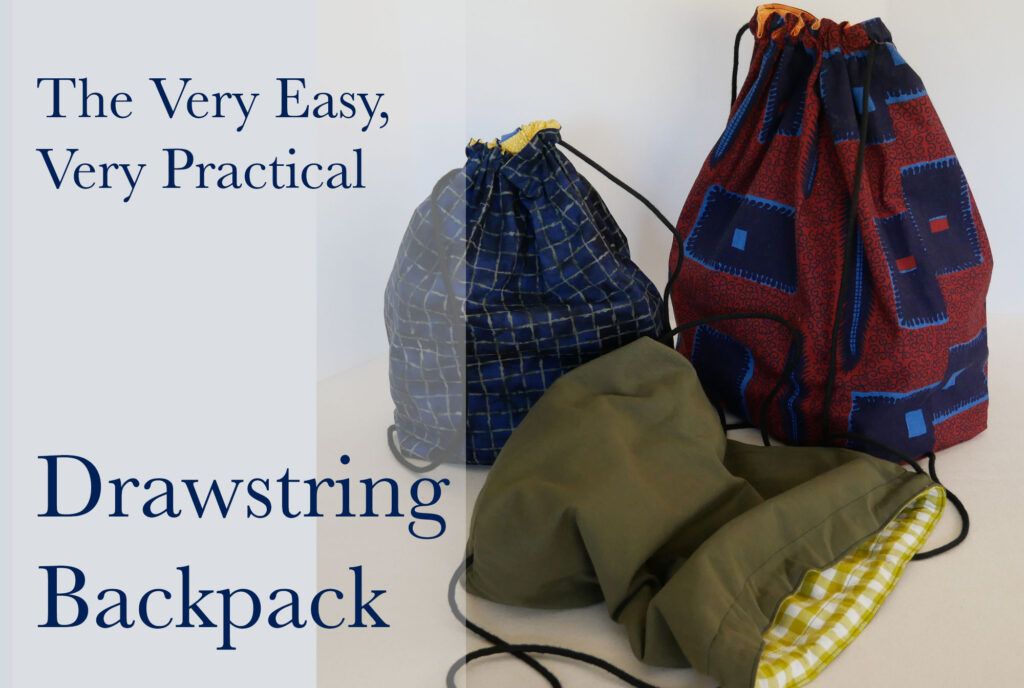
This simple drawstring backpack is similar to the type companies give away as a promotional gift. The swag versions are usually made from a nonwoven fabric with a silkscreened name or logo, big eyelets in the corners and shoestring cords for the straps.
This is the same basic style I super upgraded for my Super Deluxe Drawstring Backpack.
This version lies in the middle, between the flat freebie and the pocketed purse-like, super version. It is lined and has boxed lower corners to give it width. It streamlines the making process by leaving off the details found on the Super Deluxe but it still retains all of its practicality.
And if you desire, you can add any details you want. Add patches to the bag, make it from patchwork squares, applique your own logo, add, a loop for attaching keys, or add a side zipper pocket. This pattern is so basic it‘s almost a blank canvas.
You can watch how to make this bag or read on for clear instructions and lots of pictures.
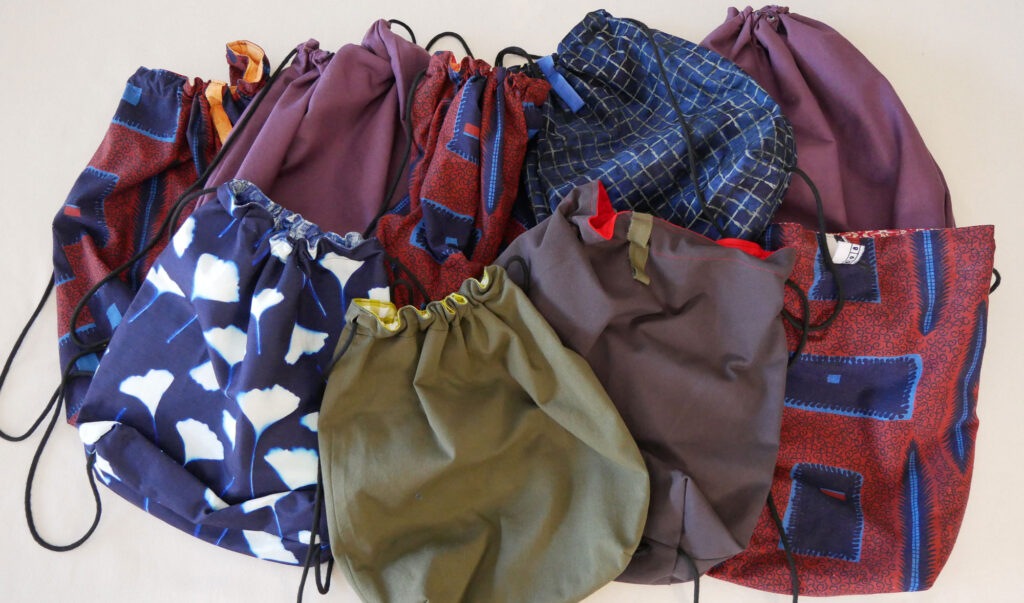
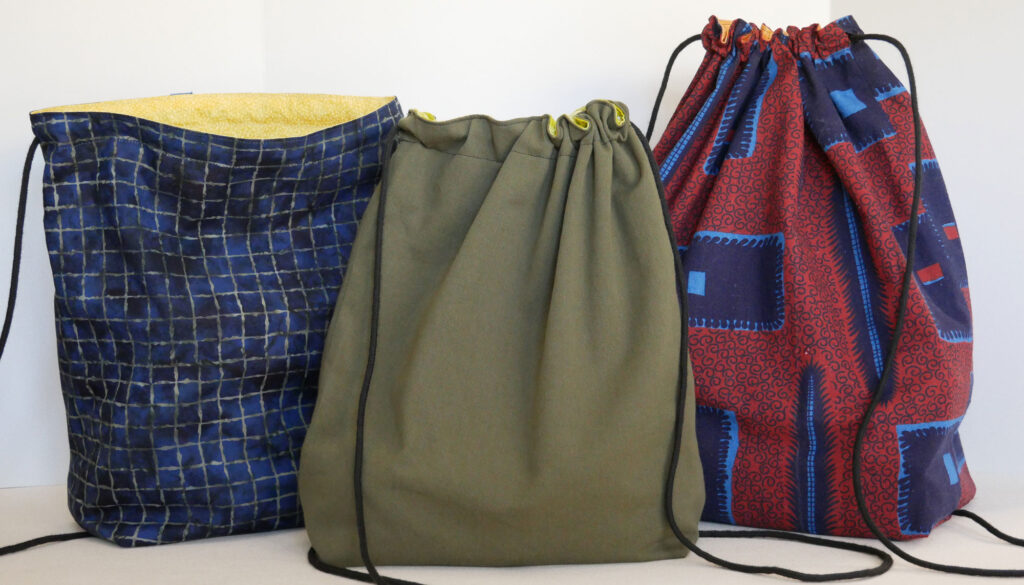
I made 10 of these bags this week to donate to Streetside, a group who hands out meals from a mobile unit to anyone asking for one here in Asheville, NC. They’ve been doing this critical work even before Hurricane Helene struck us. They have many requests for a bag so the meal recipient can free up their hands and eat their meal.
My eldest, who volunteers with Streetside regularly asked me weeks ago how hard would it be to make some bags to give away? Not hard. So now that I have electricity back, it’s time to help. And with all our stores closed, and no deliveries happening I will use what I already have.
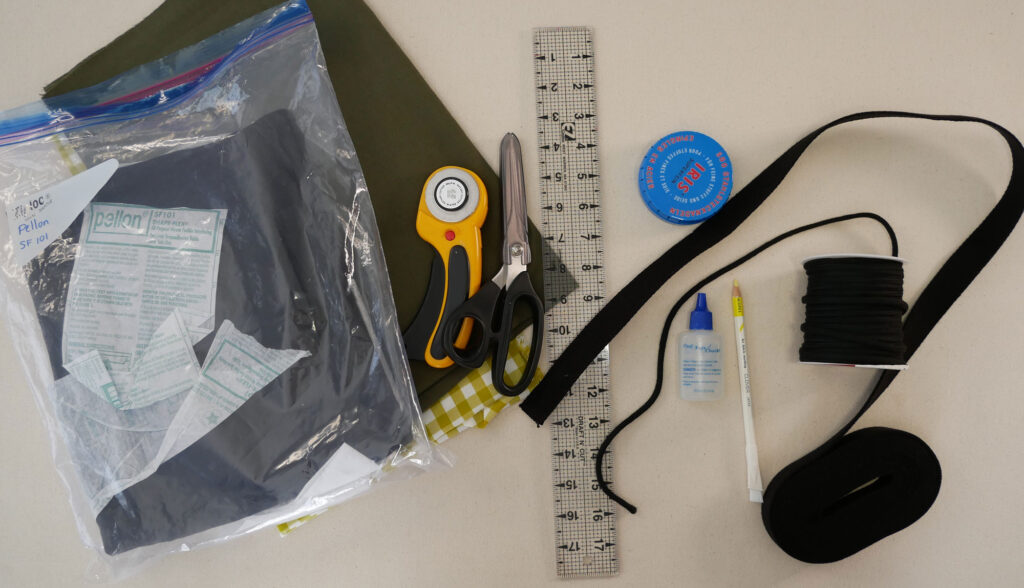
Supplies Needed
Fabric both for the bag exterior and the lining; about ½ to ⅔ yard of each depending on the size bag you make. This is a great project to use up larger scraps or piece together similar weight fabrics for a patchwork or color-blocked bag.
Ideally, the bag needs mid to heavy-weight fabric like twill, canvas, denim and batiks but you can use quilting cottons and homespuns. While you could use flannel, linen and lighter-weight fabrics these fabrics would work best with a midweight fusible interfacing like Pellon SF101
The lining can be made from most anything. I have used cotton lawn, quilting cottons, cotton blends, batiks and homespuns.
You’ll also need scissors or rotary cutter, a ruler, a fabric pencil or another way to mark your fabric, and pins.
For the straps you have choices:
- thick cording (see following note)
- flat webbing between ½” to 1” wide.
- Or make straps from fabric – for which you’ll need an additional ¼ yard or 8” of 40” wide fabric
If you are using cord or webbing you’ll need Fray Check to prevent the ends from unraveling.
Note: Cord is the least comfortable as it can dig in to the wearer’s shoulders especially as the bag gets heavy. If you want to use cord use a cording that is ⅜” thick or thicker.
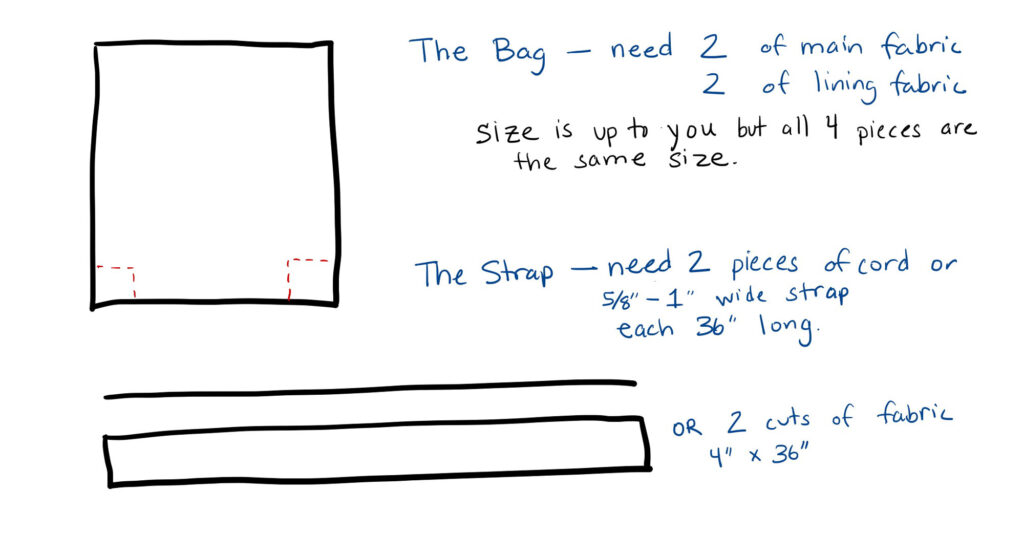
Cut the Bag and Lining
Since the bag and lining are exactly the same you can stack your fabric and cut these out at the same time.
You can make the bag almost any size.
You want to think about the size of the person the bag is for and the purpose of the bag. Whatever the size the height is larger than the width
- 15” wide by 17” tall is a good size for a small to average adult female.
- 13” wide by 14” tall is nice for a child/ preteen. It makes a small bag that still holds a swimsuit, wallet, phone and car keys for your trip to the Y
- 18” wide and 20” tall will proportionally fit a larger frame and will of course, hold a lot more things.
These measurements include a ½” seam allowance.
You will measure and mark out the rectangles on your fabric and then cut them. (I stacked my bag fabric and lining fabric on top of each other so I could measure and cut only once). Cut two rectangles from the bag fabric and two from the lining fabric.
The lining is not optional in this version. It anchors the straps.
If the exterior fabric of your bag is lightweight fuse the interfacing to it now, before the next step. (You can do it after but it’s easier to do it now)
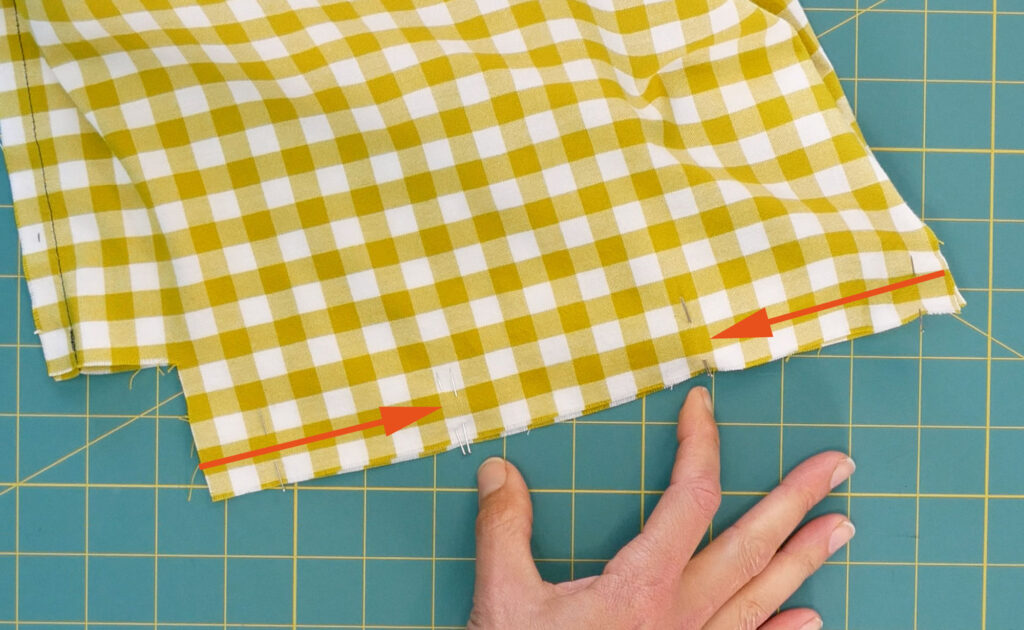
To obtain the flat bottom structure of the bag the bottom corners are cut from the bag and lining pieces
For bag pieces that have a directional print (an obvious wrong-way for the design) orient your bag pieces so you will cut away from the bottom.
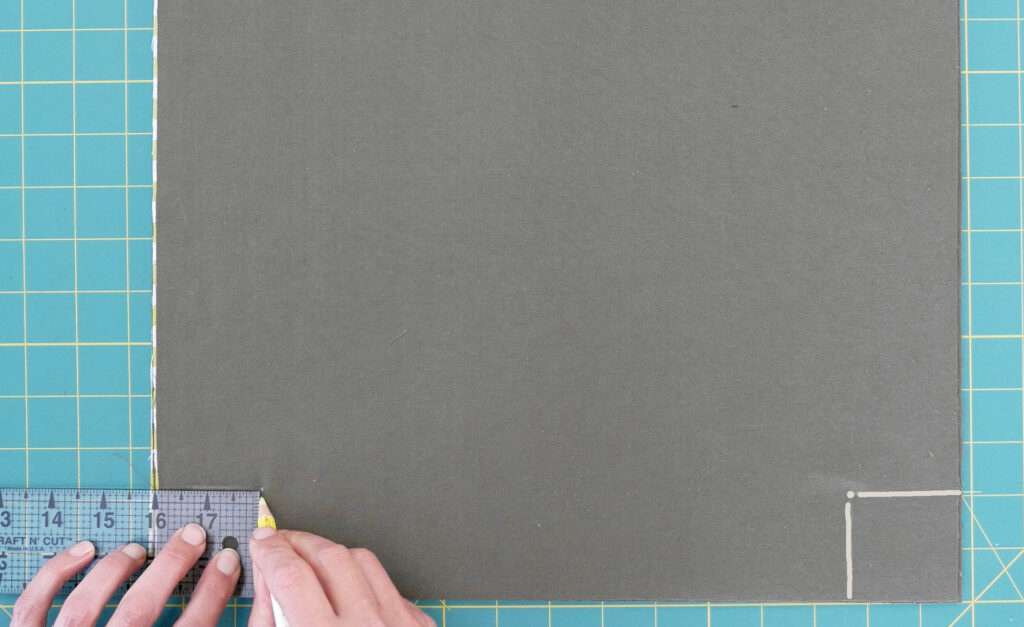
Measure in and up the same amount, mark and cut.
Here are some guides for how much to remove:
- 15” x 17” remove 2” from the corner for a 4” wide bottom
- 18” x 20” remove 3” from the corner for a 6” wide bottom
- 13” x 15” remove 1” from the corner for a 2” wide bottom
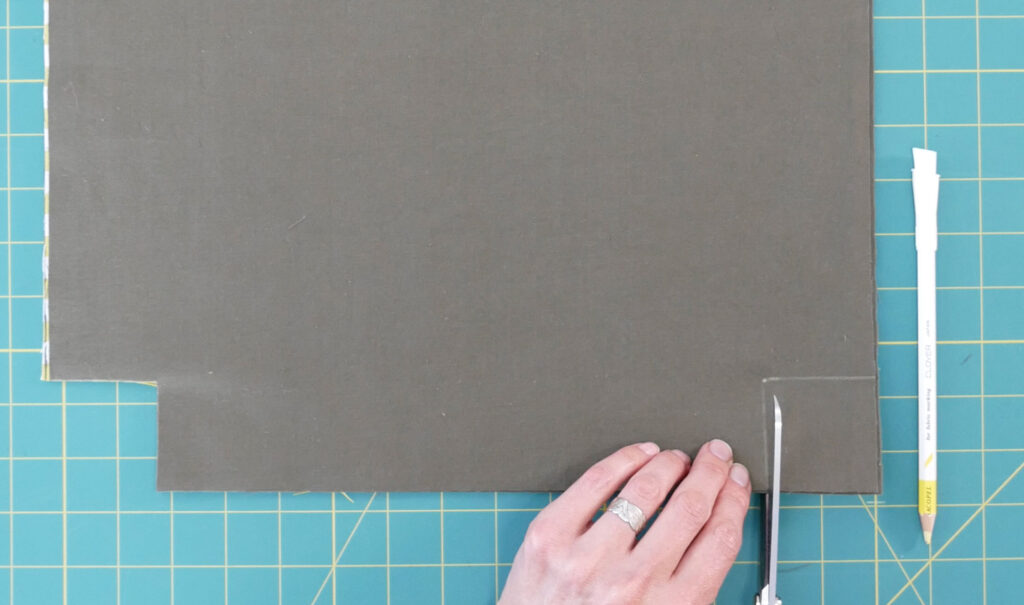
Note: The more you remove from the corner will make the bag bottom wider and the bag shorter. Example: a bag piece cut 15” x 17” tall sewn flat, with no bottom, will be 14” x 16” when sewn (½” seam allowance).
That same size bag with 2” removed from the corner to make the bottom will be 14” tall, 12” wide at the bottom and 14” wide at the top.
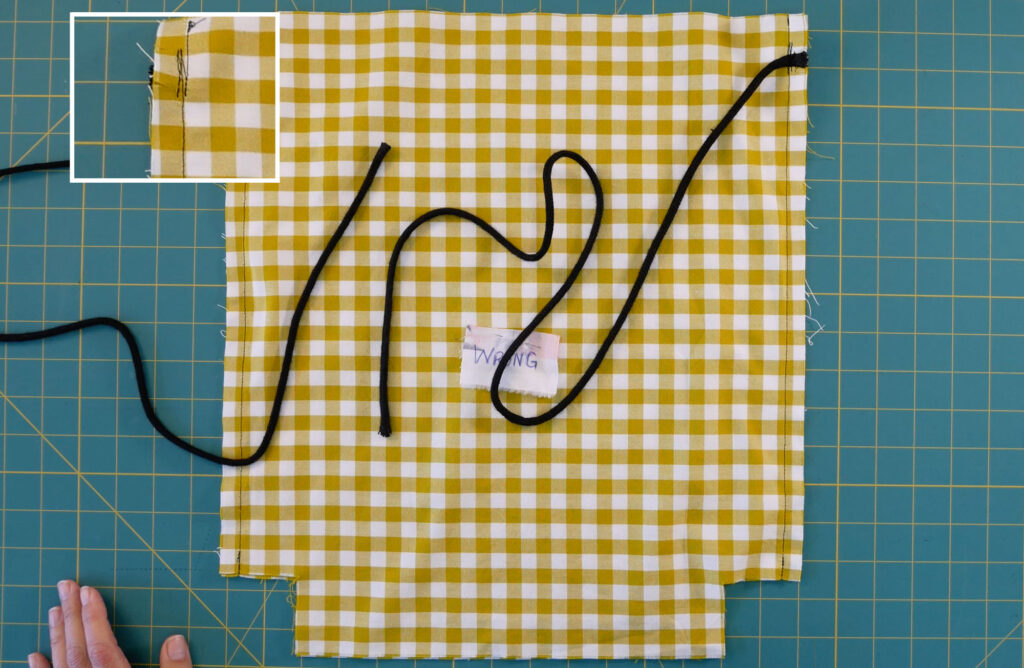
Marking the Casing
The casing is the channel the strap will move through to close and open up the bag. How wide your casing needs to be depends on how wide your straps are. In other words, the width of the straps determines the width of your casing
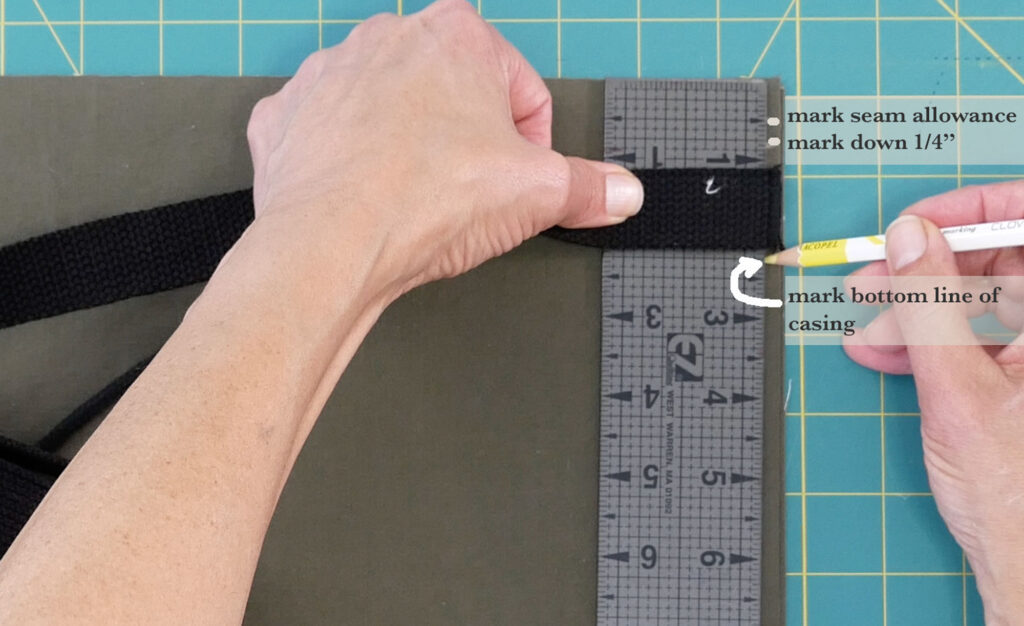
To decide where the casing will be start from one of the top corners of the bag piece and measure down the side ⅝” to ¾” and mark. This is the ½” seam allowance plus a little wiggle room between the seam and the casing. This mark indicates where the top line of stitches for the casing will be
Measure the width of your strap.
The casing needs to be wide enough to accommodate the cord or strap and have room to allow the strap to move, at least ⅛” wider than your strap. Thicker webbing might need more like ¼” extra.
Example: My cord is ⅜” thick. My casing needs to be a minimum of ½” wide (adding just ⅛”) but, because the cord has thickness, it’s not flat, I will make my casing ¾” (and when I was actually done with the bag, the casing was 1” wide 😉
Mark down from the first mark however wide you wish to make the casing.
Do this to the other side of the bag piece as well.

To transfer these marks to the remaining three pieces it’s faster to stack up all the pieces, putting the marked piece on the top. Then clip the stacked fabric at the marks to make notches into all the layers at one time. Clip in about ¼” because your seam allowance is ½”.
The Straps
Straps are 34” to 36” long. A child’s bag would be shorter, maybe 28 to 30”.
After cutting cord or webbing, apply Fray Check on the ends to prevent it from unraveling. I also like to apply a dab of Fray Check to the cord or strapping I cut the strap from.
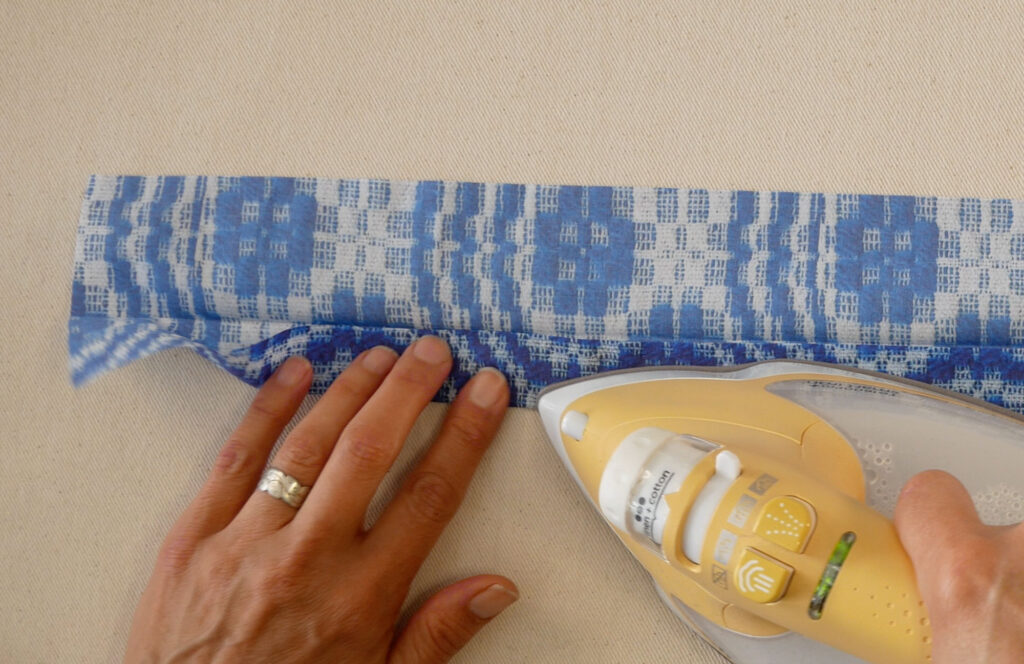
To make your own straps cut two rectangles 4” tall by 34”, 36” or whatever length you need, wide.
Fold the strap piece in half lengthwise and press well to get a good crease. If your fabric is shifty- the use of Spray Startch here can be very helpful.
Open up the pressed fabric and fold each long raw edge in to meet the crease. (I fold up and press one edge at a time) Press.
Fold it back in half so you now have a 4-layer thick strap.

Stitch the strap closed along the long edges, close to the edge.
Let’s Make the Bag
Lay the two lining pieces WRONG side up.
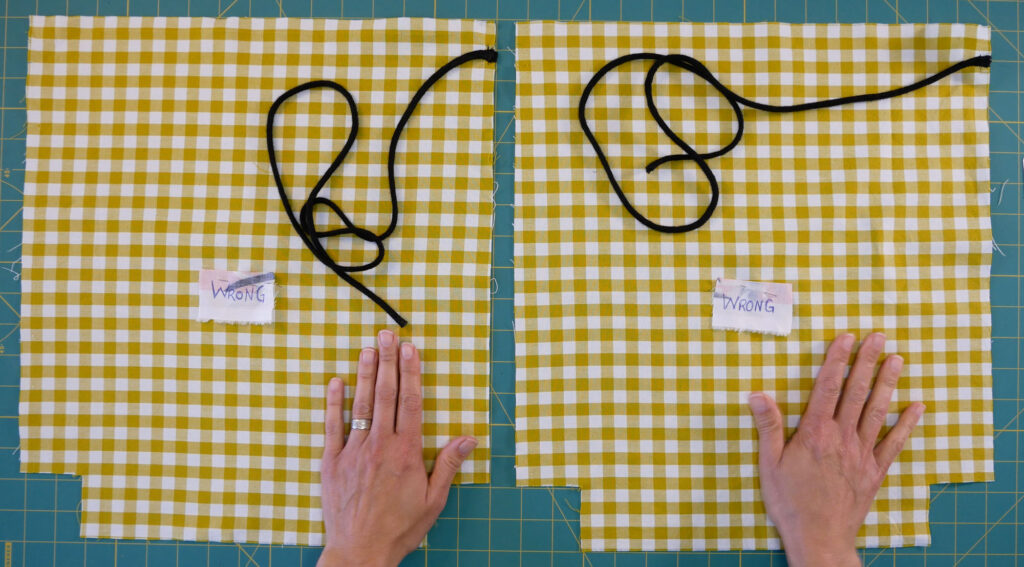
The strap, no matter what type of strap, will be attached to the right-hand side on the wrong side of the lining, between the notches.
One strap on one lining piece. It’s important that the lining is wrong side up and you attach the straps to the same sides.
At the machine baste or sew the strap down inside the seam allowance.
Place the two lining pieces together so right sides are touching and the straps are on the outside. Notice, when the lining is together the straps are on opposite sides. Pin the sides and sew them together from the top down to the bottom.
When you sew over the strap, reverse and sew back over a couple of times to reinforce where the strap is attached because there’s going to be a lot of strain on the strap at this point.
Set the lining aside. Take the two exterior bag pieces and place them so the right sides are touching.
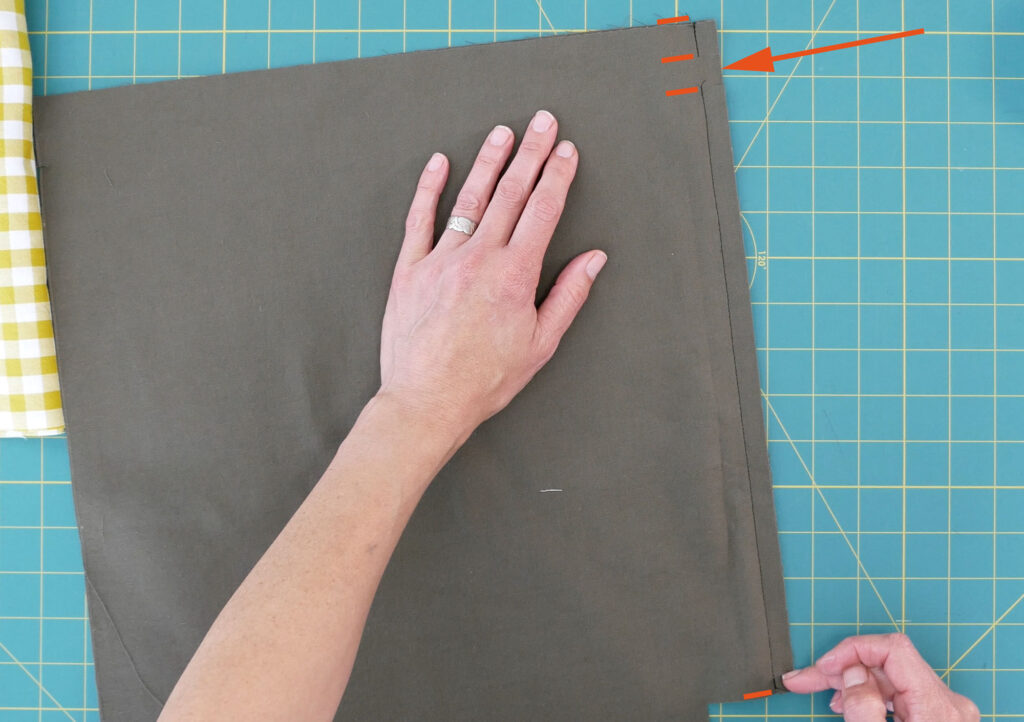
Sew from the top to the first notch. Stop. Clip your threads. Begin sewing again from the bottom notch to the bottom.
It’s important to press the seam allowances of this seam open, like pages in a book. This gives you an opening in the side seam which the cord or the strap will exit out of the casing.
Place the bag inside the lining so the right side of the bag touches the right side of the lining.
Along the top edges, match up the side seams and pin. Pin around the top edge and sew the lining to the bag around the top edge using a 1/2″ seam allowance.
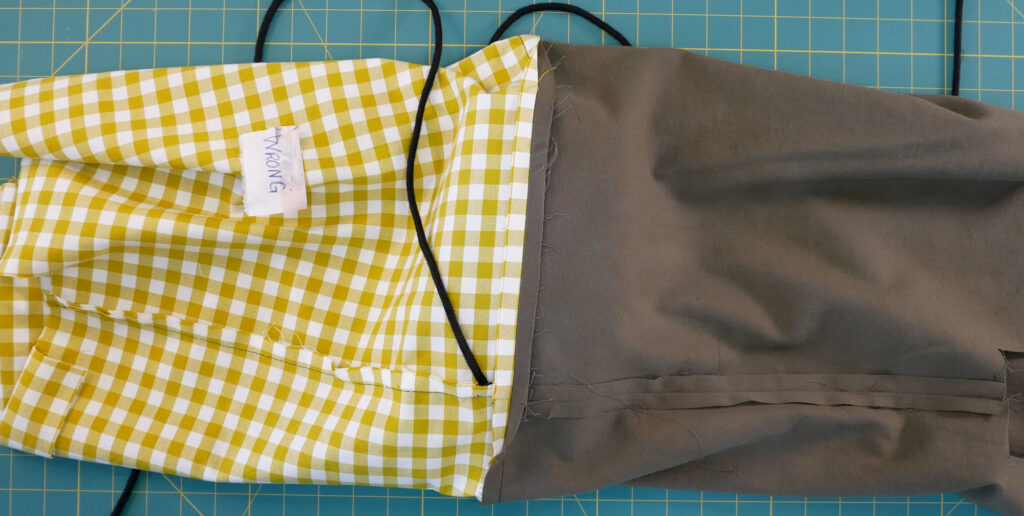
Pull the bag away from the lining so it’s one long tube. Place either a tailor’s ham or a folded towel under the top seam. Press this seam’s seam allowance open. Give it a good press. This is going to make the next step so much easier.
Flip the lining or the bag so the two layers are together with the wrong sides touching.
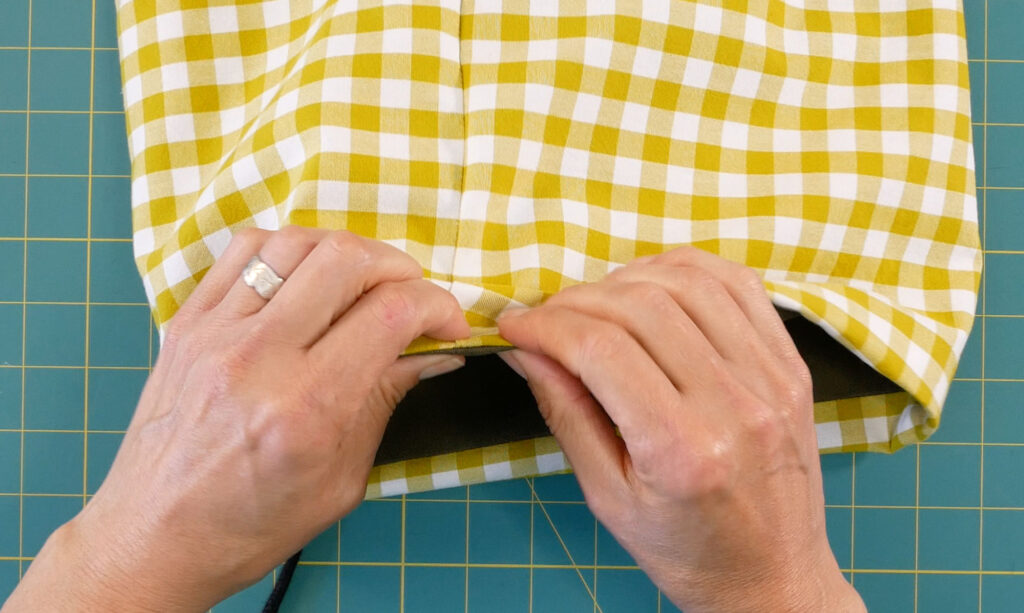
Fold the lining and bag directly on the seam line. You don’t want to see the lining peeping up over the bag or vice versa.
Manipulate the fabric with your fingers to get the seam in place and pin it.
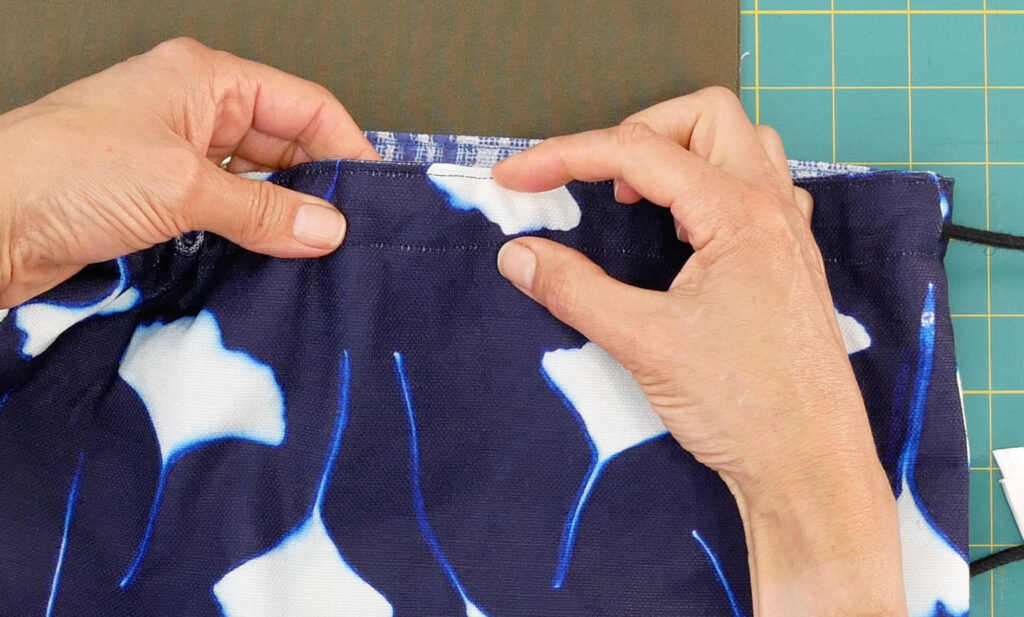
Press and sew around the top, close to the edge catching the seam allowance and securing the evenness of the top edge. I like to start and stop near a side seam. It’s less conspicuous.
This line of stitching is also the top of the casing. If you measured down only ⅝” sew ⅛” in from the edge. If you measured ¾” you can sew ⅛” in or ¼” in from the edge (it isn’t rocket science. There’s always room for artistic interpretation 😉
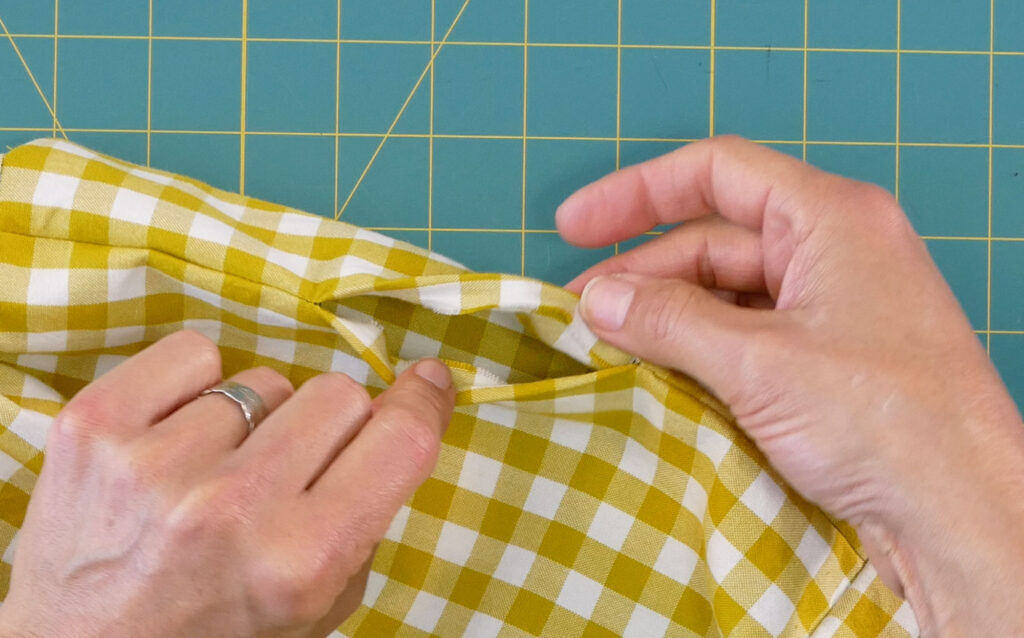
Threading the Straps
Getting the straps in place is easier for me to show than write but here we go:
Pull the bag and lining apart like a long tube so you’re looking at the wrong sides and orient it sideways on your work surface so the openings are on the right and left and the side seams are on the top and bottom.
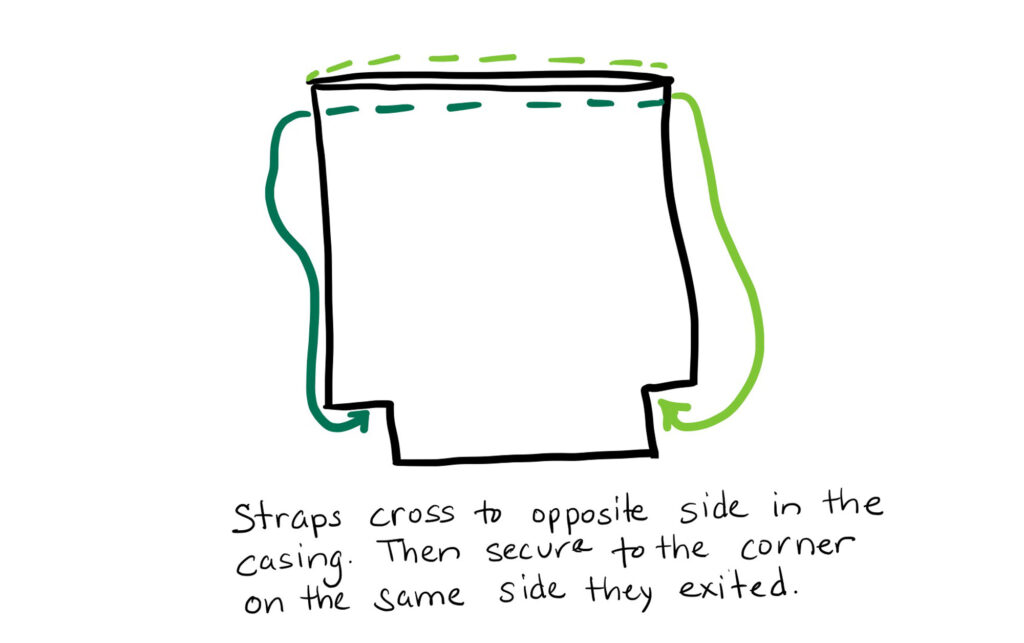
One strap will be on the bottom and one strap will be on the top
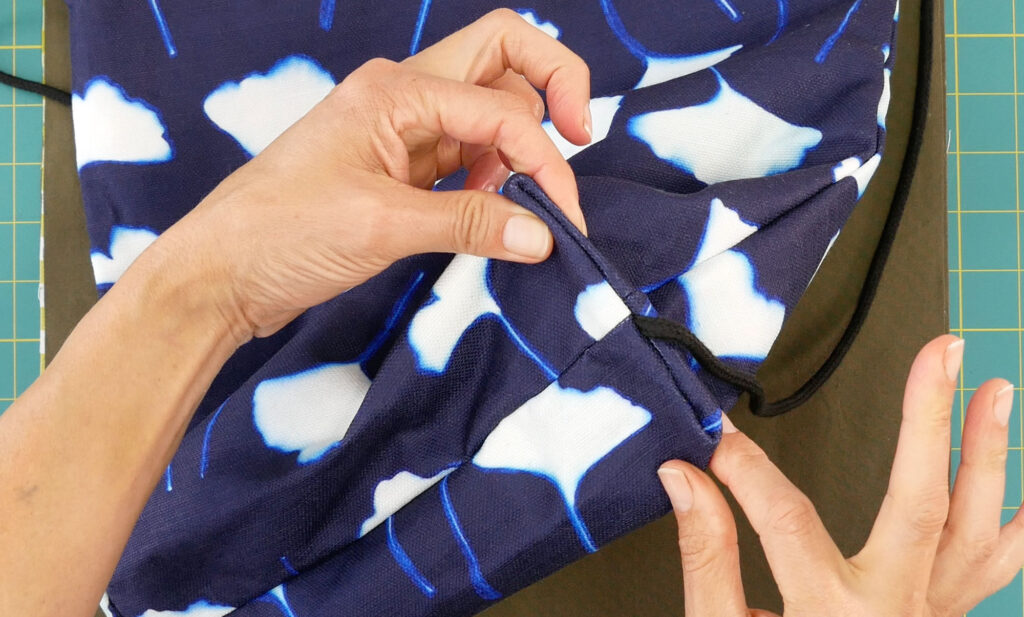
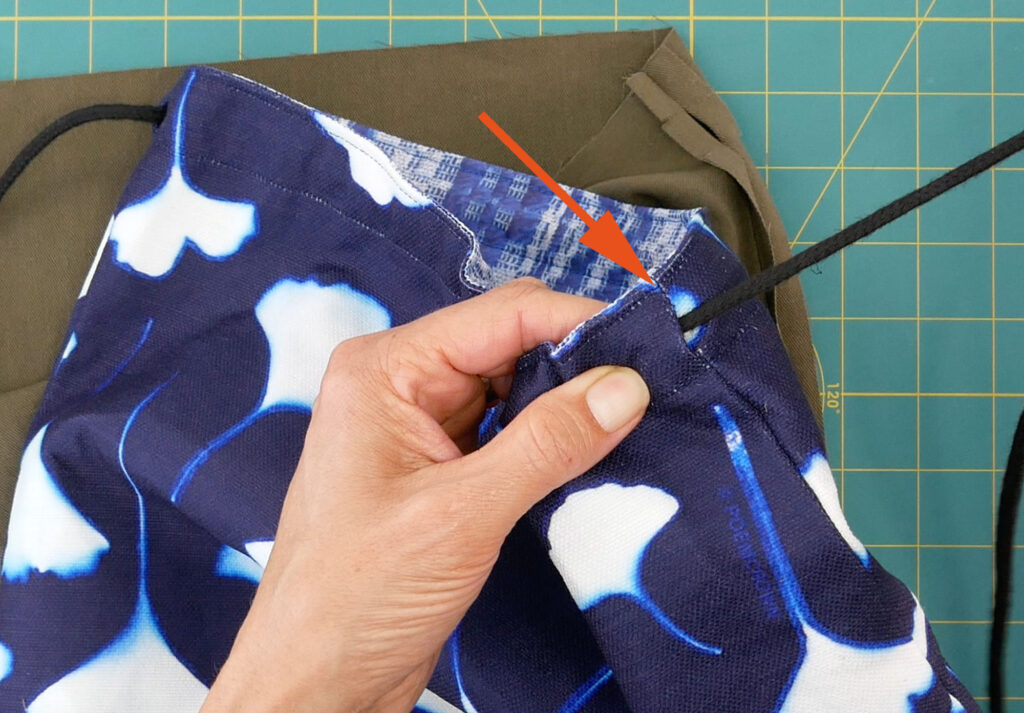
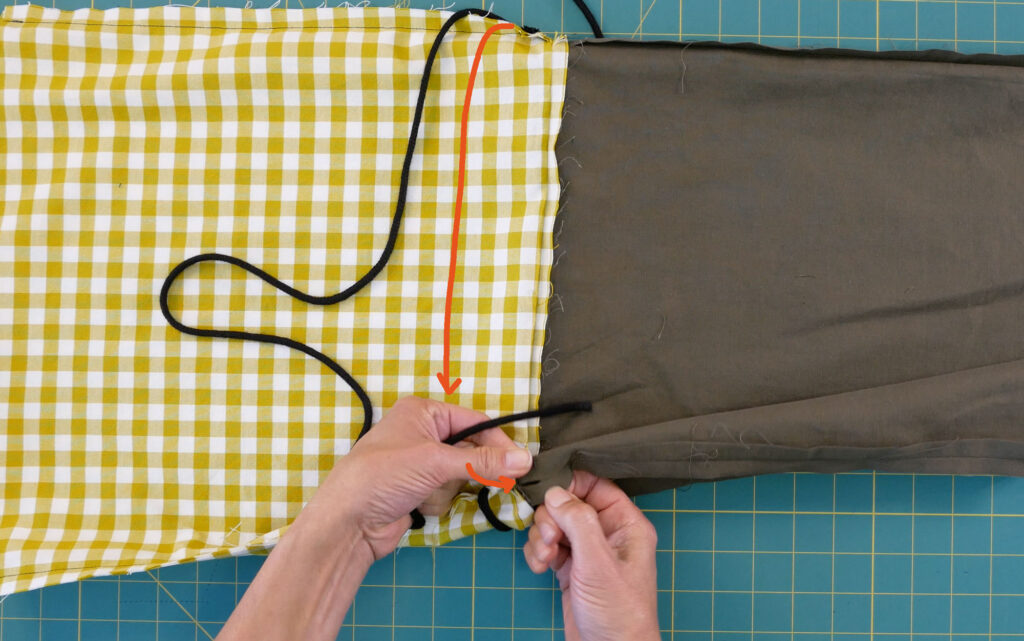
The straps are going to cross over the bag to the opposite side. The strap laying on the top, will come over the lining, toward you. Feed the free end of that strap into the bag’s side seam hole.
The strap on the top will come across the lining to the bottom and exit out the side seam that is on the bottom as you have it oriented.
Do the same for the second strap. Carry it across to the opposite side it was sewn to, then exit out through the space left in the side seam.
After the straps are threaded correctly The bag and the lining are placed back together, wrong sides touching. It does not matter which layer is on the outside right now.
Sewing the Casing
Pull gently on a strap to remove any slack between the layers. Find which side that strap is attached to and start there. With your fingers, feel for the cord or strap and push it up against the stitches going around the top of the bag.
Important: If you have flat straps, webbing or fabric, remove any twists as you position the straps up against the stitching.
Pin the cord or strap in place. Pin through the bag and the strap. This will make sewing the bottom line of the casing easier and faster and without accidentally catching the strap. Repeat with the second strap.
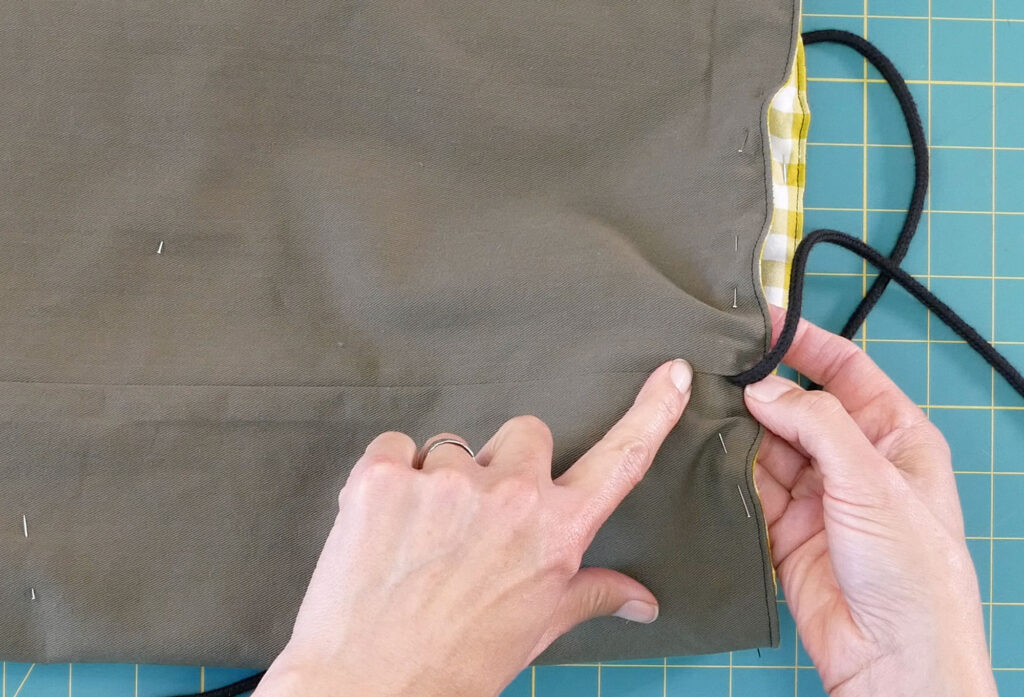
Remember how wide you decided to make your casing? The bottom of the casing will be just below the side seam opening.
Measure down from the top of the bag until you clear the strap and left enough room for the strap to move. You do not want to sew right up against the strap. Give the strap some room to move within the casing. How much is that?
That will be how far in from the top edge you will sew around the bag to form the bottom of the casing.
Now, most machines only have guidelines for up to an inch and you probably have to sew in more than an inch. You can either use fabric chalk and mark a line around the bag to follow while you sew or you can measure over from the needle and place a piece of painter’s tape on the machine to be a guide. LINK
Sew the bottom line of the casing. Again, I like to start and stop near the side seam. You may need to use a zipper foot if your strap is thick. And even though the strap/cord is pinned out of the way, do take caution not to sew over it.
Remove the pins and check that the straps did not get caught in the stitches.
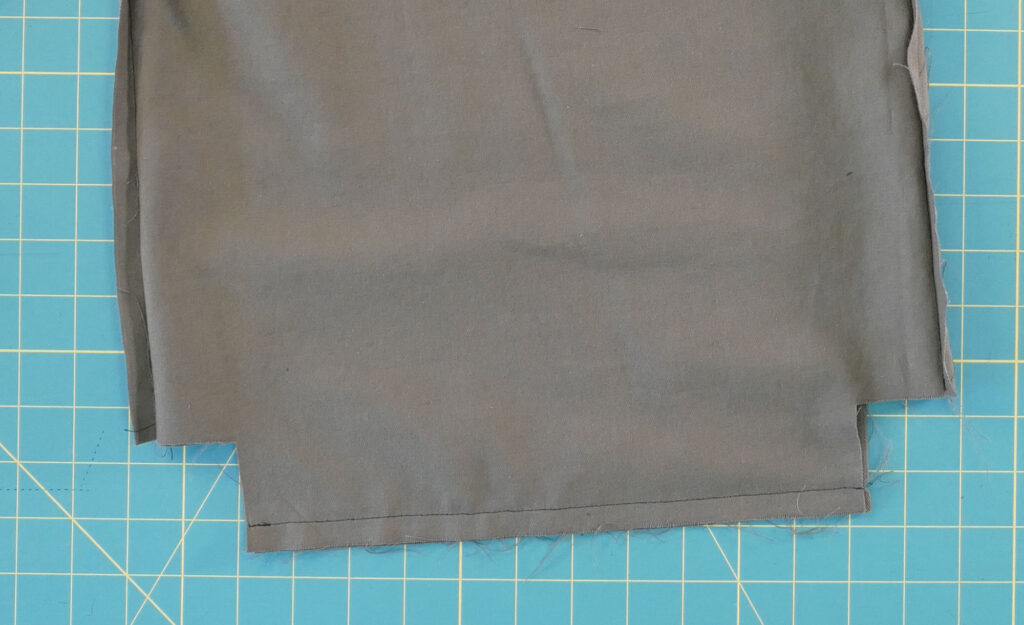
Sewing the Bottom of the Bag
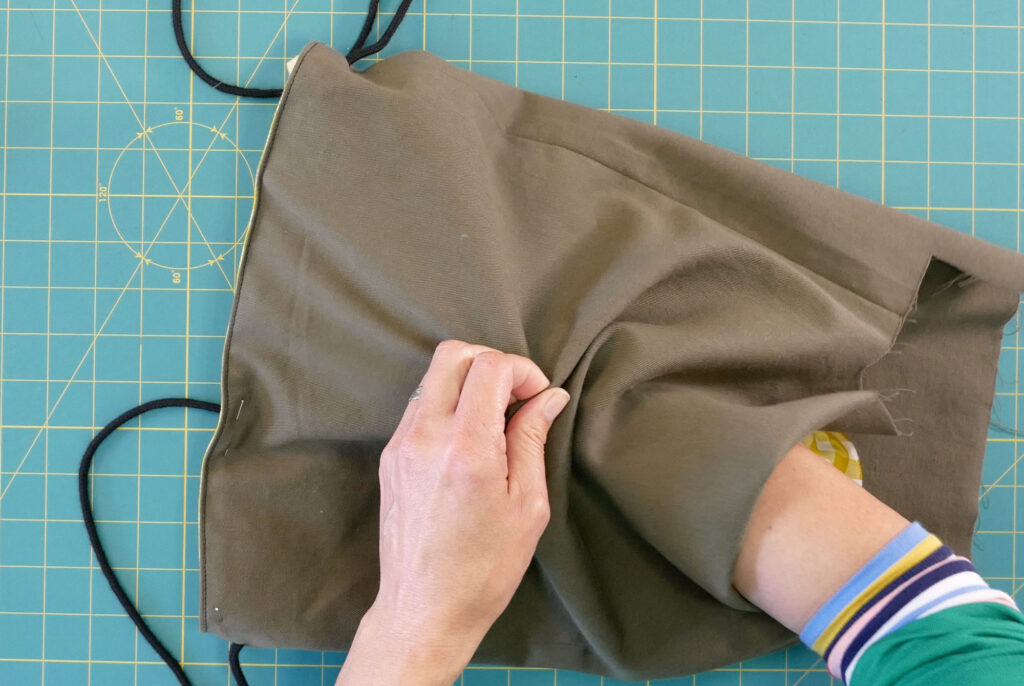
Flip the bag pieces out and so the right sides are touching. Line up and sew across the bottom of the bag only. Not the lining. Be sure the straps are out of the way
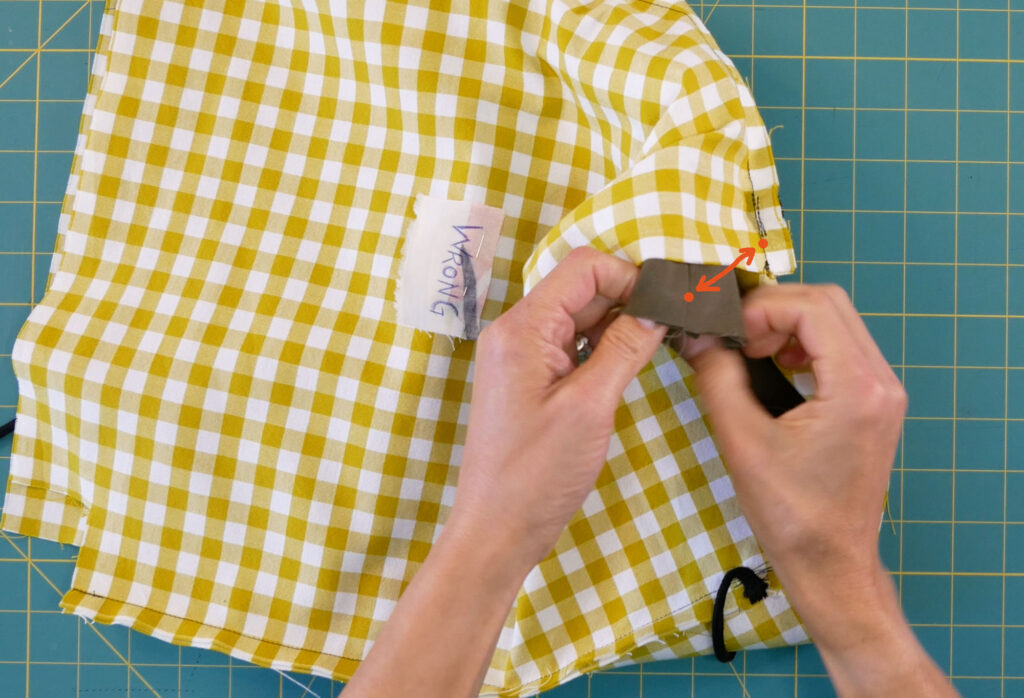
The straps attach to the bag at the bottom corners. One at a time, bring the strap straight down the side it’s on (the side it popped out of) and down to the corner. Center the end of the cord or strap on the end of the side seam and pin it in place. If you have a flat strap it’s important to keep it flat and remove any twist before you pin it.
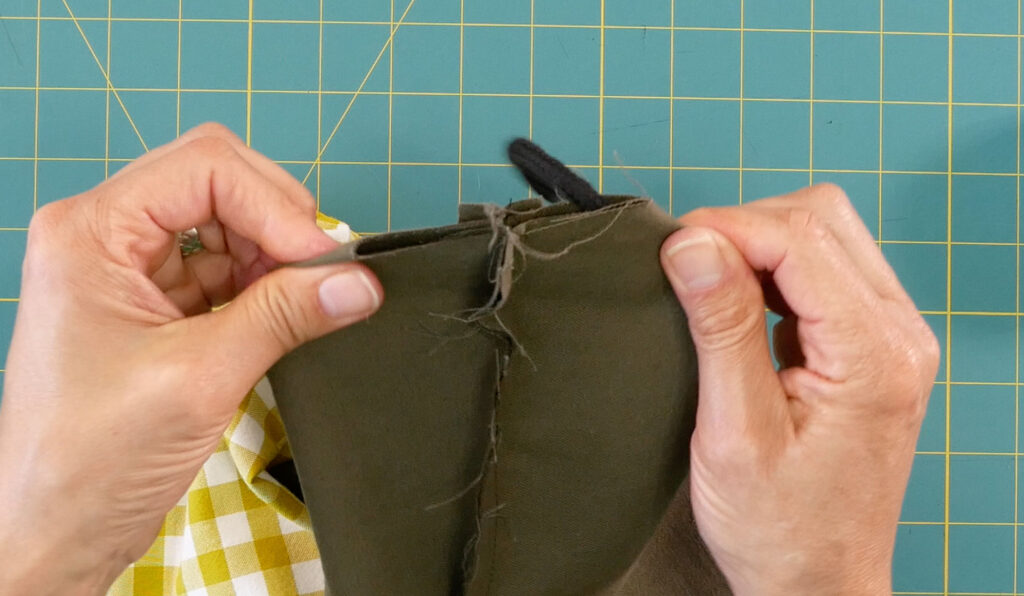
If you pull the inner corners of the cut-out square apart from each other, the bottom seam and the side seam will flatten out and line up. That is what you want; the bottom and the side seam to line up with the strap or cord placed in the center. Pin together.
Do the same to the other side of the bag.

Sew across these bottom openings with a ½” seam allowance. When you sew over the strap like you did when sewing the strap to the lining, go back and forth a couple of times to reinforce the attachment.
Finishing the Bag
Have the lining outside of the bag and right sides together. Unlike the bottom seam on the bag, you cannot close the lining bottom up completely. If you did, you wouldn’t be able to pull the bag through to the right side when you’re done.
You must leave an opening of about 4 to 6 inches wide. The bigger the bag and/or stiffer the fabric the larger the opening needs to be.
Line up the bottom edges of the lining pieces (right sides together). Start at one end and sew up to a couple of inches before the midpoint (the midpoint is found by simply folding the lining in half side to side. If I need an opening 4” wide I will stop sewing about 2” before the crease I made in the middle). The opening doesn’t have to be a precise amount but large enough to pull the bag through.
Of course, you can mark where you want to stop before going to the sewing machine.
Do the same at the other end leaving an opening in the middle of the lining bottom at least 4” wide.
The corners of the lining are sewn the same way as the corners of the bag were except no strap to place in the seam. Pull the inside corners of the cut-out square apart to line up the bottom and side seam with each other. Pin together and sew across with a ½” seam allowance.
After the lining corners are sewn, find the opening you just made in the bottom of the lining. Reach your hand or fingers in and gently pull the bag through the opening.
To close up the opening in the lining fold the seam allowance of the opening back. It tends to do this on it’s own when pulling the bag out. Line up the edges of the fold and stitch the opening closed by machine, which is visible, or by hand which is more subtle if not invisible.

Place the lining inside the bag
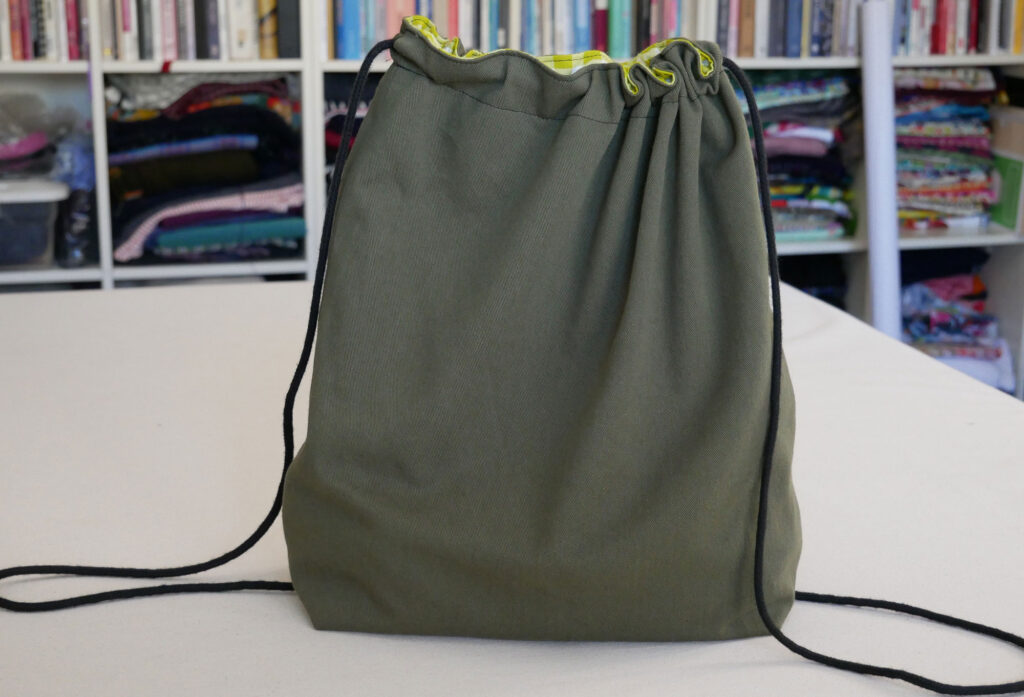
Voila – Your Bag is Done
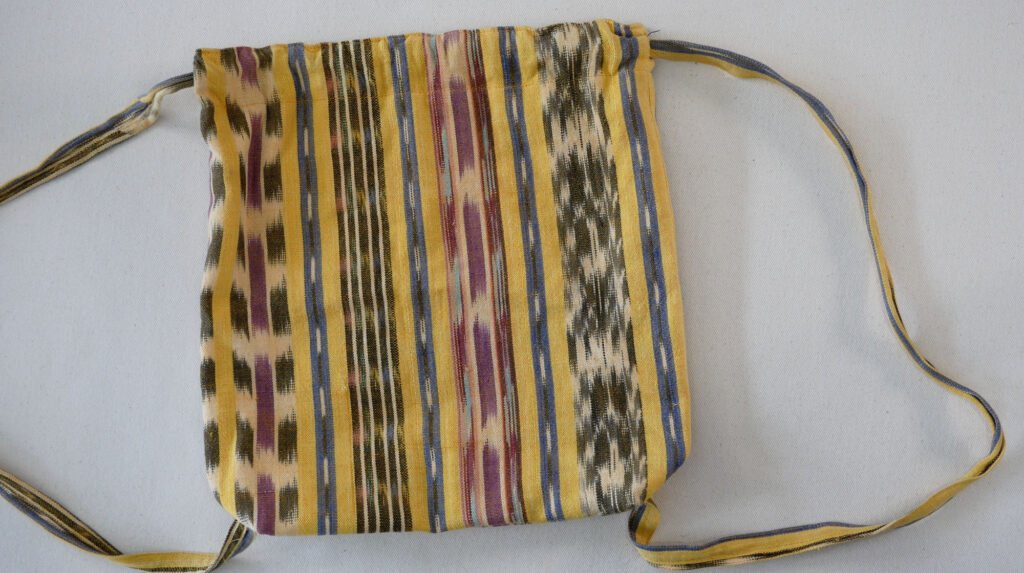
You’re really going to like this bag. It’s very adaptable. I’ve made it rugged out of black denim for a teen boy. I’ve made in floral cotton and added rick rack trim for a young girl. My first bag was made from a yellow hand-woven Ecuadorian fabric that had once been my favorite skirt It was perfect for a beach tote. And of course, I’ve made it Super Deluxe with both an interior pocket and a zipper pocket on the outside plus decorative piping along the top edge. You can find those instructions here.
But this time these bags are for the people in my community.
My town, where I’ve lived for 18 years now, was hit by a deadly and devastating hurricane on September 27, 2024.
Forty-two people in my county alone lost their lives, hundreds lost their homes, more lost their cars and thousands will lose their jobs. Asheville has become a tourist town and we were without water for over two weeks. Currently, we are without potable water and while we are very thankful toilets can be flushed again, the hotels, restaurants, breweries, and coffee shops remain closed and people will be laid-off.
Many of our local groups, like Beloved Asheville, and Manna Foodbank, will be inundated with requests for assistance for months to come.
I have seen nothing but kindness from my community members during this sad time. Please join us and help. Consider giving to these organizations over the coming weeks and months. Thank you.
- Manna Food Bank (they distribute food across western NC)
- Beloved Asheville
- Local Cloth is a fiber-based nonprofit that educates folks about Western NC’s fiber-shed. They were located in our River Arts Districts, and as far away from the French Broad River as they were, the water came in 10 feet high into their space. All the spinning wheels, looms, sewing machines plus all the fiber artists’ goods for sale in the Local Cloth shop and all the supplies and work in the resident artists’ studios were lost or ruined