Backpacks don’t last forever but they can last longer with your help. It’s easier than you might think to replace a buckle, attach a zipper, or replace it, mend a rip, and patch a hole.
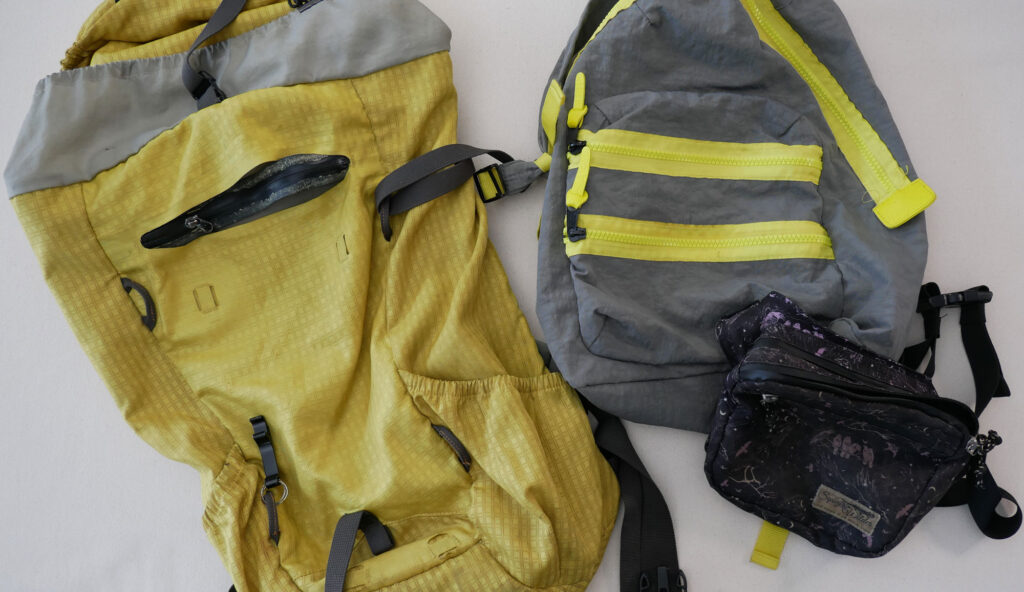
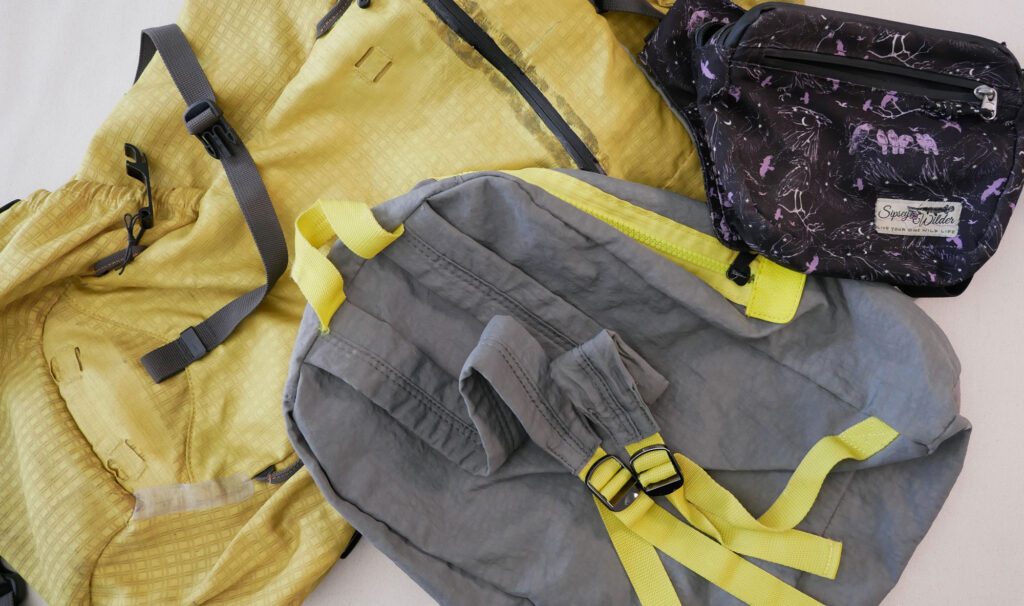
Three very different packs with different needs were saved in the making of this video and post.
- A well-used Patagonia pack for serious outdoor use.
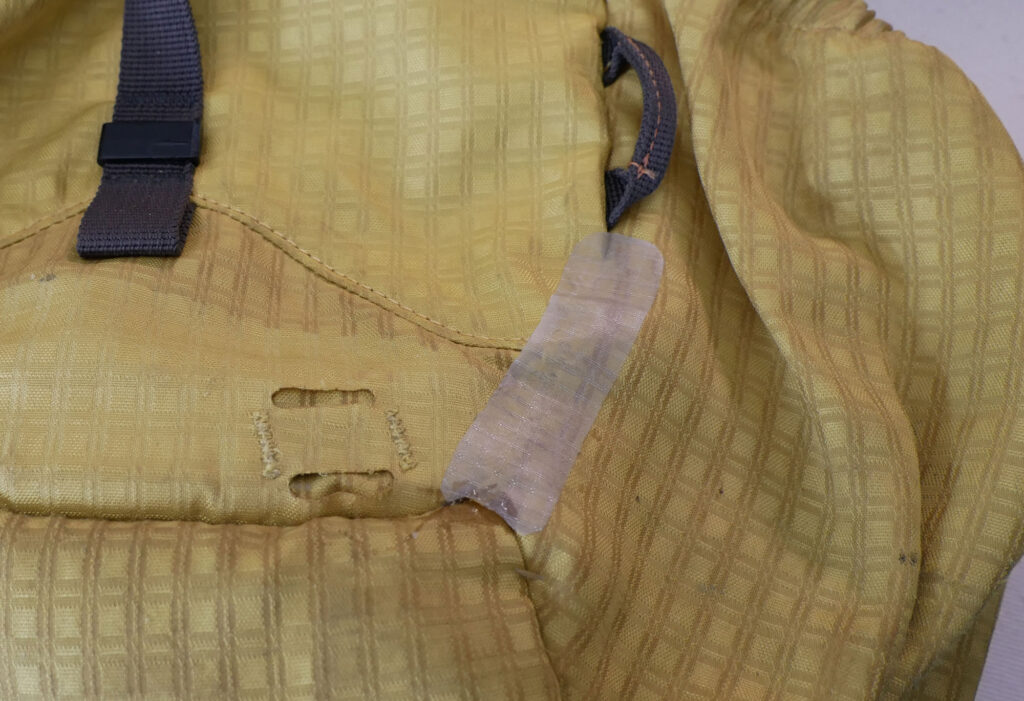
- Problem: A sticky zipper that because of the strain put on it when struggling to open and close eventually became unattached to the pack. It also has a ripped seam where the pocket is sewn to the front of the bag.
- Challenge: This bag needs to stay waterproof for future hiking use.
- A day pack
- Problem: One plastic strap buckle was crushed
- Challenge: Replace both buckles to match
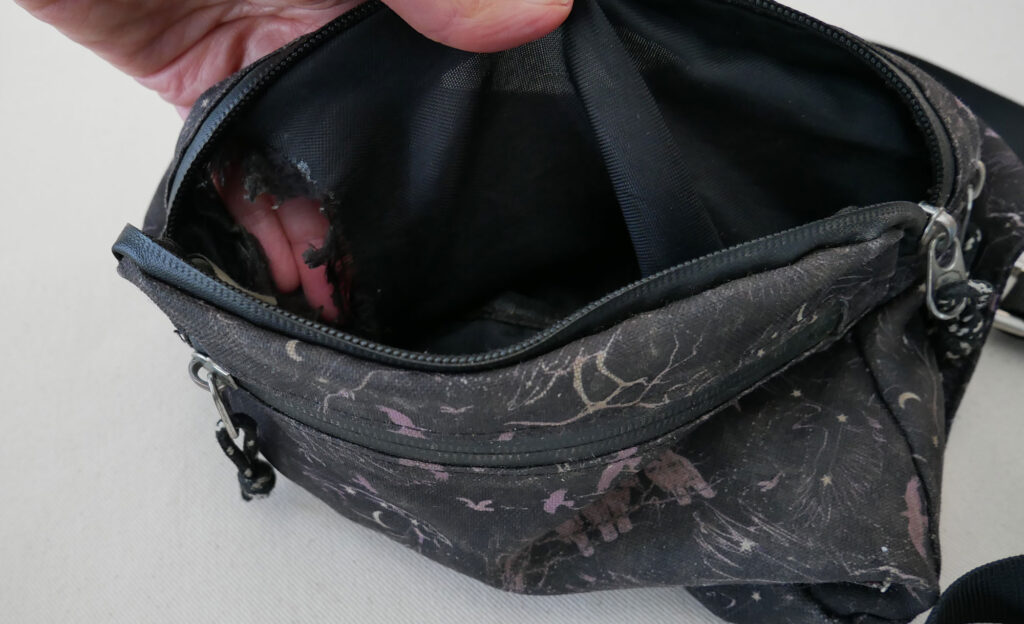
- A belted waist bag for dog training gear and treats
- Problem: a large rip has frayed into a hole between two pockets
- Challenge: The hole is large. This pack sees heavy daily use (belongs to a dog trainer). The pocket needs to remain easy to reach into. The dog treats have leeched oil over time into the fiber and will continue to do so. All adhesive options are out.
While your pack might be different these repairs and the methods used to make them can be adapted to every nylon, or other fabric, backpack.
You can watch the repairs in this video or read on for detailed explanations.
This post contains Amazon affiliate links to products I bought, used, and still recommend.
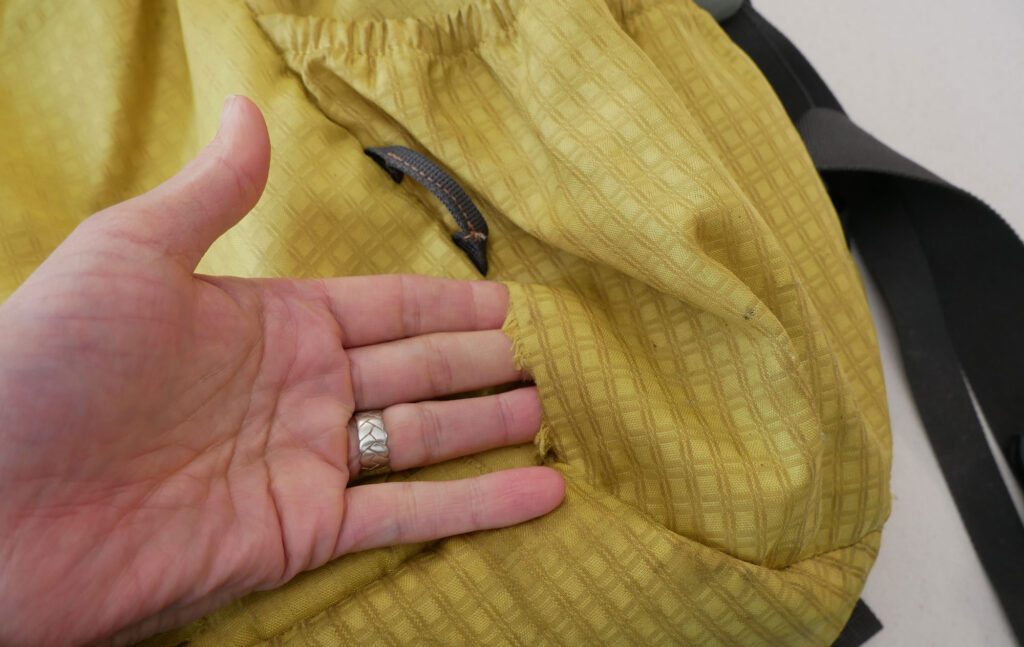
A Torn Seam
Nylon is a common material for backpacks. It’s durable, lightweight, and water-repellent. It rarely rips but when it does it will fray like it’s job #1. To fix the rip simply apply duct tape over the problem – Wait! No. Let’s keep it classy.
The goal for any rip in something nylon is to prevent further fraying of the fabric.
You could sew up the rip with a zig-zag stitch or hand stitches stitching across the rip and bringing the edges together.
The problem with sewing the rip shut is you have to catch the rip early before it frays so much it becomes a hole AND when sewing the rip shut the needle will puncture the nylon. These punctures in turn can loosen the weave of the fabric. If the needle penetrates too close to the rip it will speed up the fraying. Plus any puncture will allow water to seep into the pack rendering it waterproof no longer.
You could patch the rip on the front and the back sealing the rip so it won’t grow – but do you sew it on? Glue it on? And you best apply some sealant to the rip before you patch it to be sure it stops fraying.
And this is why people think of Duct Tape. It seals, patches, and prevents further fraying all in one easy go.
But this is a legit “How to Repair Your Backpack” article so no Duct Tape.
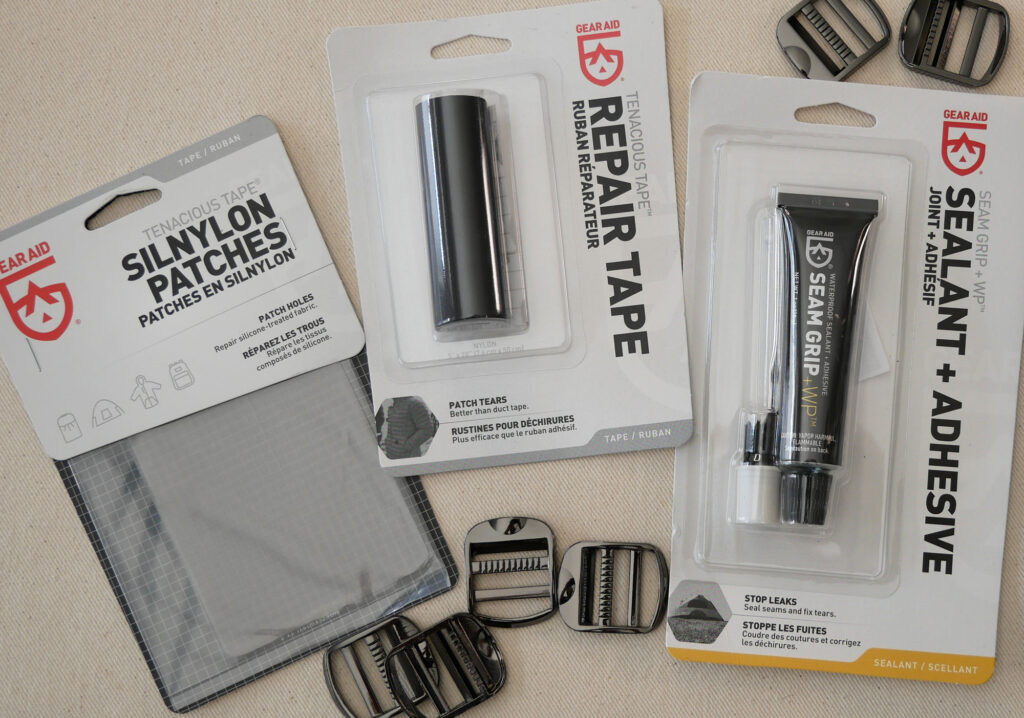
Instead, we’ll keep the pros of the tape – all of them – and leave the cons: the eventual peeling up of the edges and the aesthetics. We’ll use an adhesive patch made just for nylon, Gear Aid’s Silnylon Patches. It’s strong, it’s waterproof, it stays stuck, and it comes in various colors including Clear. I bought mine at REI but you can buy directly from the manufacturer or on Amazon.
It’s important for a good seal that the area around the rip is clean. The cleaner the better, really. If you can’t wash the pack then wipe the area around the rip with rubbing alcohol. If the area where the rip is cannot lay flat, place a towel under the rip so the bag will keep its shape when applying the patch.
Cut the patch so it is about ½” or 1 cm larger on all 4 sides of the rip. Round off the corners. Remove the backing and apply the patch over the rip. If there is a hole put a second patch behind the first patch, sandwiching the hole.
And should the rip be in an awkward location the patch is repositionable until you press it hard into place.
Don’t trim the patch too small. (The patch pictured above should have been wider.) Extra width gives the patch more adhesive surface to adhere to the bag.
Let the patch sit for about 24 hours. It will become a stronger bond over that time.

The Busted Zipper
There are sticky zippers, broken zippers, and missing zipper pulls.
A sticky zipper, one that is not so easy to open and close, can lead to a bigger problem if not taken care of. Luckily this is the easiest fix of them all. Apply zipper lubricant to the zipper.
Zipper Lubricant sticks cost under $10 and will last forever. It’s shaped like a color crayon that you rub on the zipper teeth. Open and close the zipper a few times to spread the lubricant across the zipper. You’ll notice an instant improvement.
Replacement zipper pulls are easy to buy, and they come in so many styles. It may be hard to know what size pull you need so an easy pull you can make yourself is threading strands of embroidery floss, or a small jump ring into the loop on the zipper head instead of replacing the pull.
A busted zipper will need to be replaced. And you will want to replicate whatever method in which the original zipper was set.
On day packs and school packs the zippers are typically sewn in place. On technical packs, zippers are fused into place, not sewn. This helps the pack remain waterproof.
My friend’s pack’s zipper was sticky and after repeatedly fighting with the zipper, using extra force to open and close it, the strain on the fuse was too much, and the zipper separated from the nylon. In this case, the zipper only needs to be reset, not replaced.
If you are replacing a zipper you have to remove the busted zipper. Take pictures, take notes, whatever you need to do to remember how the original was set in place. You will find all sorts and sizes of zippers at Wawak.com or on Etsy (both places I use a lot to source bag-making and repair items).
For a sewn-in zipper use a seam ripper to gently remove the stitches. Use clips, not pins to hold the new zipper in place as you sew it by machine or hand. Pins can damage nylon and you already have enough little holes left by the needle, or pin the zip down in the holes left by the original stitches. There are sewing clips, but don’t go out and buy them just for this. Use paper clips, binder clips, clothes pins, miniature clothes pins made for hanging photos, or chip clips.
Or fuse the new zipper into place with FLEXIBLE glue. It must be a flexible glue. I read to use shoe glue as it’s flexible but many people highly recommended the outdoor gear sealant, Gear Aid Seam Grip, which is waterproof and made for outdoor fabrics like nylon. This is also important because not every glue works with every type of material. In fact super glue does not do well on nylon. So pay attention to details when choosing glue.
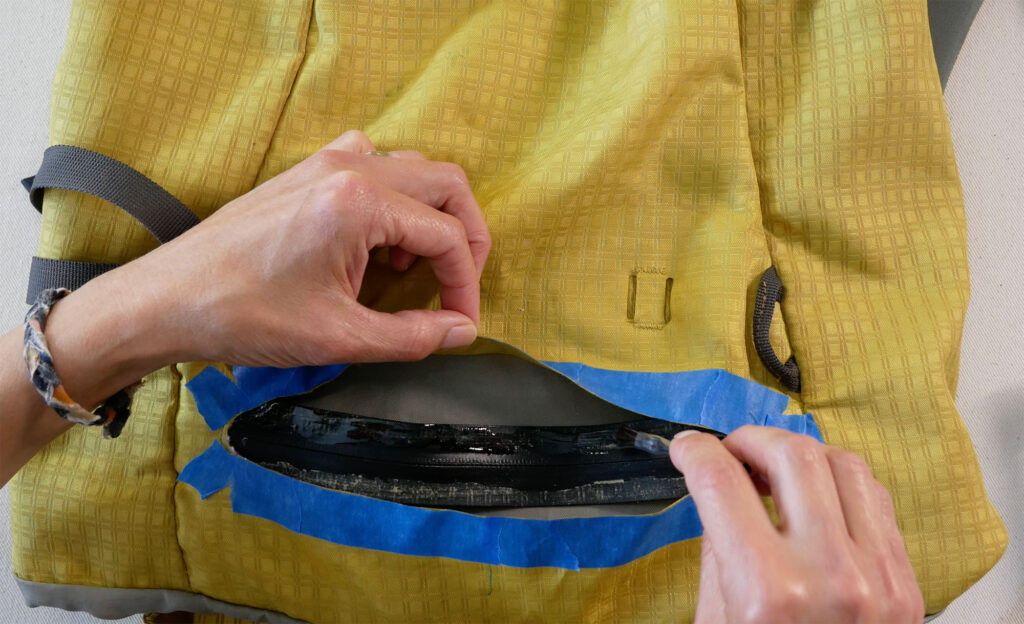
When glueing it’s always a good idea to mask off the area next to where the glue goes with painter’s tape in case the glue seeps out. Then the excess glue will be on the tape and not your bag. Don’t leave the tape on too long or it will be glued on. Remove it after the glue sets, about an hour or two.
Again clean the area with rubbing alcohol so the glue can penetrate the fibers and form a tight seal.
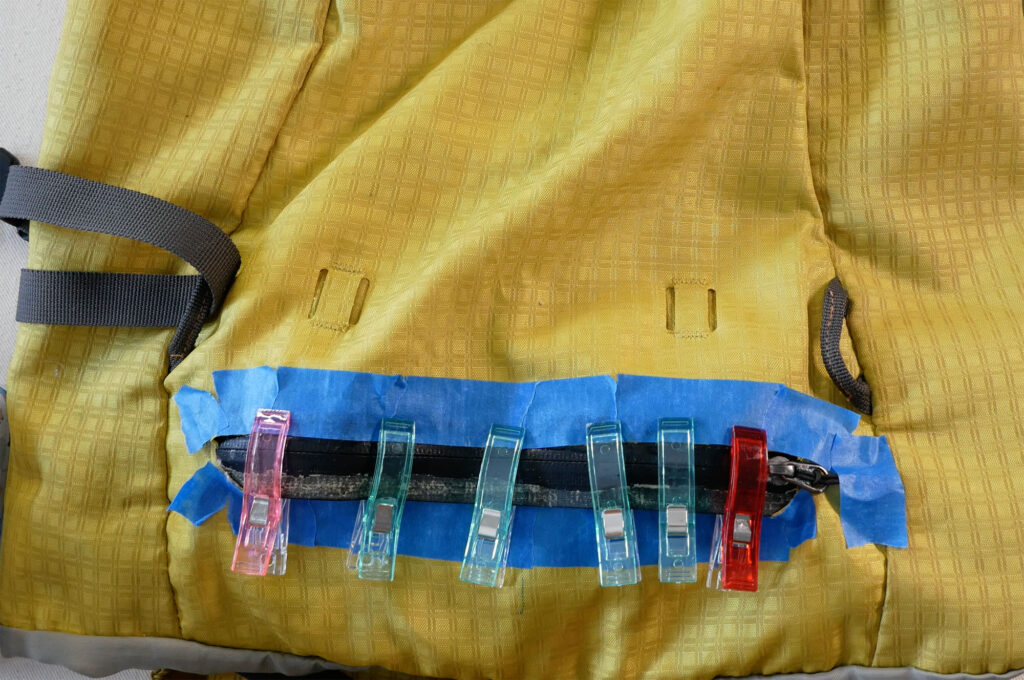
Glue one side of the zipper down at a time. Use clips* to hold the zipper to the pack as it dries. It needs to lay flat for 12 hours as it dries. You want to use as little glue as you can get away with. This glue will leave a “shadow” through the nylon.
*You could also use chip clips, clothes pins, binder clips, or large paper clips.
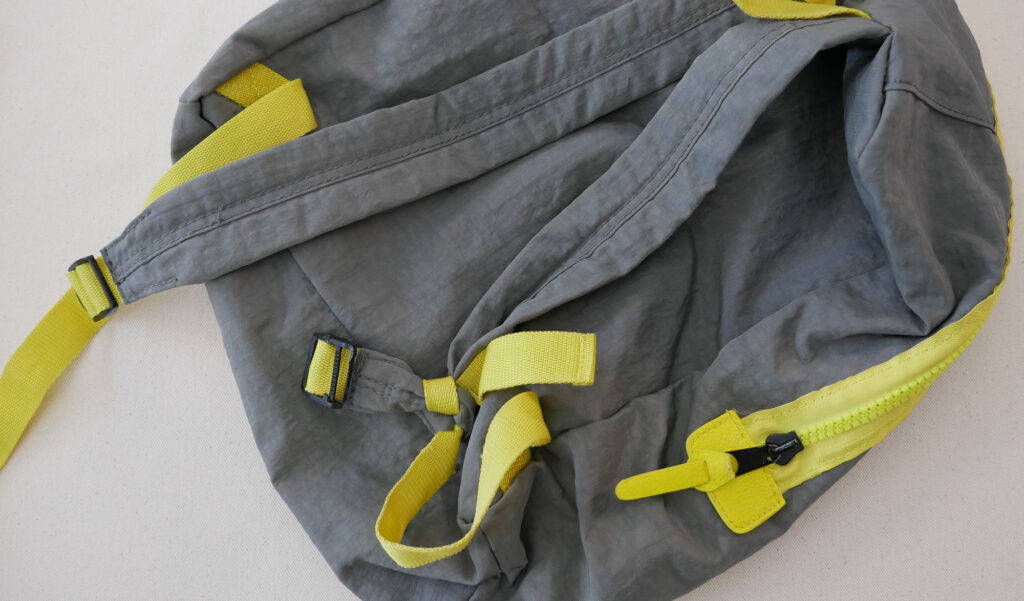
Busted Buckles
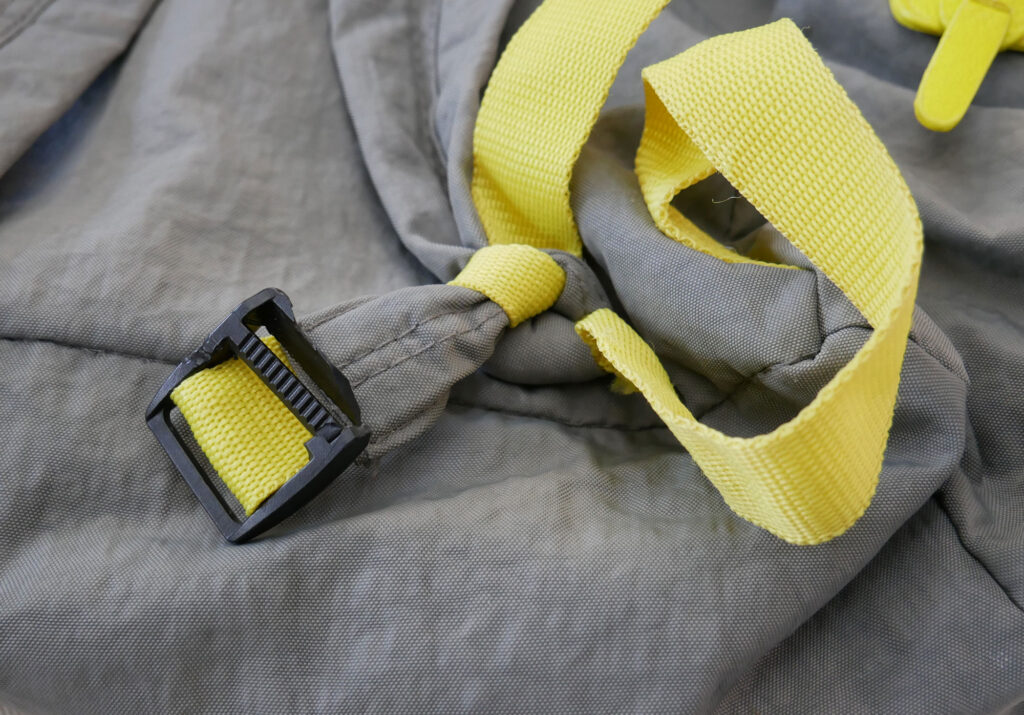
Plastic buckles break but, again, an easy fix. This time though, I’m going with metal buckles because I know the dog who chomped this one.
Measure the width of the busted buckle or the webbing/strap that is in the buckle. This tells you what size replacement buckle to buy. Decide now, if you want to replace just the busted buckle or all the buckles, to make them match.
Look over the strap and buckle to see how this was put together because you want to copy it when attaching the new buckle. Measure how much webbing is showing. Then you can replicate the original design when resetting the strap. Take pictures, write down notes, whatever you need to do to remember.
On the pack above, I can see the yellow webbing is placed inside the end of the grey fabric strap. There are four rows of grey stitches holding the webbing inside and holding the shape of the strap as it narrows at the end. These are the details you want to take note of now, before you remove anything. They will prepare you for what you need and what you will need to do.
My Plan, after looking the bag over:
- Step 1 Remove the stitches at the end of the grey strap just enough to pull out the yellow webbing.
- Step 2 Replace the buckle so the same amount of yellow webbing is showing
- Step 3 Sew it back together with grey thread in the same pattern as it is sewn now
Be careful, take your time when removing the stitches through thick or many layers of fabric. This is when we naturally use more force and if not paying attention can rip through the fabric or injure ourselves.
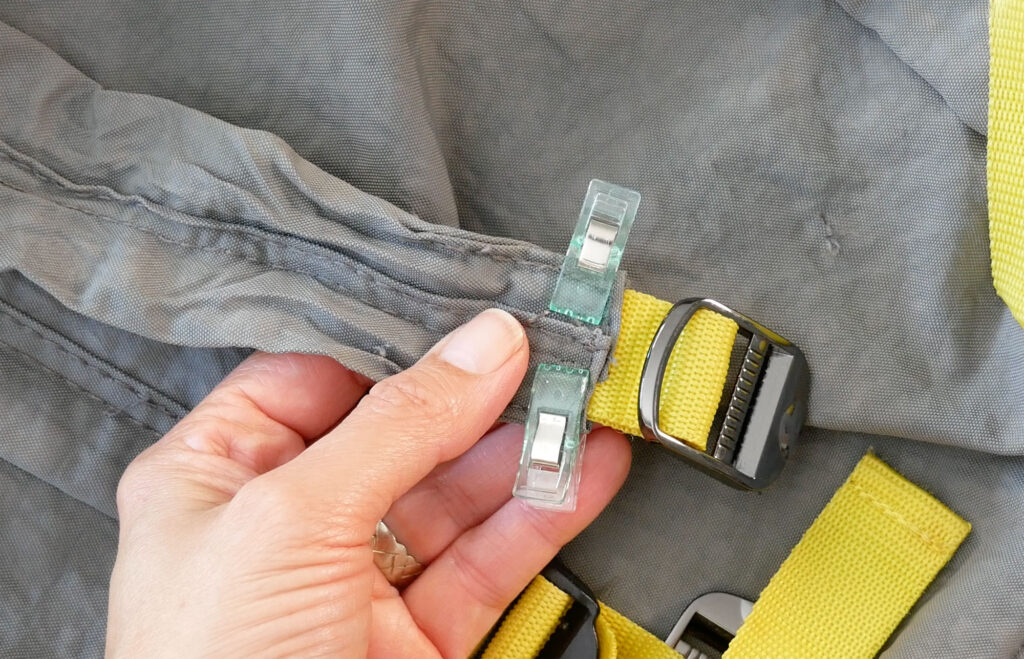
Insert the webbing/strap through the new buckle and check the length. Hold it all in place until you get to the sewing machine. I used clips due to the thickness.
Of course, you want to orient the new buckle correctly on the strap. Upside down, backward, left and right, are where I mess up. If you’re like me, check twice before you sew the new buckle in place.
Sew the strap back onto the bag through all the thicknesses following the holes left from the original stitches. Using a narrow presser foot might be helpful if there isn’t a lot of room between the buckle and where you need to sew. My standard presser foot barely fit.
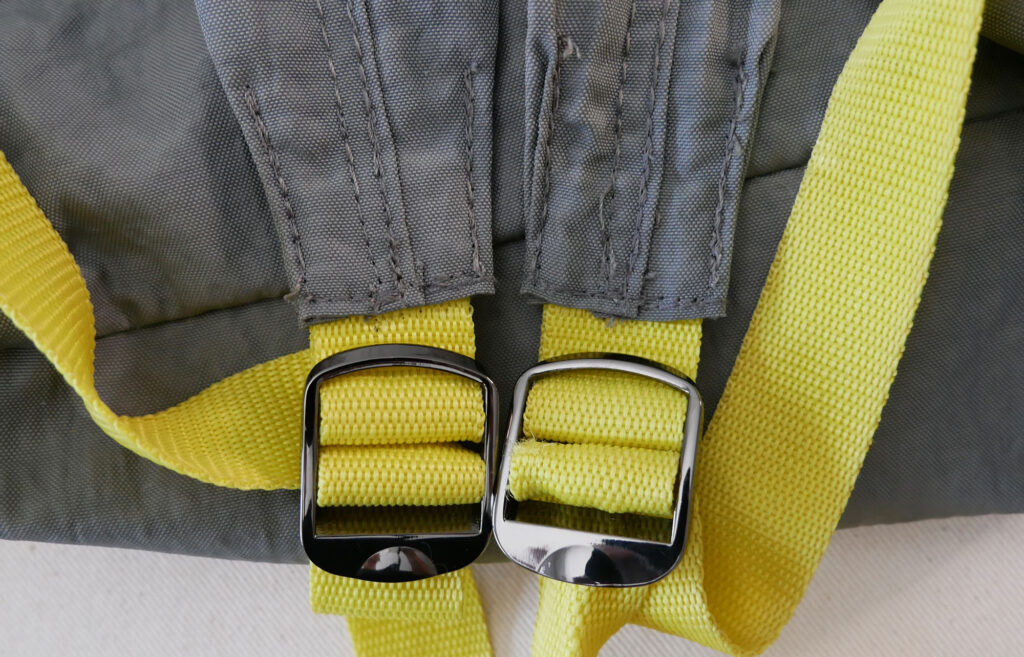
The best needle for Nylon is a Microtex needle but you could get away with a Universal needle.
You may have to manually move and reposition the strap under the needle a few times especially when sewing through many layers.
When the fabric becomes too bulky to sew through easily, stop and slowly turn the hand wheel toward you to stitch through the bulky layers
A Hole
A hole can be made from a puncture or a rip that has been left to fray for too long.
Pulling the fabric from one side of the rip/hole to cover the rip/hole is never ideal because to cover the gap the fabric would be pulled too tight and tight equals strain and strain is never good for fabric and seams.
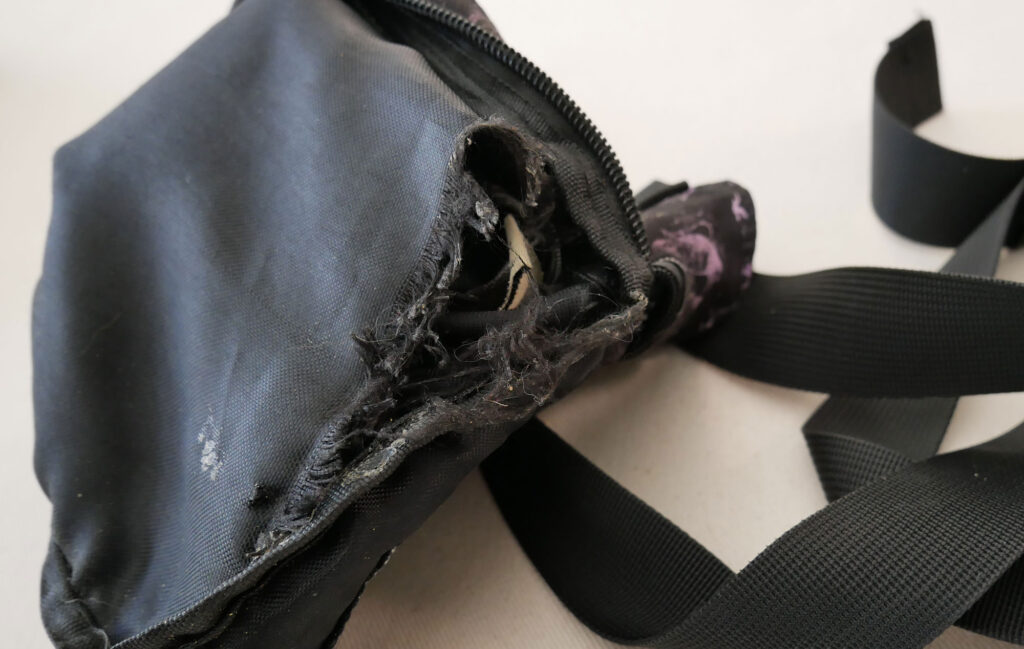
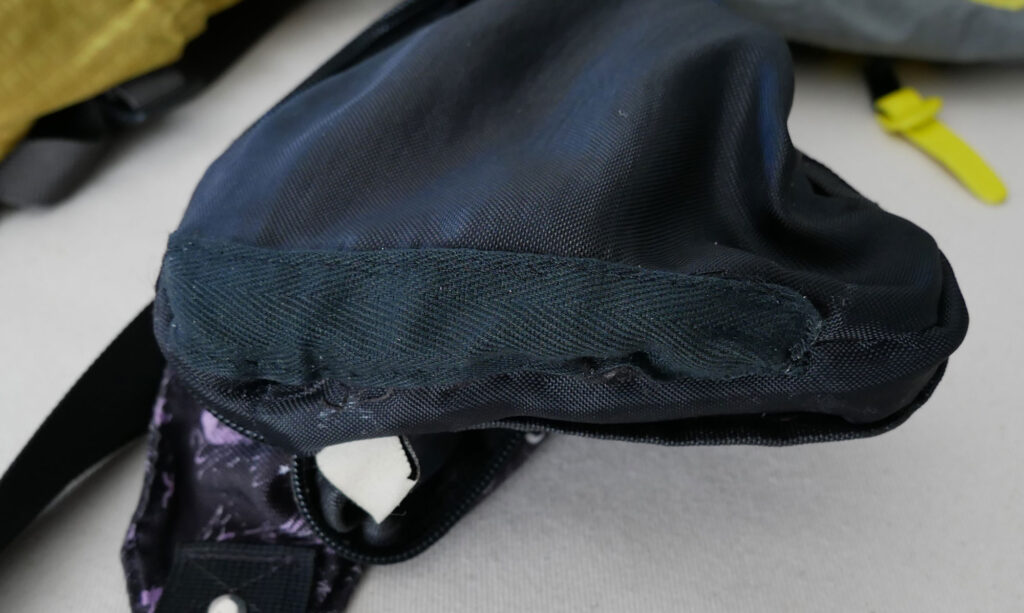
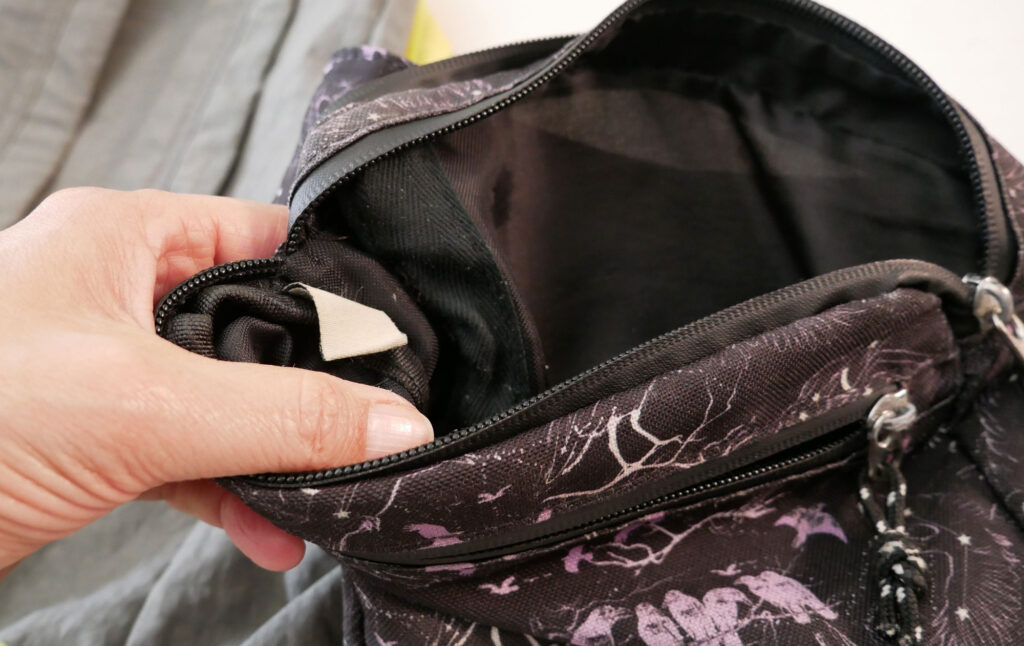
The bag I was given to repair is a dog treat bag designed with multiple, separate Pockets for holding treats and other dog training things. The fabric ripped at the seam and frayed as nylon likes to do and is now a hole. It is wider at the top where the seam curves.
I tried the adhesive tape made specifically for patching nylon outdoor gear. It is similar, but not identical to the adhesive patch I used on the yellow backpack. Both patches are made by Gear Aid.
To repair a hole in a dividing pocket I will need to patch both sides. Two patches would sandwich the hole and an adhesive patch would not only cover the hole but prevent the rip from fraying further.
However, the tape would not stick because the oils in the dog treats, over time, penetrated the fibers, and acted as a solvent to the adhesive. Cleaning the bag wouldn’t really help, as future dog treats would eventually leach oils into the fibers, and the patch would become unattached.
For this pack, I would need to patch the hole with fabric. However, a fabric patch needs the edges to be folded under itself all the way around to prevent it from fraying. That’s a lot of bulk. And that’s where twill tape comes in.

Twill tape, like ribbon, is like very, very narrow fabric. It comes off the loom with its long edges so tightly packed that they don’t fray. Twill tape is also strong and comes in many widths.
Using twill tape instead of fabric for a patch means you only have to treat or fold under the two short ends. If you use fabric for your patch treat all the edges. Different methods you could use:
- Zig-zag or overcast stitch the edges
- Fold the edges under the patch so they are enclosed between the patch and the bag when the patch is sewn down
- Apply Fray Check or other clear glue – not washable – to the edges.
Also, it’s a good idea to apply a sealant, like Fray Check, to the frayed edge of the rip. This will prevent further fraying of the hole.
Cut the tape longer than the hole (or the patch larger than the hole). It’s easy to trim a patch that is too long/big. It’s more of a pain to cut a second one.
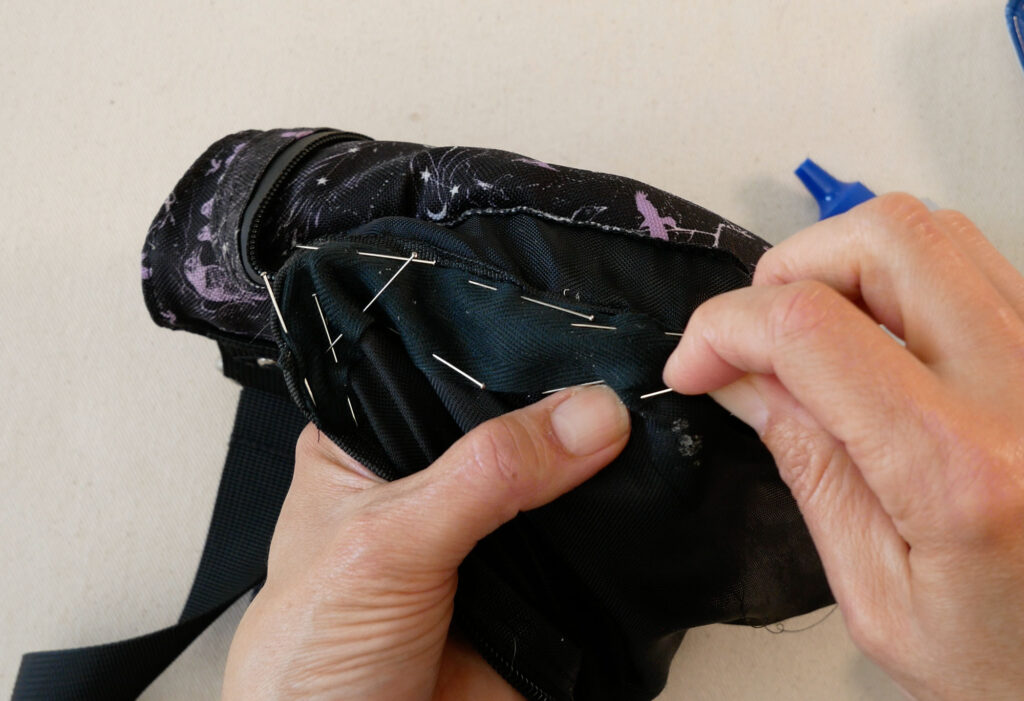
Pin the patch down to cover the hole starting in the center and working out to the ends. Be sure the patch is not stretched tight but lying flat and smooth.
The area where my patch needs to go is too tight for a sewing machine to reach. If you have to sew the patch on by hand, like me, use a backstitch. It’s a strong stitch that’s great for repairs. You don’t need to double your thread or use anything other than all-purpose thread on thin nylon fabric. As a general rule, you want to match your thread thickness to the weight of the fabric.
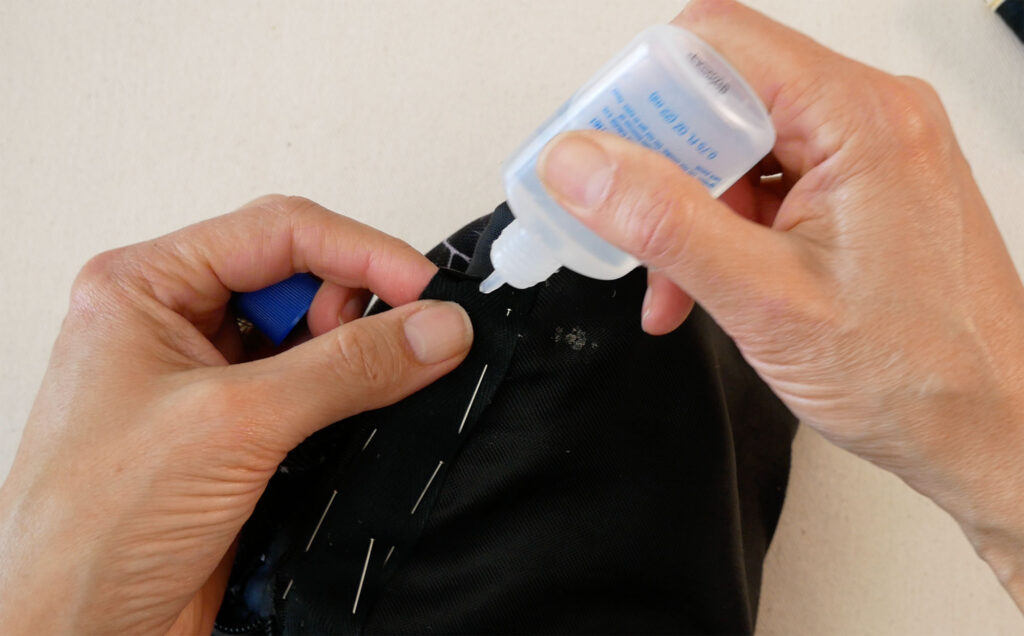
Apply a sealant, like Fray Check, to the cut ends of the twill tape before sewing them down. You could turn the ends under the tape before sewing it down.
Because the location of this hole can be seen from two sides, it needs to be patched on both sides. Leaving one side open, leaves the hole exposed to continue fraying. Sandwich-ing the hole will prevent it from growing.
Summary
So, a rip, a zipper, a buckle, and a hole. All things that can happen to your backpack and all things you can repair yourself and get a few more years from of your gear.
It feels good to know you can fix your things.
If you have any questions please put them in the comments below and I will be sure to reply