
It would be nice, or at least a lot simpler, if the way to hem pants was the same for every type of pant. Of course it isn’t, and the technique isn’t even the same for the same pants if the amount you’re hemming is less or more than 4″.
So let me answer a question I got, and one, I was surprised to find out, was hard to find an answer;
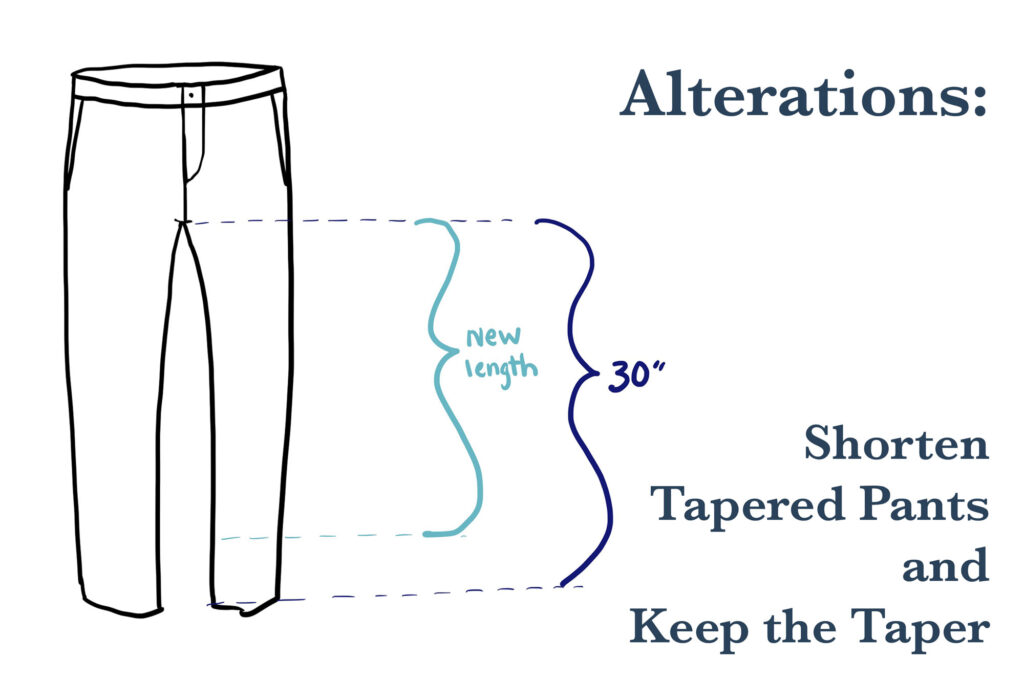
“I am trying to alter a difficult pair of pants. I have to take up over 7″. The pants taper at the ankle, and I cannot find any videos about how to mimic the taper. The last time I did this I did not mimic the taper and they looked like clown pants.”
The writer is absolutely correct. You can’t just take 7″ off a tapered pant leg and expect the pants to look right. You have to mimic the original leg shape.
Side Note: Believe it or not, someone wrote in reply to this same question by someone needing to take 6″ off their husband’s pants that the husband was being too picky. Look, everyone deserves to feel good in the clothes they wear and just because you need shorter pant legs doesn’t mean you don’t have a good eye for proportion and style.
Determine the Length
This post on pinning and hemming dress pants will show you how to determine and mark the new length. If you are taking off more than 4″ on a tapered styled pant you will need to also taper the legs as well as hem them.
Once the final length is decided on, mark it on the pants with tailor’s chalk or with a line of basting stitches.
Note: The more tapered the opening of the pant leg the shorter it should be. A narrow opening cannot fit over the shoe and will push the excess length up as you walk and bag around the knees.

Measure the Taper
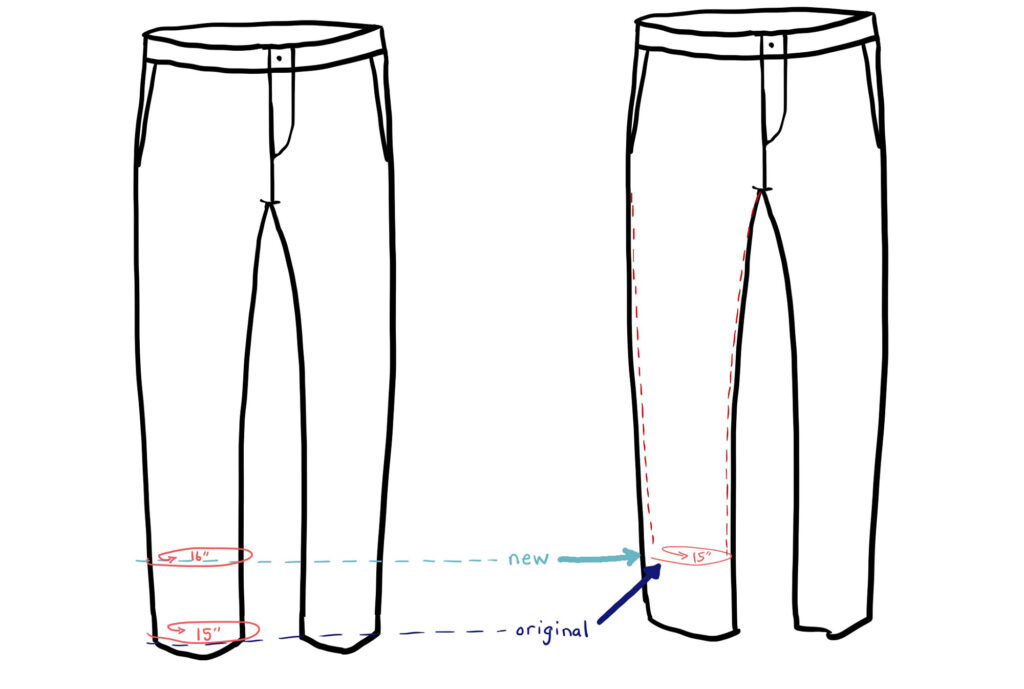
Before cutting anything, measure the original opening of the pants’ leg. Write it down. For my example, the leg opening is 15″.
Measure the width of the pant leg where the new length will be (the chalked or stitched line). For my example, the leg is 16″ wide, where the new hem will be, 7″ up from the bottom.
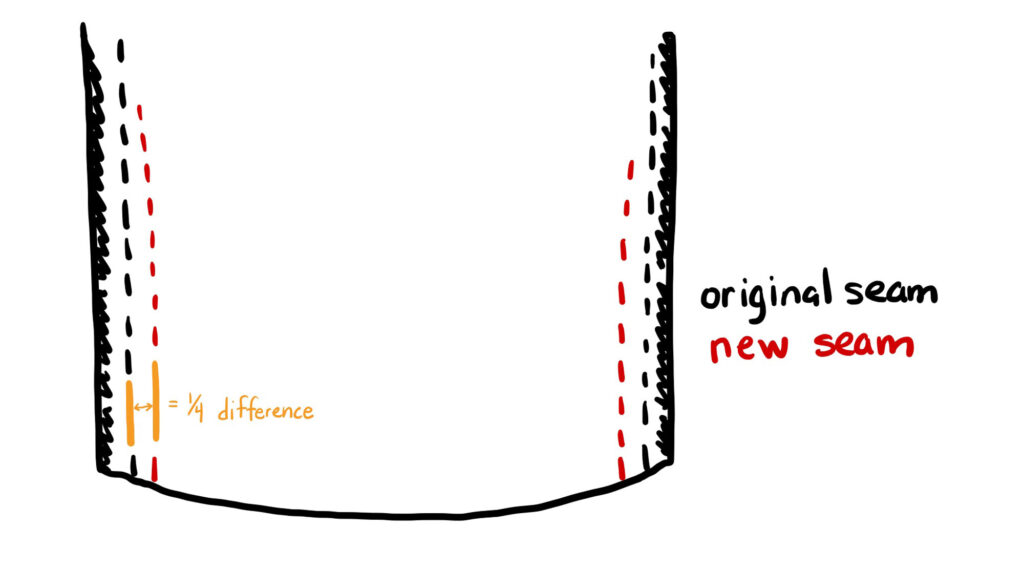
The new leg opening needs to be equal to the original opening. Find the difference and divide it by four. I have a 1″ difference: 16″ (opening at new height) – 15″ (original opening) = 1″ divided by 4 = .25″. Write this down too.
Cutting and Sewing
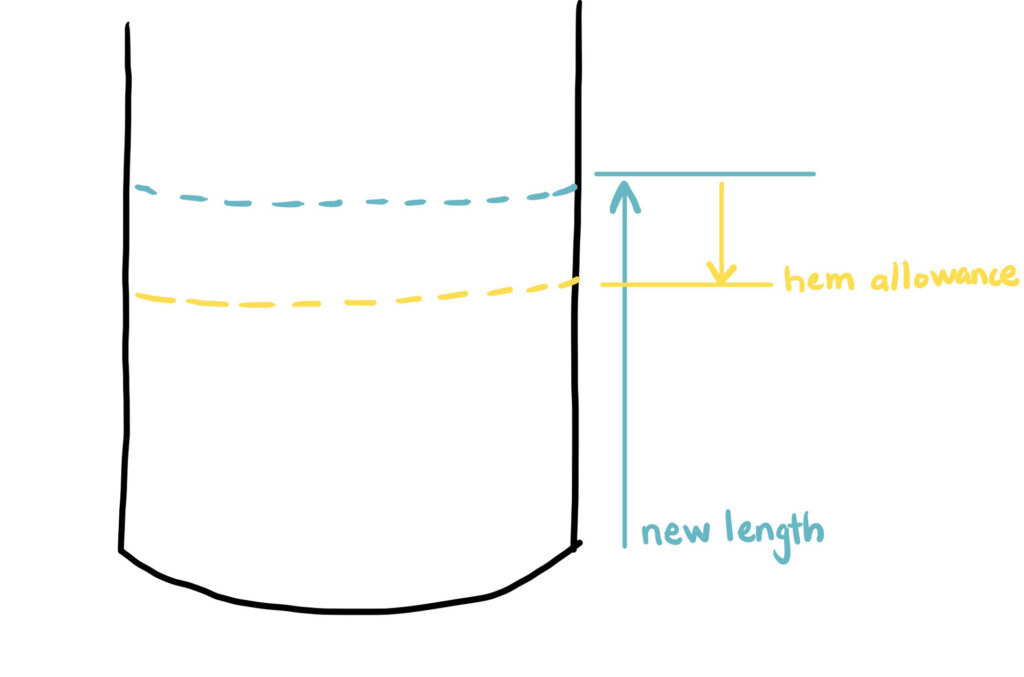
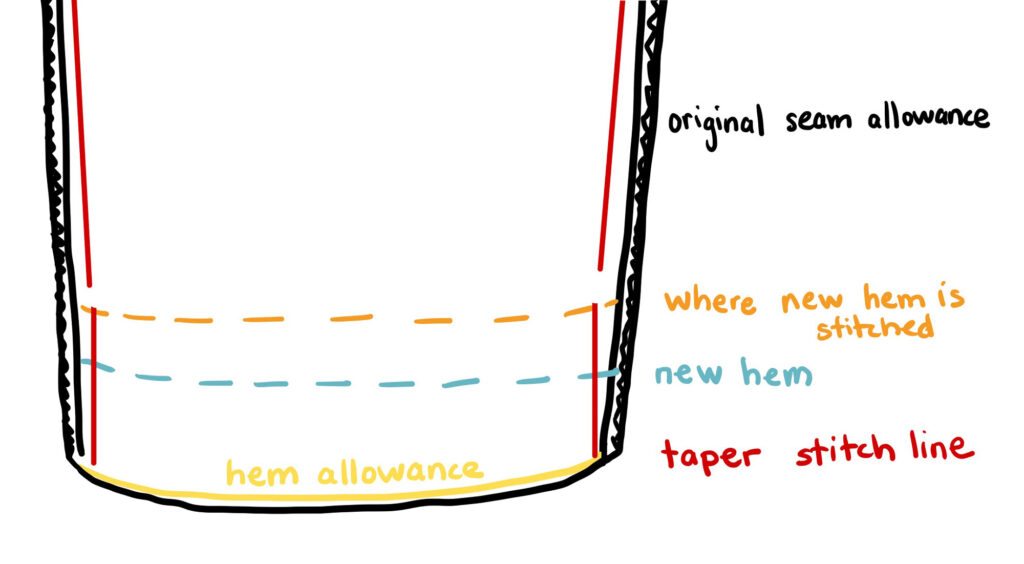
Measure down from your new hem fold line (the chalked or stitched line) the hem allowance you want to use and mark it on the pants with tailor’s chalk. I typically use the same amount of hem allowance as the pants originally had.
However, if the original pants have a wide hem allowance and a drastic taper you’ll notice that the width of the pant leg below the new hem fold line is narrower than where it will be sewn to the pant once folded up.
You can still keep the wide hem. You just need to unpick the seams in the hem allowance to make the hem allowance as wide as the pant leg above the hem fold line. This is why I always say you get to decide how you want to hem and what amount of hem allowance you want.
Cut off the leg on the hem allowance line. (Yellow line in diagram above)
Before You Hem, Taper
You need to take in the leg from both seams or the leg will twist on the wearer. This is why the difference is divided by four. On both the side seam and the inseam measure over from the original stitches, 1/4 the difference between the original leg opening and the width of the leg at the new height.

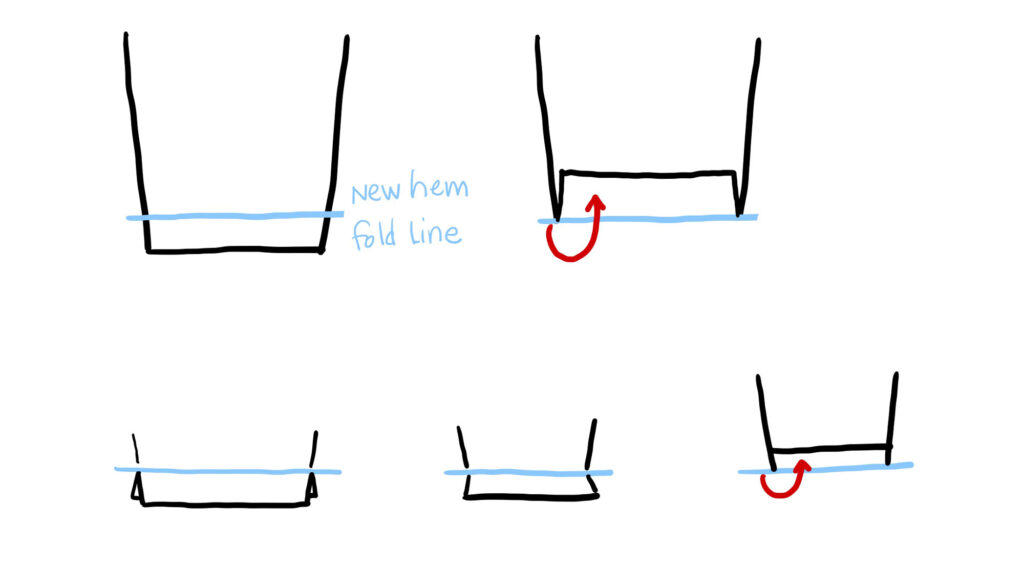
This is easier if the pants’ side and inside seams are simple seams, as those of dress pants. If the seam allowances are folded to one side and sewn down, like the picture above, you will unpick the top stitching / release the seam allowance from the pant leg. After you’re done tapering the legs, you can stitch the seam allowance back down or not.
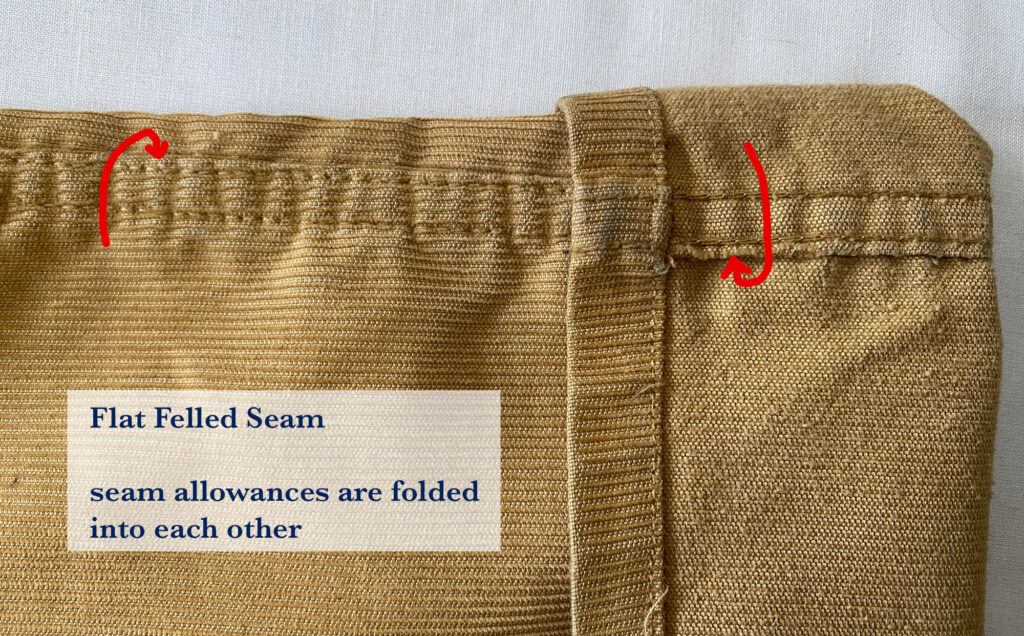
Most casual pants, however, have a flat-felled seam (two rows of stitching) on the inseam. This seam will need to be unpicked and not sewn back. It’s much easier for the home sewist to sew a regular seam and then, if desired, sew the seam allowances down as the first photo shows. Also, you’ll need to taper and restitch the inseam all the way to the crotch, which will eliminate that flat-fell seam completely.
Start the taper by going straight up the pant leg until you’ve cleared where the hem is attached. Then slowly, gently taper up the leg.
The side seam stops tapering around the height of the crotch or, on drastically tapered pants at the bottom of the pocket opening. Sew up the side seam gradually getting closer to the original seam and joining the original seam when you want to stop. Or you could start from the top on the original seam and gradually come off the seam and down to the hem where you will end 1/4 of the difference away from the original seam.
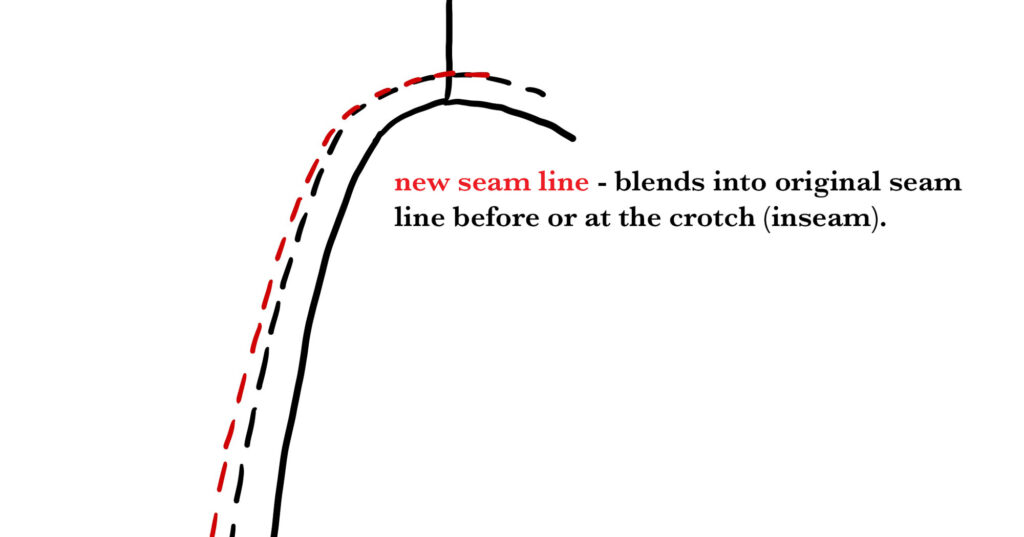
The same for the inseam unless you have a flat-felled seam. In that case, I would sew all the way up to the crotch so I could cut off and do away with the flat-felled seam.
Always blend your new stitches into and/or off of the original seamline. Everything needs to be smooth.
Press your new seams.
After tapering the legs, hem the pants in your chosen method, by hand or by machine.
Please, if you have any questions, put them in the comments below.