There is a fine line between stylishly baggy pants and sloppy, frumpy, baggy pants. And I think the line has a lot to do with, not the pattern, but your body. The younger and fitter someone is the more they can look cute, perhaps even fashionable, in loose fitting clothing. Well, I’m no longer young (we’ll leave it at that – no talk of being fit or not or if I ever was).
I started reading “The Life Changing Magic of Tidying Up” and per the book, I gathered up all my clothes. ALL of them, from the closet, from the drawers, from the off season box, and from my large mending basket. It was in that basket that I found a pair of pants I had forgotten about. They were in the basket because the fit didn’t flatter any part of me but I still loved the color so I hung onto them (and I actually bought them new. Maybe you can relate to the emotional stress I felt. The idea of tossing something “you paid good money for”. Of course, if you never use the thing you paid good money for then that’s tossing away money too).
Because I was in need of a recovery project, and because it was fresh in my mind, I decided to give those pants a makeover and since many of us have similar pants buried in our closet, and since it’s a hassle to go shopping for new pants (and costly) I wanted to show you how easy this fix is. My pants were baggy all over but just by taking out the excess fabric from the outside leg seam you can de-sag the butt and trim out the hips and legs. If the waistband is large but not huge we can fix that too with the side seams.
If it’s been awhile since you’ve had the pants on, put them on and analyze the fit. Pinch a little of the side seams out with your hands and see if that helps the pants look better. If it’s a “yes” then this method is going to work for those pants. Yay!
Pull the pants inside out and put them on (it’s tricky getting the zipper up but do it to get an accurate fit). Choose a leg and pin out the excess fabric along the outside seam. Try to keep the amount of fabric from the front and the back roughly equal.After you pin (just the one leg), sit down and be sure you have not
After you pin (just the one leg), sit down and be sure you have not pinned out too much fabric. Keep checking the mirror and making adjustments with the pins until you like what you see.
(If your body is very asymmetrical you will have to pin both legs to get the best fit.)
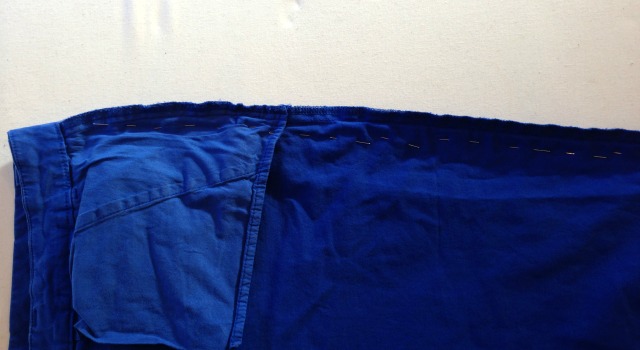
Take the pants off, put on different pants, and lay your pinned pair on your work surface. Notice that the pins do not make a pretty line (above) but they give us a place to start.
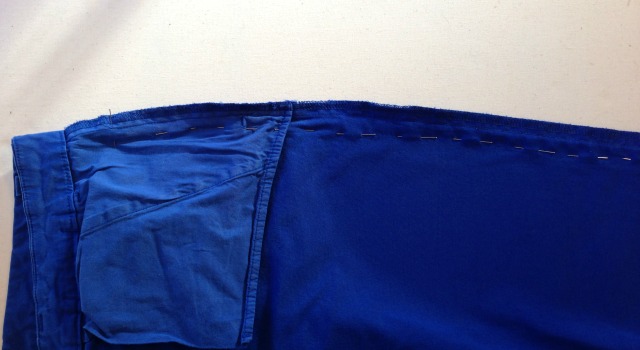
Unpin and re-pin, smoothing out the fabric, keeping the outside seam of the pants flat. Meaning take out an even amount of fabric from the front and the back. The pins should remain close to where you had placed them when you were standing in the pants, but now the pins form a smoother line.
If you noticed when you had the pants on that you need more fabric in the front than the back or vice versa then this method is too simplified for you. But read the steps through and you may see how you can adjust the tutorial.
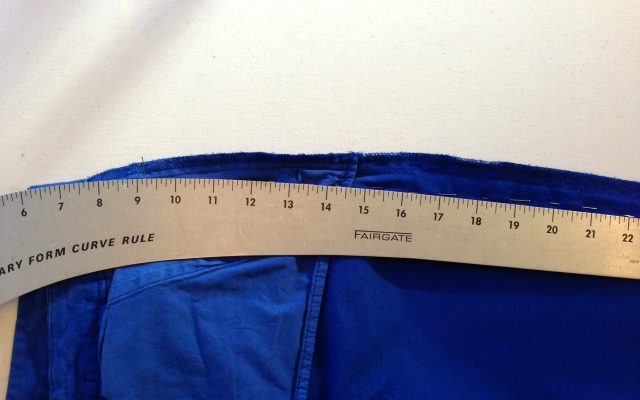
Use a hip curve, if you have one, and a marking tool to mark where your new outside seam will be. Use the pins as a guide for this line but you may have to stray a little away in either, or both, directions to get a smooth curve.
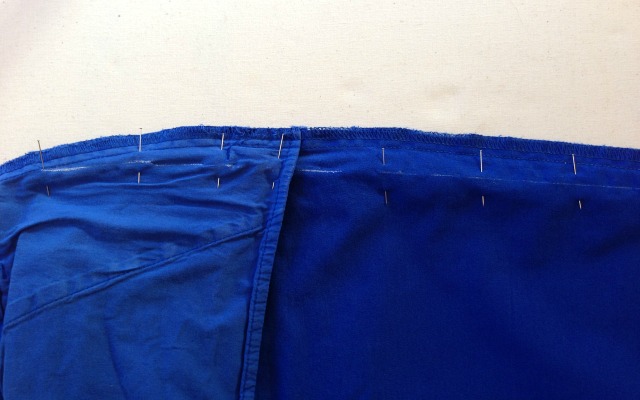
Move the pins for sewing on the line. I placed many pins in because I really didn’t want my fabric to creep. Don’t worry about the pocket, IF it’s a slash pocket, you will just sew on the marked line and the pocket will be there when you’re done. If it’s an in-seam pocket either start taking in the leg under the pocket or sacrifice the pocket by sewing it closed. (Sorry)
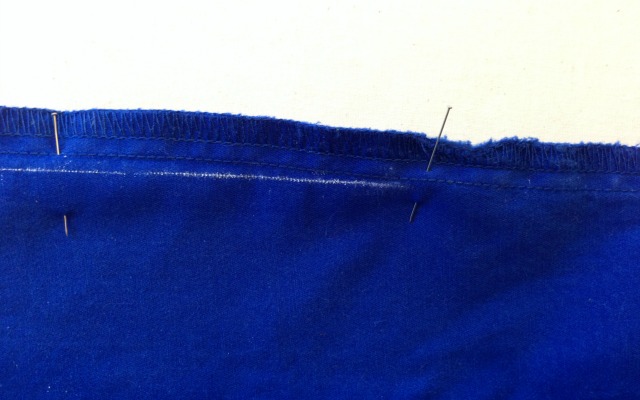
Bring the marked line down the leg as far down as you had to pin out the fabric. At that point, it may take a couple inches more to gracefully run your new line into the original seam. You want a line with a smooth curve over the hip and easy transition into the lower leg. Nothing jarring or jagged.
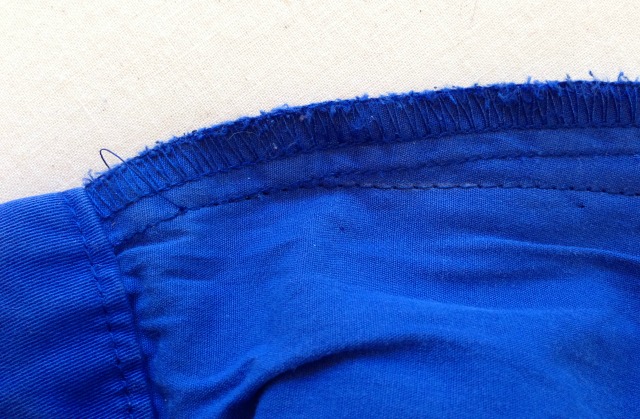
Start sewing on the original seam line and gently ease off and onto your new marked line.
If your waist band is way too big (more than an inch) start sewing at the top of the waist band while it is folded, and continue to stitch down. Stitching on the waist band area will be straight up and down, parallel to the fold it makes when taking in the outside seam. You may not be sewing on the original seam line when you get to the legs just keep your line smooth and it will look good.
Why only alter the waist if it’s more than an inch too big?
When you take the waistband in at the sides, and not the back, what you do to one side, you need to do to the other side. So if you’re taking in the waist band only a 1/2″ you are sewing 1/8″ in from the fold (1/8′ on the double -two layers- makes 1/4″ taken in; 1/4″ on both the right and the left side is 1/2″). Remember, the waist band is bulky (three layers) and not easy to sew through. It doesn’t seem worth the work to take it in so little. I’m just using a belt instead.
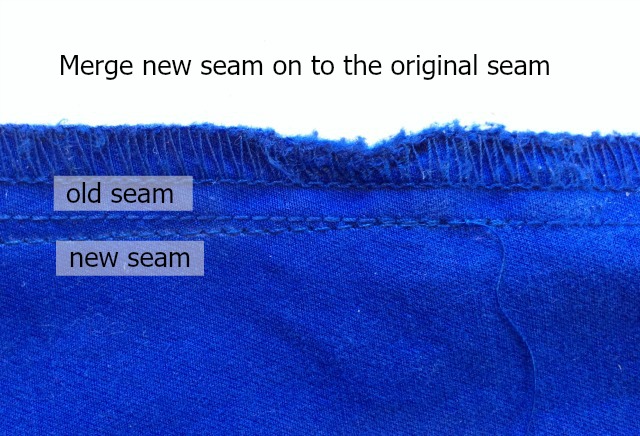
Blend the new stitching line into the original seam at the end. Nice and smooth.
If they fit, like you like them; proceed. DO NOT CUT ANYTHING YET.
If they do not fit, pin in more fabric and make a new stitch line, or take out your newly stitched seam to let out a little fabric and make a new stitch line.
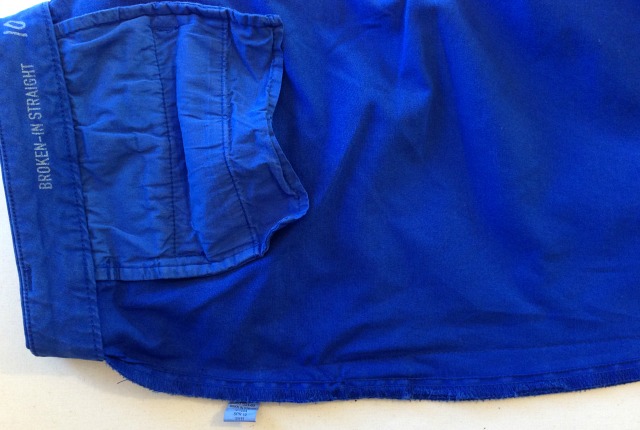
Now for the other leg. Fold the pants so the altered leg is on top of the unaltered leg. Match up the legs as best as you can. Match the tops of the waistband on the outside edge.
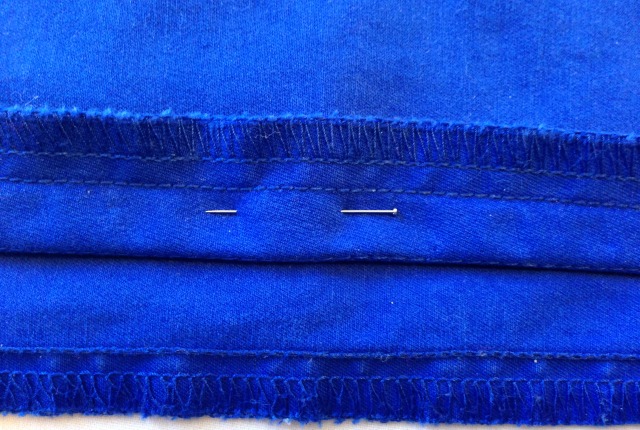
Fold and pin back the altered leg so you can see where the new side seam on the upper leg lays on the bottom leg. This is where you will mark on the bottom leg. You want to transfer the top line to the bottom leg. It sounds complicated but once the pants are laying in front of you, you will know where to mark. You could also use transfer paper and a tracing wheel.
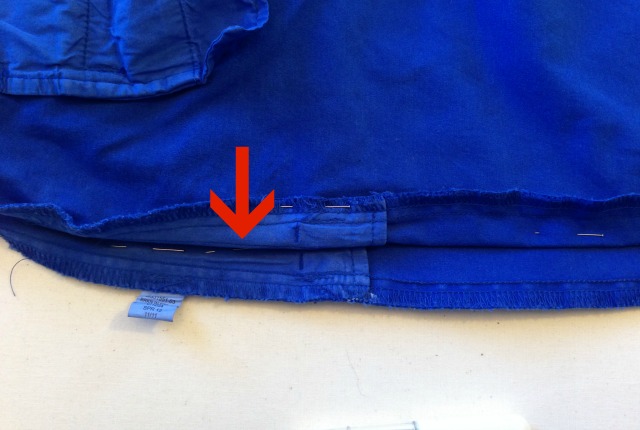
The pocket area was too bulky for me to pin back the top layer so I used pins to mark on the bottom leg where the new seam should be.
(Notice that my pockets do not line up. However, I knew the legs were matched because the top of the waist band and the side seams were lining up perfectly. I figured the pockets were just off from the pants original production. Garment workers have to work so fast that little mistakes like this are made.)
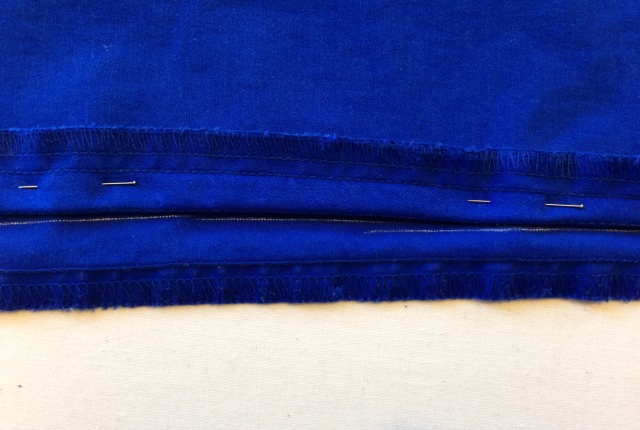
Mark your new guide line. Use a hip curve or other tool (your eye) to straighten out this new line where needed. Sew it up.

If they fit; proceed. If they don’t fit, adjust and redo and remember you’re getting practice.
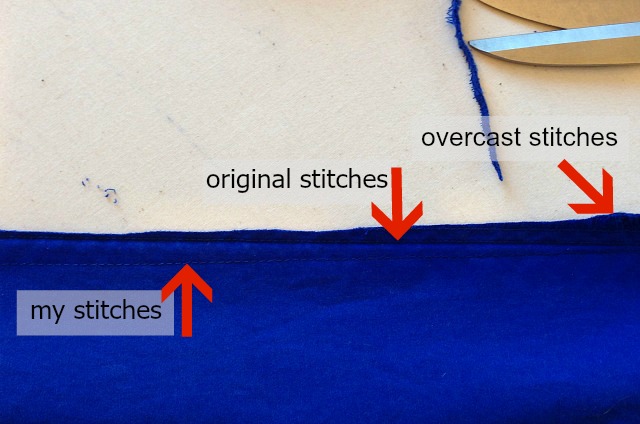
NOW you can cut off the excess fabric. I leave a 1/2″ seam allowance. I don’t bother taking out any of the old stitches. I just cut 1/2″ away from my stitches.
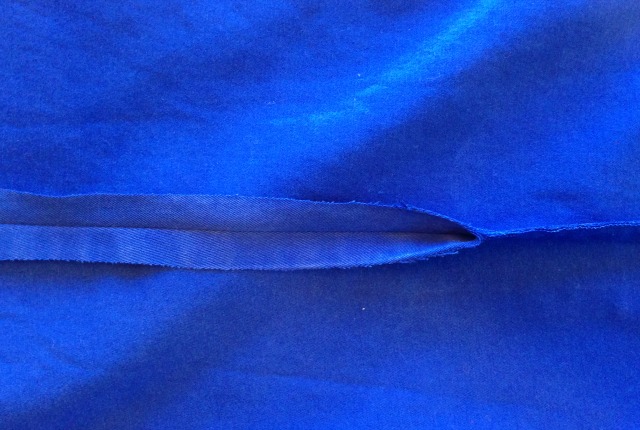
Press open the new side seam where you can. Then press the side seam to one side. Since these pants had been worn and washed the original seam allowance had already picked a preferred side to go to. Press your seam allowance, new and old to that preferred side.
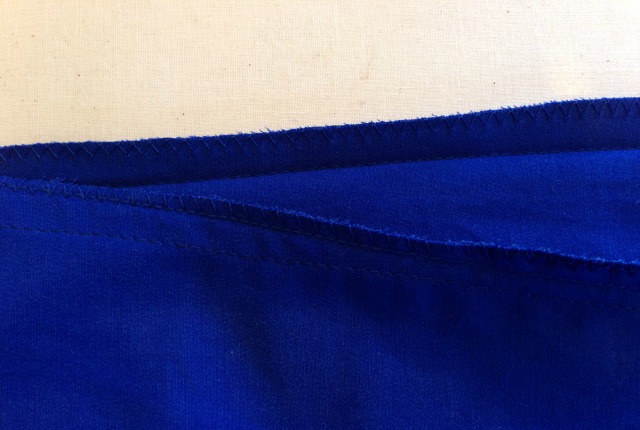
Enclose the new seam allowance with a zig zag stitch or other overcast type stitches.
Seriously I could not have gone to the shopping mall and found a new pair of pants in the time it took to alter these. It feels good to like and use what you already own.
And just for fun:


You have given me some very good information, I never thought I would be able to find. I am in need of taking in many pairs of good quality casual pants from a size four to a zero.
Do you think your method will work, needing to take in so much fabric?
Thank you,
Susie
Hello Susie,
Going from a four to a zero sounds like a lot of fabric will be taken out and I do wonder can taking it all out of the side seams work? My alteration was just reducing the hips and thigh area of the pants so it’s a little different. However, how many sizes are between zero and four? Just size 2, right? So really maybe the reduction isn’t huge. Maybe it’s under an inch (at the waist) on both the left and the right side. I would try it (on your least favorite pair 😉 by basting out the excess, not cutting anything, turn right side out and trying them on to see. Without cutting the extra fabric off it may look like you have on another pair of pants underneath (the bulk) but it will give you an idea if taking all the excess out from the sides will work. Look at the crotch area that it’s laying where you want – the center and that the area above the legs does not look “off” in any other way.
You can also take out a little fabric from the inseam of the legs if they are really loose.
Also it’s likely you’re going to have to take the waistband off the pants and shorten it to get the waistband to a size zero. The other trick is, if your pants are light weight and the waistband is not usually seen (either a belt is worn or you don’t tuck in your tops), you can simply pinch out the excess fabric in the waistband. Take a little out at both the left and right sides above the side seams. Sew a seam where you pinned it so the extra fabric is to the inside of the waist band. If your pants are wool or denim this can be too bulky.
If the waist band is elastic you could probably leave it as is. OR if it’s a regular waist band with a fly front could you sew some elastic (as wide as the pant’s waistband) to the inside to “gather” up the excess fabric. Like little kid’s jeans have elastic with button holes so you can let it out or tighten it up. I’m thinking I want to reduce the band 1″ on both sides (example). So I cut a 4″ inch piece of elastic and sew one end of the elastic down 2 1/2″ to the left of the side seam (but on the waist band) and the other end 2 1/2″ down to the right of the side seam. This way my 5″ of waistband becomes 4″. I’ve reduced it an inch by having the elastic gather the excess inch. Uhm….I wonder if that could work. It seems like it could.
Well, please let all of us know if you have success or not with this method. I’m very curious.
And thanks for the question. -Mary
Hi Mary,
Thank you for your helpful information. I will get back with you when I have altered a pair of pants.
Thank you again
Susie Ross
I literally threaded a sewing machine and took my first stitch in my life last night. I am a 57 year old clothes crazy woman and want to learn to tailor my clothes for a better fit (l’m 5’8″ and 117lbs-hard to fit sometimes). First project is to take in a dozen pairs of pants. Thanks to you- I feel confident and excited and ready to begin my new passion.. Thank you for your generosity and skills sharing.
Thank you very much and Congratulations on launching your sewing super powers. You’re going to love wearing clothes that fit (whether a tailor alters them or you do) makes such a difference.
And because I can’t help myself: My number one tip, if anything goes wrong with the machine – rethread it before you mess with any dials. You never know by looking at it but sometimes the thread doesn’t catch right. If that doesn’t work, take the bobbin out and put back in, and then, check that your needle isn’t too old and is inserted correctly.
And email me any sewing questions you may have. mary@thedailysew.com
Hi Mary,
What a great tutorial, very clear steps and good accompanying images. I especially like the advice on how to check and correct as you go.
My son is tall for his age and very skinny, I need to adjust his school uniform for it to fit him. To get the correct length, the waist is 2 sizes too big and the pant legs are very baggy. His school pants are pleated, will this method work? If not, do you have any advice regarding how to tackle this?
Thanks for your help.
Hi Jacinta,
Thank you, I’m glad you found the tutorial helpful. I think this method will allow you to take in some of the baggieness in the leg but not all.
When/if you use this side seam take in you’ll want to pin the pleats down in place so you don’t end up pulling them to the side.
You also want to take in some of the excess along the center back seam. You don’t need to take off the waistband to do this but you will end up sewing over the waistband. Like making a dart. If your son wears a belt it will hide the seam you made at the center back of the waist band.
Men’s suit trousers have a waistband in two parts (seamed at center back) so they can be taken out or brought in if the owner’s waist changes size.
If you take in a lot and the bulk of the waist band “tuck” is uncomfortable you can cut off the excesses and finish the raw edge with a zig-zag stitch.Then iron the seam open.
I hope this is helpful. Ya’ know as soon as you alter all his pants he’ll grow 😉 Murphy’s Law.
Hi Mary, thank you for your tutorial re altering pants. I have numerous pants that, over the past couple of years, seem to be baggy just in the area under my rear end. I have taken in some (less than an inch on each outside edge) but they seen to ripple or bunch up a litte under my rear end. Would taking them in on the inside seam as well as outside seam eliminate problem. Or should I open up outside seam completely and remove excess material mostly from back panel?
Hey, thanks for the question. Horizontal wrinkles in a garment are usually a sign of excess length. So, if you have wrinkles/bunching up/ excess fabric under the seat your inseam is too long. (To clarify the inseam is the seam that joins the front to the back and runs along the inner legs.) Stitch a deeper crotch seam. Start sewing on the current back seam. As it starts to curve to make the crotch seam, sew off the original seam, going about a 1/2 deeper into the pant. Of course, you’ll be deepening the front curve too, and end the new stitching so it tapers smoothly into the original center front seam. (baste it and try on before you cut any fabric away) Try on. If it’s still too baggy but better, repeat but only deepen the crotch 1/4 inch. Trim away excess seam allowance when it’s all good. And credit to Nancy Zieman for the reminder of how it’s done. But I do want to say, woven fabric with stretch like most store bought pants today, the stretch can wear out and lose its recovery. So that could be part of it too. Sure hope this helps.
This was an “ah ha” moment for me. I have a number of pants that have an unattractive pooch of excess fabric so will try this method of taking the crotch seam in. Maybe no more droopy pants for me!
I have 2 pants that are about 10 years old (from Geoffery Beane). They fit well at the waist and hips, but the legs look too baggy. Specifically it looks like there is too much fabric down the back of each leg starting just under the butt, but the legs aren’t all that wide. Can this be fixed? Which seam should I take in? Or should I get a tailor to do it?
Start with thread tracing the grainline down the back. Start at the butt and go down to the knees. Then put the pants on and stand between two mirrors. One mirror may have to be propped up on a chair. You want to be able to look in one and see your backside in the other. Another option is to get a picture of your backside using the delay option on your phone/camera or holding it out far enough, or even someone else taking the picture for you.
You want to see what the pant legs are doing, that will tell you where to start in taking them in.
If the grainline down each leg bows out to the sides then you want to remove the excess fabric from the center back seam or you want to scoop out the back crotch some more.
Take the pants off and baste just a small amount in on the seam, like 1/4″, and try them on again to see if that worked before cutting anything.
If it helps but doesn’t eliminate the bagginess then move on to taking in the inseam and outside seam. A straight grainline will be your guide for which seam and how much.
But it could be the style of the pants. We’re so used to a closer fitting pants these days, like jeans, that pants which “skirt” over the butt and crotch seem baggy to us. (Of course, I can’t see them so I don’t know if this is the style of your pants or not)
I suspect the center back and crotch seam is what needs changing. After looking at the grainline, I would start there.
Hi, I am struggling with reducing the width on a pair of wide legged pants they are for someone else, so can’t try them on. How do I handle the excess material at the back of the pants ? When I lay them flat to take them in do I include and ignore the excess material or do I push it out of the way ? No one seems to mention that the pants are wider at the back and with making then narrower it’s a real problem. Hope you can help me ?
Thanks Marie
Are you taking in the width of the legs? Tapering the legs? Or are you taking in the width at the hips or waist? I think you mean the legs and, yes, pant legs are usually wider in the back than the front because the inseam comes slightly forward. When I taper the legs of a pant I do all the tapering at the side seam. However, that wouldn’t work for wide leg pants. If you tapered a wide leg from only the side seam the pant legs would go off grain and that would look bad.
So, I would divide what you need to take out of the leg taking half out of the side seam and half out of the inseam. The side seam is easy, lay that flat as if the back and front are exactly the same letting the extra back leg width come forward at the inseam. Mark what you need to take in.
Then, lay the inseam flat, letting the extra back leg width go toward the side seam. Mark what you need to take out. This should work. It will keep the back of the leg a bit wider and the inseam slightly forward.
Now, in my head, this works but maybe you could pin baste or baste the taper before you do anything permanent just to be sure 😉
Thank you for this info!! I am tall and apple shaped, so have an extremely difficult time finding pants. I will be testing this technique on a nice pair of pants that I got for next to nothing at an end of season Dillard’s clearance sale. Very excited to try this.
I’ve noticed that most pants are very generous in the hip area. Is this because my hips are not large or is it my waist is so to have them fit the waist the hip area is baggy? I think the later is true. This year I’m beginning to love dresses. They’re so easy to wear and to fit 😉 Hope the alteration works out for your new pants. Maybe baste and try on before you cut off any fabric – just to be sure – ya’ know, measure twice cut once.
Your comments are so helpful, but I need to shorten crotch as well as narrow a pair of wide legged trousers, they are summer material with elasticated waist, I would be grateful for your advice……should I undo the crotch stitching? Thankyou from Joan
I might try taking in my baggy pants, or I might not, but thank you most of all for the Madness video.
😉 Thanks
I have a wonderful pair of Ialian linen pants that are meant to be (sort of) baggy with narrow cuffs. I’ve recently lost weight, but I LOVE these pants. I am NOT a sewer but I’m going to attempt to alter these pants by hand. If I’m reading the comments correctly I think I’m going to be taking in the BACK of the pants from the waist, following the curve that exists in the fabric all the way to the point of the crotch where the four seams meet but NOT the front of the crotch? Is that right?
Thank you,
Siobhan
So, we all lose weight from different places. Some folks lose from their butt, others the hips, thighs, stomach, bust… Where you lost a lot of your weight is where you’ll need to take in your clothes
If the pants show too much fabric in the seat area taking in the center back seam will help. You may stop your stitching where the center back seam starts to flatten out at the bottom, or you might have to cross over and take out a little from the center front seam as well. The important thing is to have your stitches gently veer off the original line of stitches when you start and gently blend back on to the original stitches at the end – like on and off ramps of freeways. And this blending off and/or on is important wherever you take in any garment.
If the pants are baggy in the front you’ll take in at the center front seam. If they have a zipper at center front try taking excess fabric out with little waist darts (you’ll have to take the waistband off to do this) or pin out at the sides and see if that will help.
How the pants “puddle” on your body will tell you where and why the pants are too big. Horizontal bagginess means too much fabric lengthwise. Vertical bagginess means too much fabric widthwise. And then the location of the bagginess tells you where it’s too long or too wide.
I know this was kind of a general answer so please let me know if you have more questions. Also, I suggest a backstitch since you’re sewing by hand.http://www.thedailysew.com/2018/04/sewing-by-hand-back-stitch-half-back-stitch-prick-stitch/