
DOWNLOAD the Free Super Deluxe Drawstring Bag pattern here
Don’t let the name fool you. This drawstring bag is Super Deluxe but it’s easy to make.
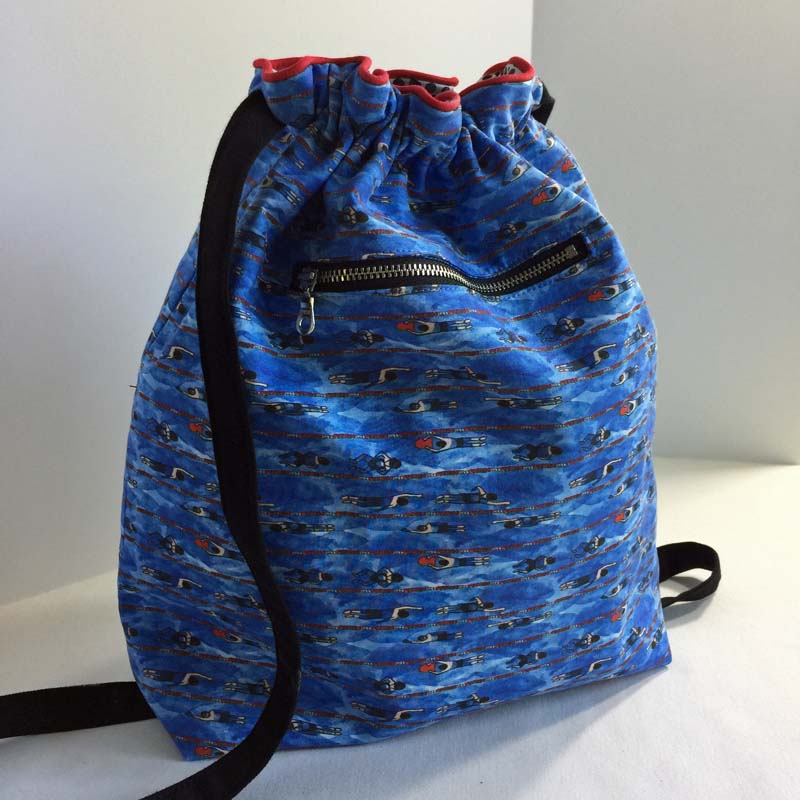
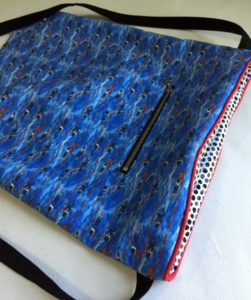
And don’t let the style fool you, this isn’t a knock off of those flimsy, freebie drawstring backpacks – it really is Super Deluxe with its two pockets, decorative cording, structure and substance, and super cute fabric. (by Eileen McKenna)
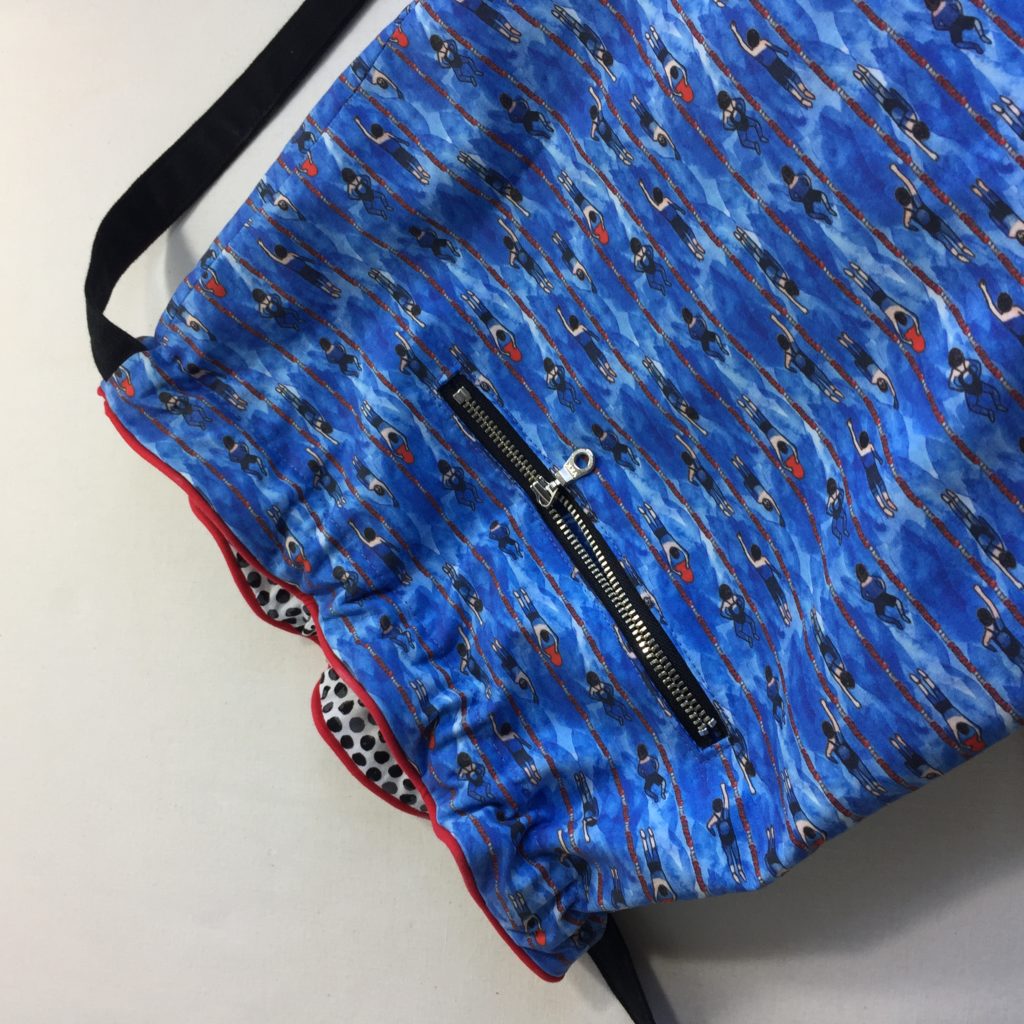
The interior pocket is large enough for a large smart phone and keeps your phone, or other essentials from falling to the bottom of the bag. The outside pocket is also roomy. It keeps things like your keys and pool pass close at hand and easy to reach. The zipper keeps those items from falling out as you travel on down the road.
This bag can be made with in almost any weight of woven fabric. Large scraps from your stash could be used for the pockets, they don’t have to be matching. You could color block the exterior to use up even more of your stash.
However, there are many (small) steps to make this bag and some steps may seem a little complicated so I strongly suggest skimming if not reading the instructions through before you begin. Just follow the instructions, look at the pictures, and ask any questions you have.
You can see more pictures and read about the Super Deluxe Drawstring Bag here.
 Notes
Notes
My fabric is quilting cotton, a medium weight fabric. I applied interfacing only to the bag pieces, not the lining. If your fabric and lining fabric are a light weight fabric you may wish to apply interfacing to the lining pieces as well. If you are using a denim, twill or heavy weight fabric for the bag no interfacing is necessary.
The bag needs some structure but too much will make the casing too stiff to pull the bag closed.
My straps are 34” long. For comparison, the model stands at almost 5’8” with a short torso.
If making this bag for a small child, shorten the straps.
If you prefer the bag to hang lower, lengthen the straps to 36” long. The weight of items inside the bag will also make the bag hang lower.
You can purchase webbing or other trim for the straps but you will need to adjust the casing width (and notches for the casing) if you are using anything wider than 3/4″ for the straps. I found most strap webbing came 1″ wide and although the casing on the pattern is 1″ wide you want a little wiggle room in the casing for the bag to open and close easily.
I advise against cord and string straps as any thin strap can become very uncomfortable and cut into your shoulder especially when the bag becomes heavy.
Fabric Needed
- ½ yard, 45” wide for the exterior (buy a little extra if it’s going to shrink)
- ½ yard, 45” wide for the lining
- 1 yard, 22” wide of fusible midweight interfacing like Pellon SF 101, a woven fusible. (2 yards if the lining also needs interfacing. See Notes above to decide)
- ⅔ yard 45” wide for pockets (if using a printed fabric where the direction of the print runs lengthwise). (⅓ yd if you are using a solid or a nondirectional print)
- ¼ yard 45” wide mid to medium heavy weight fabric for straps OR 2 yards strapping between ½” to 1” wide – nothing too stiff (see Notes above)
- ¼ yard 45” wide fabric for optional decorative cording
Notions
- 1 6” zipper. Metal or nylon teeth but NOT an invisible zipper.
- 1 yard of ¼” cord for the decorative cording
- Spray Starch (found in the laundry section of grocery stores) is handy for making the straps if you are using a light or medium weight fabric to make the straps.
Download the Pattern
Download the pattern.
Print page 5 of the pattern at “actual size” no scaling. Measure the test square. It should be 2″ on all sides. If it isn’t, check your print settings. Print the remaining pages, 1-4 & 6, when the scale is correct.
Line up the six pages according to the diagram on tile 6. The pattern tiles will match on the red lines. Many people find it easier to match the pages if they trim off the left and bottom margins of each page.
Line up the registration marks, the small black rectangles, and tape the pages together inside the pattern piece. Cut out the pattern or trace it off onto tracing paper, pattern paper, or such.
The pattern is for the bag and lining. All other pieces required are simple rectangles which you will measure out directly on the fabric you are using.
Preparation
Wash, dry and press all of the fabric according to its fiber content. Cut out all of the pieces.
- Cut from exterior fabric: 2 bag pieces (pattern)
- Cut from lining fabric: 2 bag pieces
- Cut from fusible midweight interfacing (like Pellon SF101): 2 bag pieces and 1 8” square (if using denim, canvas or other heavy fabric for the bag you will not need interfacing)
- Cut from pocket fabric: 1 22” high x 10” wide* rectangle (this is the zippered exterior pocket) and 2 8” squares (inside pocket) * how you place the rectangle for cutting, horizontally or vertically, only matters if the fabric has a directional print.
- Cut from strap fabric: 2 3” high x 34” wide rectangles or, if using purchased strapping, cut the strapping in two 34″ to 36″ long pieces.
- Optional cording: cut from cording fabric 1 ½” x 30” rectangle
The seam allowance is ½” and is included in the pattern and in the measurements for all other parts of the bag.
Like a chef, we will make all of the components, have them in place, and then put the bag together:
The Cording
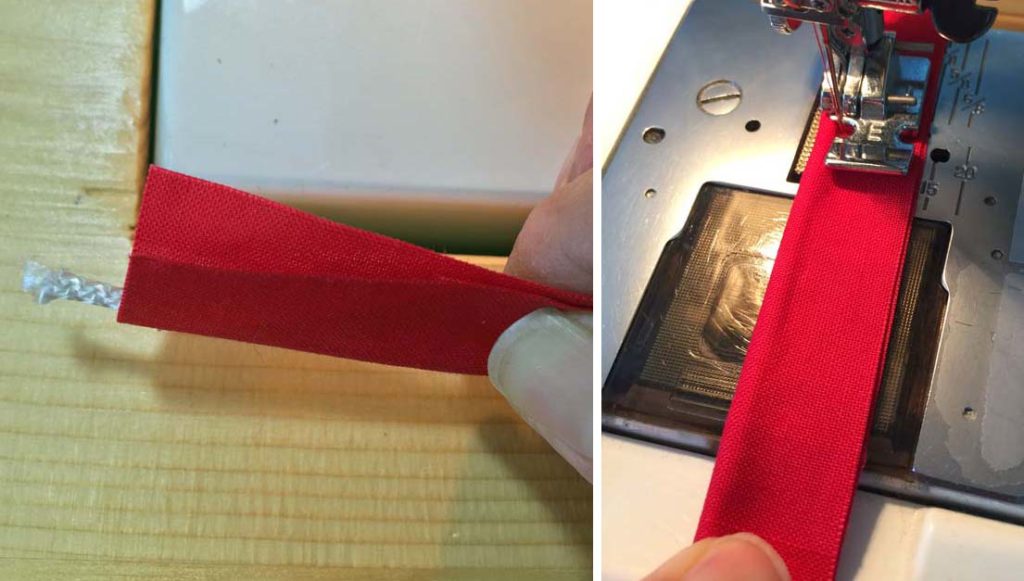
At one end, fold the fabric strip for the cording in half lengthwise and place the cord in the fold. Have some of the cord hang over the short edge like a hot dog too long for the bun. Use a zipper foot sew the fabric together up close to the cord, encasing the cord in the fabric.
Pinning the strip is not necessary, it is easy to line up the raw edges of the fabric as you sew. You want the cord snugly encased in the fabric.
When done, don’t cut the excess cord. Have some cord sticking out both ends and pull the fabric to stretch out any curling that may have occurred while sewing. Press and steam the cording to relax the fabric.
The Straps
The straps are made by folding the rectangle in fourths lengthwise. It can be helpful to use spray starch on your strap fabric when folding the fabric into the strap. If you’re using a twill, denim, or other heavier weight fabric you will not need starch.
Fold a strap piece in half lengthwise. Press to form a crease.
Open the fold up and fold each raw edge in to meet at the crease. Press these new folds. Fold again along the center crease so the strap is four layers thick and the raw edges are inside the strap.
I fold in the top edge, press the fold without ironing out the center crease, then fold up the bottom edge a few inches of length, fold again on the center crease and press the four layers together. I do this the entire length of the strap.
Topstitch down both edges of the strap, close to the edges. Press the straps.
The Zipper Pocket
Apply the interfacing bag pieces to the wrong side of the exterior bag pieces as per manufacturer’s instructions.
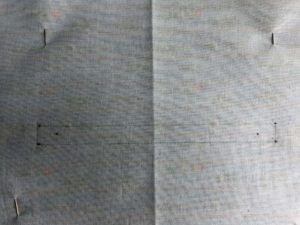
Transfer the zipper placement, the four dots from the pattern, onto the interfaced side of the bag front piece.
An easy way to transfer the dots is to make a little hole in the pattern at each dot with an awl. (Protect the surface you’re working on.) Use a pencil and mark the dot onto the interfacing through the hole.
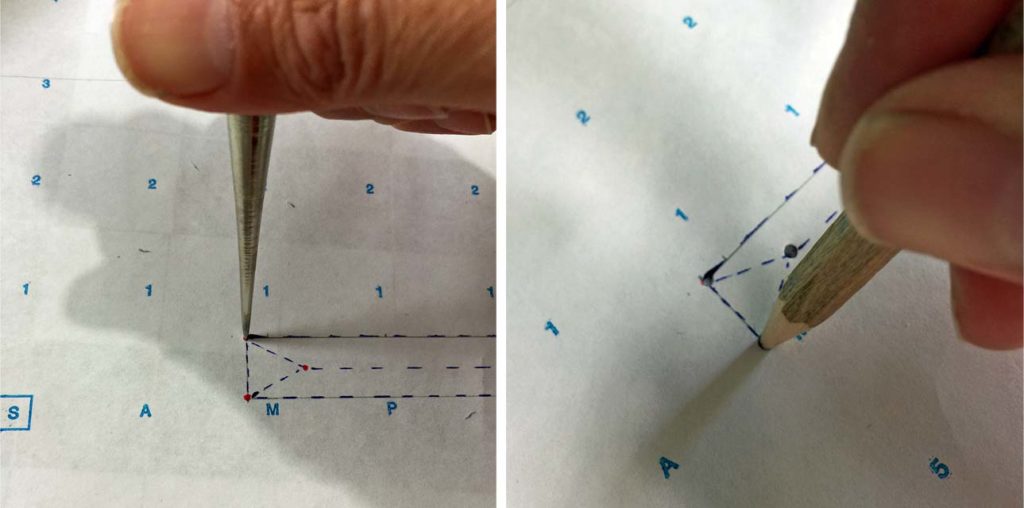
Connect the dots with a ruler and marking tool to draw the rectangle onto the interfacing side of the bag front.
Transfer the upper side seam notches (the little “T” marks) onto the bag front and the bag back if you haven’t already.
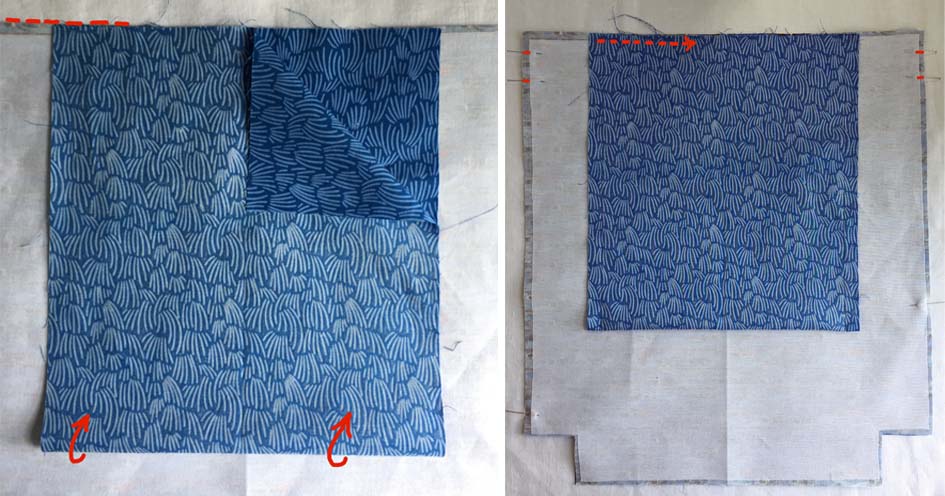
Fold the bag front in half lengthwise and press the fold with your finger to make a crease. Do the same with the exterior pocket piece (the 10” x 22” piece).
Unfold the pieces and lay the pocket piece, on top of the bag front, right sides together lining up the vertical creases. Line up the top short end of the pocket with the top edge of the bag front.
Pin the pocket to the bag in a few spots not on or close to the rectangle you marked on the back.
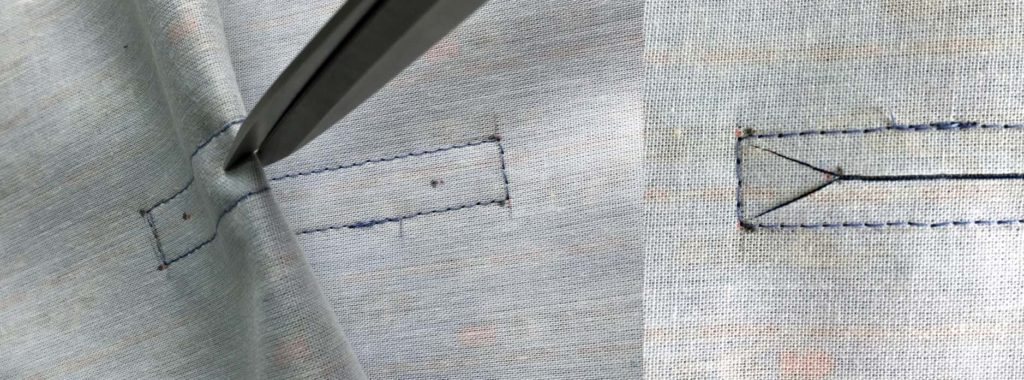
Stitch through the bag front and pocket on the rectangle you marked. (Turn the corners with the needle down in the corner and the pressure foot up. You can use the hand wheel of your machine to place the needle EXACTLY in the corner.)Pinch the bag in half and make a snip in the middle of the sewn rectangle. Cut down the middle of the rectangle stopping about a ½” from the short ends. From this stopping point cut to each corner as close to the corner as you can without cutting the stitching.
Pinch the bag in half and make a snip in the middle of the sewn rectangle. Cut down the middle of the rectangle stopping about a ½” from the short ends (the center dots). From this stopping point cut to each corner as close to the corner as you can without cutting the stitching.
If you accidentally cut the stitch, go back to the machine now and restitch that corner, blending it into the rectangle.
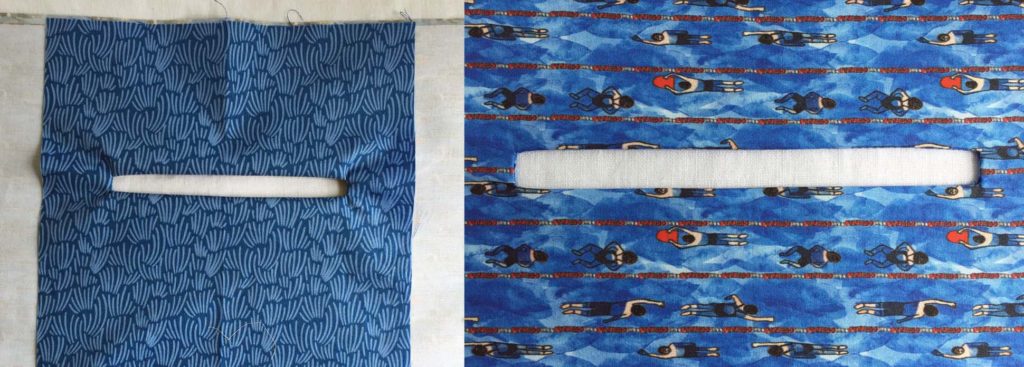
Pull the pocket fabric to the wrong side of the bag front through the rectangle.
Press the rectangle opening so the pocket fabric is not seen from the front side. If the fabric still seems to pull at the corners of the rectangle you have not clipped close enough to the corner. Fold back and clip, carefully, into the corner some more.
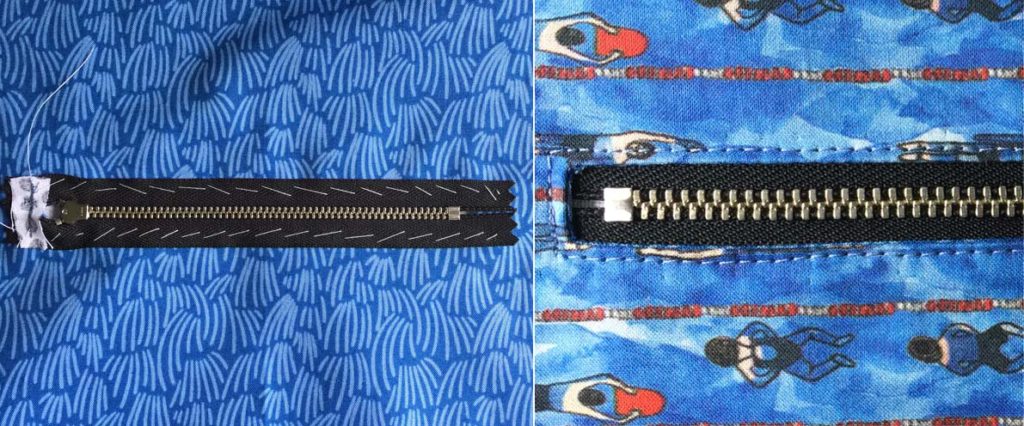
Lay the zipper down on your work surface. Place the bag front piece on top of the zipper. Center the zipper in the rectangle window. Pin and hand baste the zipper in place OR you can use two sided pressure sensitive fusible tape to hold the zipper in place.
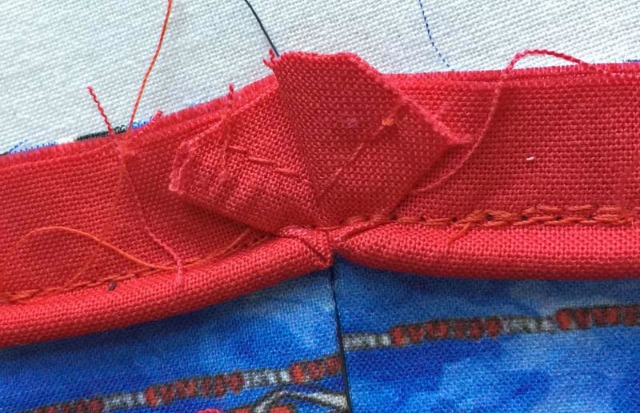
To hold the top ends of the zipper together for a more centered placement, I sewed across the ends on a scrap of fabric. I then trimmed the scrap down.
On the exterior side of the bag front, using a zipper foot on your machine, topstitch around the window catching the zipper. You may need to lift the presser foot up to move the zipper pull out of your way as you sew.
Remove your basting threads and press.
Fold the bottom of the pocket up to meet the top of the pocket and bag. Pin together.
Fold the bag front out of the way and sew the side edges of the pocket together on both sides of the pocket. Don’t sew through the bag front.
Baste the top edge of the pocket to the bag within the seam allowance.
The Interior Pocket
Apply the interfacing to one of the 8” squares.
Sew the squares, right sides together to each other around the edges leaving a 3” opening in the middle of the bottom seam.
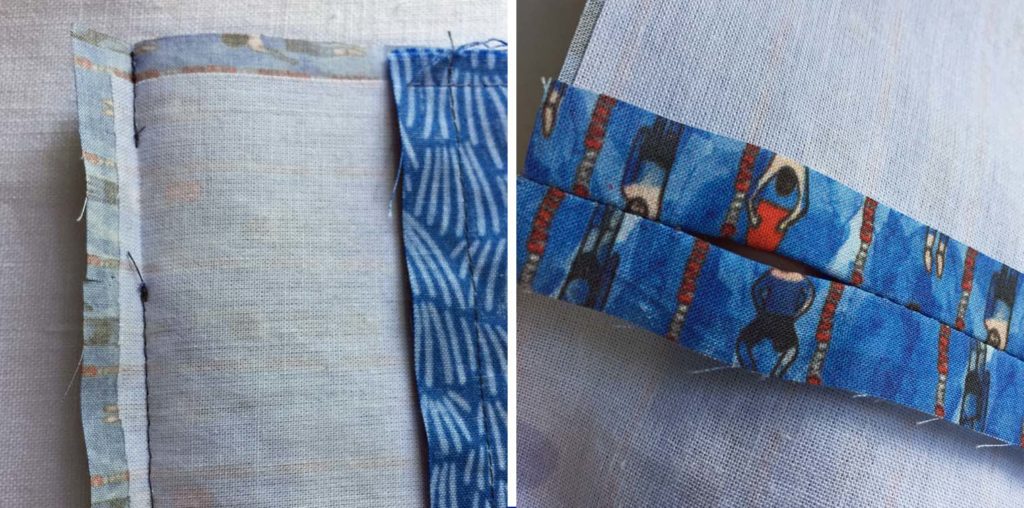
Clip off the seam allowance across the corners to reduce bulk. Press the seam allowance of the top pocket piece in, away from the other seam allowance. Fold the seam allowance of the opening back on both sides and press
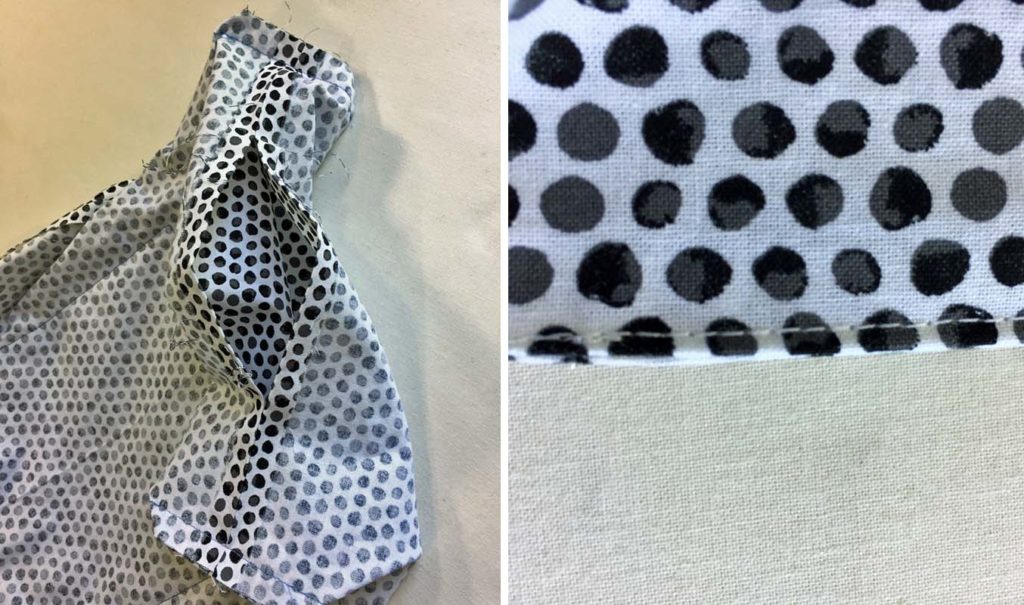
Turn the square right side out through the opening. Poke out the corners but don’t use anything too sharp or you may poke through the corner – a chopstick is useful.

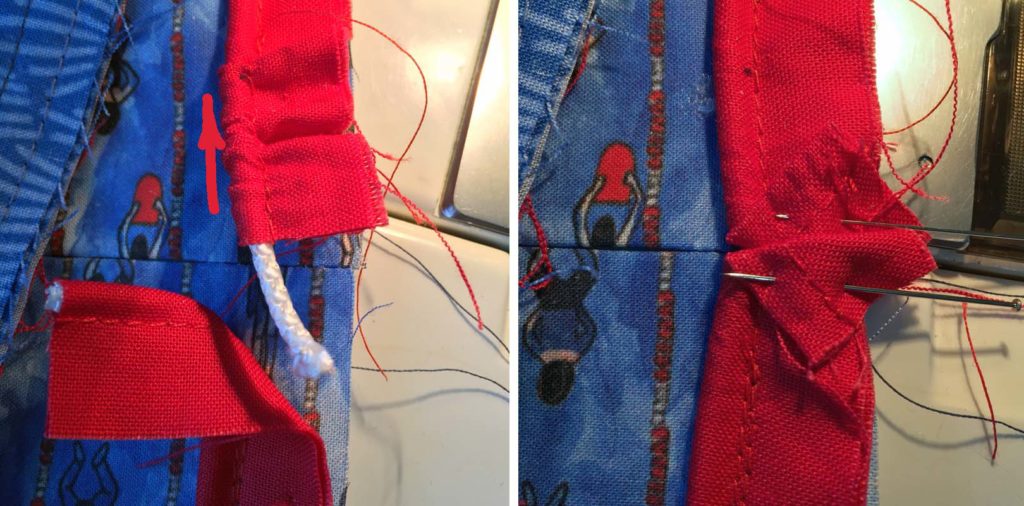
Press the pocket so the seam is exactly on the edge or is rolled slightly to one side consistently. Edge stitch the top edge of the pocket (white arrow in the photo above)
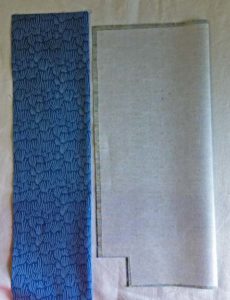
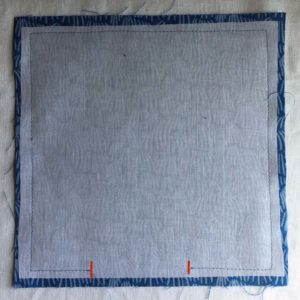
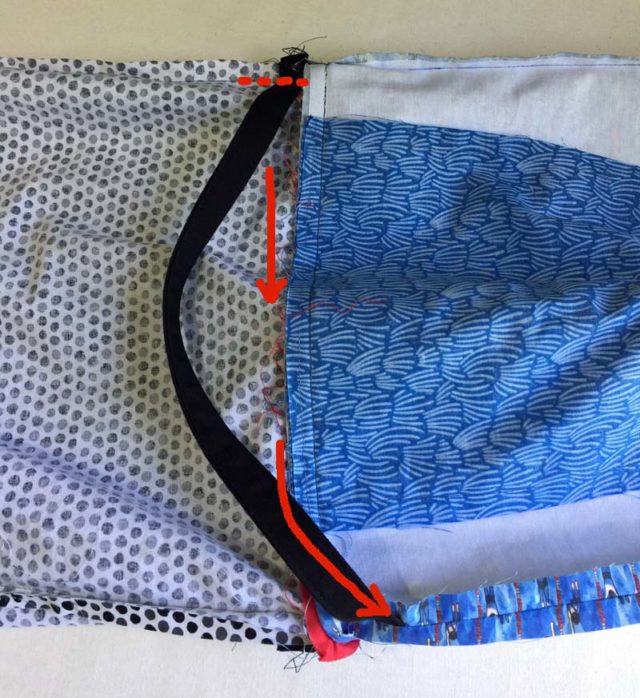
Fold the back piece of the lining in half lengthwise and press the fold with your finger to form a crease. Fold the pocket also in half lengthwise and press with your finger to form a crease.
Lay the pocket on top of the back lining, matching up the creases. Place the top of the pocket 4” down from the top edge. Pin the pocket down to the lining.
Stitch the pocket in place (red arrows in the photo above). You will close up the opening in the bottom of the pocket as you sew it to the lining. Reinforce the stitching at the top sides of the pocket.
Attach the Straps and Sew the Lining
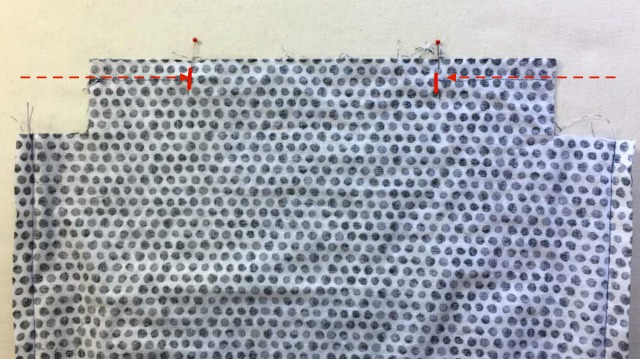
Mark the upper side seam notches on both lining pieces. (Make the marks on the wrong side of the fabric if you are not snipping the notches.)
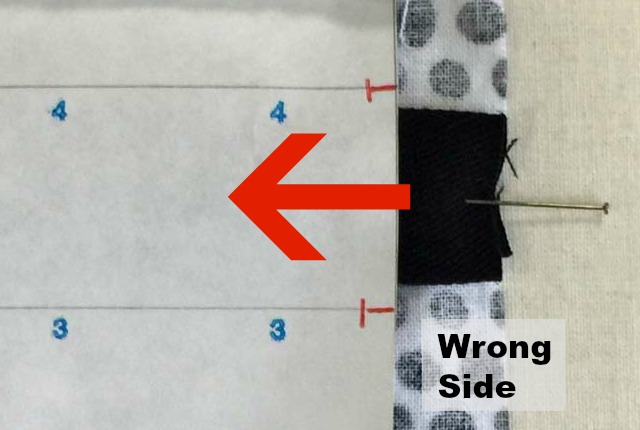
Lay the lining pieces, wrong side facing you, on your work surface. Lay the short, raw edge of the strap on the right-hand edge of the lining between the notches. Lay it so the rest of the strap goes across the lining. Pin the strap in place.
Do the same to the other strap and the other lining piece.Both straps should be pinned on the right-hand edge of the wrong side of the lining pieces, between the notches.
You now have the two lining pieces, both with a strap pinned on the wrong side, right-hand edge, between the notches.
Baste the strap to the lining about 1/4″ in from the edge.
Place the lining pieces right sides together, lining up all the edges. The two straps should be on opposite sides strap when the bag is lined up like this.
Sew the lining front to the lining back along the side edges. Leave the bottom open. When you sew over the straps, (where it is basted to the lining in the seam allowance) reverse and stitch back over the strap. Then continue stitching in a forward direction (stitching over the strap three times). This is a stress point for the straps so reinforcing this attachment is a good idea.
Sew the Bag Sides
With right sides together, pin the bag front to the bag back along the sides. Note the notches. Starting at the top of the bag, sew to the first notch, stop and back stitch. Clip your threads. Then start at the bottom notch, back stitch, and sew to the bottom edge. Back stitch.
Press the seam and then press the seam allowance open. The inch between the notches is left open. The straps will be fed through these openings.
Attach the Cording
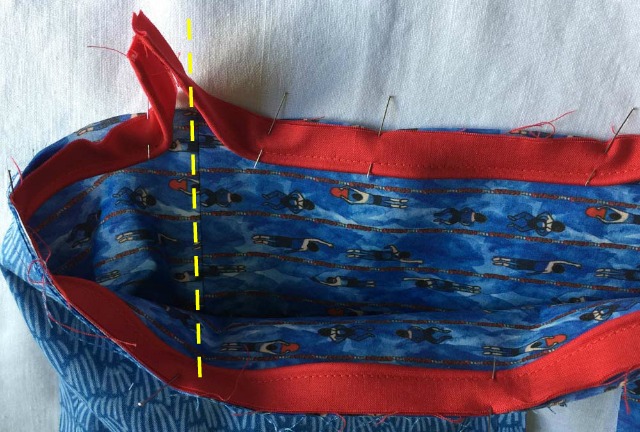
Pin the cording around the top edge of the bag so the raw edge of the piping and the top edge of the bag line up. Start the cording at one of the side seams (yellow dashed line in the picture below) but be sure to have an inch or more of the cording extending beyond the side seam, not lined up exactly.
The cording should overlap itself, in both directions, at the side seam you started at. Do not cut this extra length off.
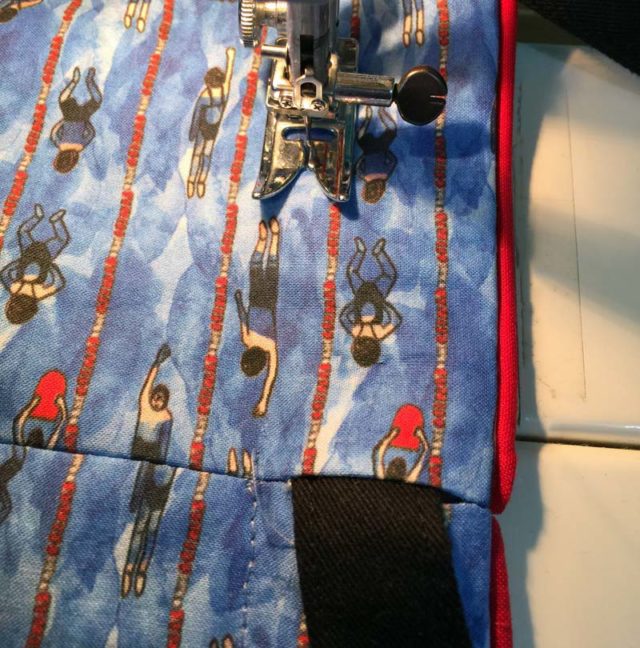
Start machine basting the cording down to the bag an inch in from the side seam. Use a zipper foot and sew close to the cord. Stop an inch before you reach the side seam you started at.
The cording should overlap itself at the side seam about ⅝” in each direction. If you have inches of overlap cut the cording down so you only have ⅝” to ¾” overlapping the side seam in both directions.
One end at a time, push back the cording fabric to reveal the cord. Lay the cord down and see where the cord overlaps the side seam of the bag. Trim the cord only, not the fabric, so the end of the cord stops at the side seam. Bring the fabric back up over the cord.
Fold the excess length of cording fabric back over itself, but down, at an angle toward the raw edge. Pin.
Machine baste the first and last inch of cording down to the bag, sewing in place, the folded edge of cording fabric.
The Casing
Place the bag inside the lining, right sides together. Match up the side seams and pin together along the top edge. Sew all the way around the top edge using a zipper foot to sew close up to the piping.
Turn the bag right side out and press the upper edge.
Open the bag, wrong sides out, with the lining to one side and the bag to the other.
Feed the straps through the side seam opening on the opposite side of where the strap is attached to the lining. The strap will go across the top (in between the bag and the lining) and come out the opening on the opposite side of the bag. The strap does not go around the entire top of the bag but only half way around.
Bring the bag and lining back together with the lining inside the bag, wrong sides together.
With your fingers, move the strap toward the top seam. You could pin the strap down in place on the outside of the bag but just be sure the bag nor the lining is being twisted or pulled.
Starting at a side seam sew through the bag and the lining 1 ½” down from the top edge (slightly below the lower notch). Feel with your fingers as you sew that you are not catching the strap.
Press. Pull on the straps to double check they were not caught in the casing stitches.
Finish the Bag
Fold the lining back out of the way of the bottom edges of the bag. With right sides together, sew the bottom edge of the front and back bag together. Press the seam and press the seam allowance open.
Pin the loose edge of the strap to the bottom edge of the corresponding side seam of the bag. Meaning; the strap coming out of the left-hand opening will be pinned to the bottom of the left-hand side seam and the strap coming out of the right-hand opening will be pinned to the right-hand side seam.

Line the side seam and the bottom seam of the bag up across the corners. Pin together and sew across this opening. Again, when you sew over the strap, reverse stitch back over the strap and then continue stitching in a forward direction (stitching over the strap three times) for reinforcement.
Pin the bottom edges of the lining right sides together. Sew a couple inches in from each corner and back stitch. You want to leave a 4” to 5” opening in the center of this seam.
Press the seam allowance across the entire bottom of the lining open.
Line the side seam and the bottom seam of the lining up across the corners. Pin together and sew.
Turn the bag right side out through the opening left in the lining. Sew the opening shut with an edge stitch.
Place the lining inside the bag. Pull on the straps closing the top of the bag a few times to loosen up the casing.
Stuff your Super Deluxe bag with all your adventure gear and get going.
Any Questions? Please ask, I’m here to help.